Gigabyte GV-RX24P256H Manual
Gigabyte GV-RX24P256H Manual
 |
UPC - 818313101914
View all Gigabyte GV-RX24P256H manuals
Add to My Manuals
Save this manual to your list of manuals |
Gigabyte GV-RX24P256H manual content summary:
- Gigabyte GV-RX24P256H | Manual - Page 1
GV-RX24P256H RadeonTM HD 2400 Pro Graphics Accelerator User's Manual Rev. 102 12MD-RX24P2H-102R * The WEEE marking on the product indicates this product must not be disposed of with user's other household waste and must - Gigabyte GV-RX24P256H | Manual - Page 2
...11 3.1.3. Driver Installation ...12 3.1.4. Taskbar Icon ...14 3.1.5. Display Properties pages 15 4. Troubleshooting Tips 32 5. Appendix 33 5.1. How to Reflash the BIOS in MS-DOS mode 33 5.2. Resolutions and Color Depth Table (In Windows® XP 34 GV-RX24P256H Graphics Accelerator - 2 - - Gigabyte GV-RX24P256H | Manual - Page 3
- Intel® Pentium® 4 or AMD AthlonTM - 512 MB of system memory; 1 GB or more for best performance - Optical drive for software installation (CD-ROM or DVD-ROM drive) • Operating System - Windows® Vista - Windows® XP with Service Pack 2 (SP2) - Windows® XP Professional x64 Edition - 3 - Introduction - Gigabyte GV-RX24P256H | Manual - Page 4
Pb/AV Output S-Video Output DVI Output Digital LCD Monitor OR Analog LCD Monitor Analog CRT Monitor D-Sub Output DVI-I to D-Sub Adapter DVI-I to HDMI Adapter HDMI Monitor GV-RX24P256H Graphics Accelerator - 4 - D-Sub Connector (15-pin) TV-Out DVI-I Connector - Gigabyte GV-RX24P256H | Manual - Page 5
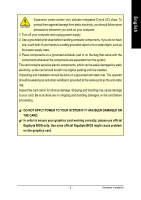
damages on the card before proceeding. DO NOT APPLY POWER TO YOUR SYSTEM IF IT HAS BEEN DAMAGED ON THE CARD. In order to ensure your graphics card working correctly, please use official Gigabyte BIOS only. Use none official Gigabyte BIOS might cause problem on the graphics card. - 5 - Hardware - Gigabyte GV-RX24P256H | Manual - Page 6
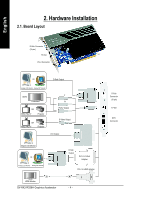
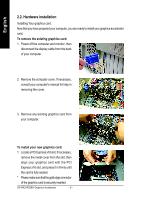
If necessary, remove the metal cover from the slot; then align your graphics card with the PCI Express x16 slot, and press it in firmly until the card is fully seated. * Pleasemakesurethatthegoldedgeconnector of the graphics card is securely inserted. GV-RX24P256H Graphics Accelerator - 6 - - Gigabyte GV-RX24P256H | Manual - Page 7
-I-to-HDMI adapter to connect an HDMI monitor. To D-Sub Monitor To TV/VCR To Flat Panel Display Connect an HDMI monitor via DVI-I to HDMI adapter You are now ready to proceed with the installation of the graphics card driver. Please refer to next chapter for detailed instructions. - 7 - Hardware - Gigabyte GV-RX24P256H | Manual - Page 8
English GIGABYTE Component Video Adapter for ATI Graphics Cards AV Out S-Video Out Connect to the TVOut port on the graphics card. HDTV Component (Y+Pr+Pb) (1) Connecting HDTV Connect your HDTV cables to the your TV to the AV Out port on the adapter. GV-RX24P256H Graphics Accelerator - 8 - - Gigabyte GV-RX24P256H | Manual - Page 9
established the use of silent pipes on graphics card's thermal solution, and has been the leading company for silent thermal solution. GIGABYTE's passive thermal solution allows system to work perfectly in chassis with 40~50 degrees Celsius through the air flow of the system. Please beware of - Gigabyte GV-RX24P256H | Manual - Page 10
"D: \setup.exe"). Then you can follow the guides to setup your graphics card driver. (Please follow the subsection 3.1.3 "Driver Installation" to install the driver for your graphics accelerator.) 3.1. Windows® XP Driver and Utilities Installation 3.1.1. Operating System Requirement • When loading - Gigabyte GV-RX24P256H | Manual - Page 11
Installation Install Microsoft DirectX to enable 3D hardware acceleration support for Windows® XP to achieve better 3D performance. 0 Note: For software MPEG support in Windows® XP, you must install DirectX first. Users who run Windows XP with Service Pack 2 or above do not need to install DirectX - Gigabyte GV-RX24P256H | Manual - Page 12
to install the driver from AUTORUN window. Step 2: Found new hardware wizard: Searching and installing The wizard will search for the driver and install it automatically. Step 3: Found new hardware wizard: Finish Click the Finish button to finish the installation. GV-RX24P256H Graphics Accelerator - Gigabyte GV-RX24P256H | Manual - Page 13
Driver item. Click the Install Display Driver item. Step 2. Click Next button. Step 3. Click Yes button. Setp 4. Click Express or Custom icon. Windows installings the components. Step 5. Click the Finish button to restart computer. Then the driver installation is completed. - 13 - Software - Gigabyte GV-RX24P256H | Manual - Page 14
Center is used to configure all your graphics card settings. Right-click the icon to enter the CATALYSTTM Control Center (refer to Fig. 1). Or you can right-click on the desktop and select ATI CATALYST Control Center (refer to Fig. 2). Fig. 1 Fig. 2 GV-RX24P256H Graphics Accelerator - 14 - - Gigabyte GV-RX24P256H | Manual - Page 15
Windows) You may adjust the screen HDMI+TV HDMI+CRT GV-RX24P256H Yes Yes Yes No Yes Yes (Note) The CRT+TV configuration requires that you connect your CRT display to the DVI-I connector on the card using the DVI-I to D-Sub adapter to ensure normal operation. This configuration is not supported - Gigabyte GV-RX24P256H | Manual - Page 16
the first time. This interface provides access to the basic settings and advanced features of your ATI graphics products. You can switch between Basic View and Advanced View at any time. To access more folder where the new file will be located. Click Next. GV-RX24P256H Graphics Accelerator - 16 - - Gigabyte GV-RX24P256H | Manual - Page 17
File area. Finally, click Next to start file conversion. „ Setup my display configuration This wizard allows you to configure display setting for desktop viewing. - 17 - Software Installation - Gigabyte GV-RX24P256H | Manual - Page 18
graphics card. „ Graphics Software Provides software information including driver version, CATALYST version, Direct 3D version and so on. „ Graphics Hardware Provides hardware information incluing graphics chipset, BIOS version, memory size, core clock and so on. GV-RX24P256H Graphics Accelerator - Gigabyte GV-RX24P256H | Manual - Page 19
settings of your ATI graphics card. View Properties: The CATALYST Control Center dashboard supports three types of views graphics setting or opening an application. A Hotkey is a combination of a modifier key or keys, such as Ctrl, Alt, or Shift, and any letter from the alphabet. - 19 - Software - Gigabyte GV-RX24P256H | Manual - Page 20
manually, through a Hotkey, or by file association. Note: A profile applies to a specific graphics card. If there is more than one graphics card Hide Splash Screen „ Enable System Tray Menu „ Select a Language ... „ Select a Skin ... „ Restore Factory Defaults ... GV-RX24P256H Graphics Accelerator - Gigabyte GV-RX24P256H | Manual - Page 21
CATALYST Control Center Help feature allows you to access the comprehensive online help, register your product, or generate a problem report should you require technical support. The CATALYST Control Center Help feature offers the following options: „ Help for this Page „ Help Contents ... „ Search - Gigabyte GV-RX24P256H | Manual - Page 22
screen Windows VistaTM the 3D Refresh Rate Override and the Display Detection Option to configure panning on displays with limited resolution capabilities are not supported since refresh rate is better controlled by Windows VistaTM and Windows VistaTM does not support panning. GV-RX24P256H Graphics - Gigabyte GV-RX24P256H | Manual - Page 23
's display screen. You can also adjust the horizontal and vertical sync or enable composite sync. „ HDTV Support Use HDTV Support when your CRT, DFP, or DTV display device supports one or DTV display devices and want both to support HDTV, select the Add 720... and Add 1080... check boxes in the HDTV - Gigabyte GV-RX24P256H | Manual - Page 24
permanent damage to your display! „ AvivoTM Color Use AvivoTM Color for ATI graphics cards that supports per-display color settings. Independently set the hue, saturation, and temperature for adjustment control that rapidly configures your application. GV-RX24P256H Graphics Accelerator - 24 - - Gigabyte GV-RX24P256H | Manual - Page 25
Aliasing (AA) is a rendering technique designed to remove jagged edges, shimmering, and pixelation problems that are common in rendered 3D images. Rather than determining the color to display for each exceptional levels of image quality while maintaining performance. - 25 - Software Installation - Gigabyte GV-RX24P256H | Manual - Page 26
while maintaining or even improving image quality. It analyzes individual textures as they are loaded to determine the best and fastest way to display them. GV-RX24P256H Graphics Accelerator - 26 - - Gigabyte GV-RX24P256H | Manual - Page 27
or moves into the background. „ All Settings The All Settings page combines all of the principal 3D features onto a single page, without any preview window, allowing for quick access and adjustment. This page is useful when it is not necessary to preview the adjusted settings because the effect is - Gigabyte GV-RX24P256H | Manual - Page 28
problem that occurred with some older games that should not occur with modern games. Color : Adjust the overall richness of color by using the Gamma control. To adjust the overall brightness use the Brightness control, and the overall contrast use the Contrast control. GV-RX24P256H Graphics - Gigabyte GV-RX24P256H | Manual - Page 29
with video overlay support. „ Theater Mode Use Theater Mode to change the way you view streaming video. Note: These settings will only affect applications with video overlay support. Extended Desktop Mode is not supported on systems running Windows VistaTM. - 29 - Software Installation English - Gigabyte GV-RX24P256H | Manual - Page 30
any preview window, allowing quick access and adjustment. This page is useful when it is not necessary to preview the adjusted settings because the effect is already known or understood. Note: These settings will only affect applications with video overlay support. GV-RX24P256H Graphics Accelerator - Gigabyte GV-RX24P256H | Manual - Page 31
reset the graphics processor without requiring a system restart. If the computer cannot recover from a crash, VPU Recover will switch the computer to software rendering mode ATI via e-mail. Note: Because Windows VistaTM provides the same functionality as this option, VPU Recover is not available - Gigabyte GV-RX24P256H | Manual - Page 32
use the Troubleshooting Guide located in the Windows® Help or contact your computer manufacturer. If necessary, adjust your monitor's setting by monitor's adjust panel to make the screen looks focused, crisp, and sharp. (Please refer to the monitor's manual.) GV-RX24P256H Graphics Accelerator - 32 - Gigabyte GV-RX24P256H | Manual - Page 33
English 5. Appendix 5.1. How to Reflash the BIOS in MS-DOS mode 1. Extract the downloaded Zip file to your hard disk(s) or floppy disk. This procedure assumes drive A. 2. Restart the computer in MS-DOS mode. (For Windows XP, you need a startup disk to restart the computer in MS-DOS mode.) 3. Change - Gigabyte GV-RX24P256H | Manual - Page 34
English 5.2. Resolutions and Color Depth Table (In Windows® XP) Display Screen Resolution 640 x 480 800 x 600 1024 x 768 1152 x 864 1280 x 768 1280 30 * The table is for reference only. The actual resolutions supported depend on the monitor you use. GV-RX24P256H Graphics Accelerator - 34 -
-
 1
1 -
 2
2 -
 3
3 -
 4
4 -
 5
5 -
 6
6 -
 7
7 -
8
-
9
-
10
-
11
-
12
-
13
-
14
-
15
-
16
-
17
-
18
-
19
-
20
-
21
-
22
-
23
-
24
-
25
-
26
-
27
-
28
-
29
-
30
-
31
-
32
-
33
-
34
 |
 |

GV-RX24P256H
Radeon
TM
HD 2400 Pro Graphics Accelerator
User's Manual
Rev. 102
12MD-RX24P2H-102R
*
The WEEE marking on the product indicates this product must not be disposed of with user's other household waste
and must be handed over to a designated collection point for the recycling of waste electrical and electronic equipment!!
*
The WEEE marking applies only in European Union's member states.
Copyright
© 2007 GIGABYTE TECHNOLOGY CO., LTD
Copyright by
GIGA-BYTE TECHNOLOGY CO., LTD.
("GBT").
No part of this manual may
be reproduced or transmitted in any from
without the expressed, written permission of
GBT
.
Trademarks
Third-party brands and names are the property of their respective owners.
Notice
Please do not remove any labels on VGA card, this may void the warranty of this VGA card
Due to rapid change in technology, some of the specifications might be out of date before publication of this booklet.
The author assumes no responsibility for any errors or omissions that may appear in this document nor does the author make a
commitment to update the information contained herein.
Macrovision corporation product notice:
This product incorporates copyright protection technology that is protected by U.S. patents and other intellectual property rights.
Use of this copyright protection technology must be authorized by Macrovision, and is intended for home and other limited viewing
uses only unless otherwise authorized by Macrovision. Reverse engineering or disassembly is prohibited.