Gigabyte H610M S2 DDR4 Unique Features Introduction
Gigabyte H610M S2 DDR4 Manual
 |
View all Gigabyte H610M S2 DDR4 manuals
Add to My Manuals
Save this manual to your list of manuals |
Gigabyte H610M S2 DDR4 manual content summary:
- Gigabyte H610M S2 DDR4 | Unique Features Introduction - Page 1
the @BIOS Utility 5 1-3 Using Q-Flash Plus...6 APP Center...7 2-1 EasyTune...9 2-2 Fast Boot...10 2-3 Ambient LED...11 2-4 Smart Backup...12 2-5 System Information Viewer 14 Actual software supported may vary by motherboard model and OS verison. The software setup menus are for reference only. - Gigabyte H610M S2 DDR4 | Unique Features Introduction - Page 2
Q-Flash Plus, providing multiple protection for the safety and stability of your computer. What is DualBIOS™? Motherboards that support DualBIOS have two BIOS onboard, a main BIOS and a backup BIOS. Normally, the system works on the main BIOS. However, if the main BIOS is corrupted - Gigabyte H610M S2 DDR4 | Unique Features Introduction - Page 3
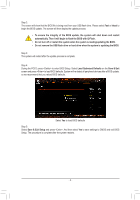
the computer. In the main screen of Q-Flash, select Update BIOS. •• The Save BIOS option allows you to save the current BIOS file. •• Q-Flash only supports USB flash drive or hard drives using FAT32/16/12 file system. •• If the BIOS update file is saved to a hard drive in RAID/AHCI - Gigabyte H610M S2 DDR4 | Unique Features Introduction - Page 4
Step 2: The screen will show that the BIOS file is being read from your USB flash drive. Please select Fast or Intact to begin the BIOS update. The screen will then display the update process. •• To ensure the integrity of the BIOS update, the system will shut down and restart automatically. Then it - Gigabyte H610M S2 DDR4 | Unique Features Introduction - Page 5
the @BIOS server site, please manually download the BIOS update file from GIGABYTE's website and follow the instructions in "Update the BIOS without up screen. Click Backup current image to save the current boot-up logo. Supported image formats include jpg, bmp, and gif. C. After Updating the BIOS - Gigabyte H610M S2 DDR4 | Unique Features Introduction - Page 6
and flashing process. Wait for 6-8 minutes and the LEDs will stop flashing when the BIOS flashing is complete. •• If you choose to update the BIOS manually, first make sure that your system is off (S5 shutdown state). •• If your motherboard has a BIOS switch and a SB switch, reset them to their - Gigabyte H610M S2 DDR4 | Unique Features Introduction - Page 7
click Install. Before the installation, make sure the system is connected to the Internet. (Note) Available applications in APP Center may differ by motherboard model. Supported functions of each application may also vary depending on motherboard specifications. - 7 - - Gigabyte H610M S2 DDR4 | Unique Features Introduction - Page 8
Running the APP Center In Desktop mode, click the App Center icon in the notification area to launch the App Center utility (Figure 1). On the main menu, you can select an app to run or click LiveUpdate to update an app online. Figure 1 If the App Center is closed, you can restart it by clicking - Gigabyte H610M S2 DDR4 | Unique Features Introduction - Page 9
in EasyTune may vary by motherboard model and CPU. Grayed-out area(s) indicates that the item is not configurable or the function is not supported. Incorrectly doing overclock/overvoltage may result in damage to the hardware components such as CPU, chipset, and memory and reduce the useful life of - Gigabyte H610M S2 DDR4 | Unique Features Introduction - Page 10
2-2 Fast Boot Through the simple GIGABYTE Fast Boot interface, you can enable or change the Fast Boot or Next Boot After AC Power Loss setting right in the operating system. The Fast Boot Interface Using Fast Boot •• BIOS Fast Boot: This option is the same as the Fast Boot option (Note) in BIOS - Gigabyte H610M S2 DDR4 | Unique Features Introduction - Page 11
2-3 Ambient LED This application allows you to enable or specify the lighting mode of the onboard LEDs while in the Windows environment. The Ambient LED Interface Using Ambient LED •• The icon on the top right corner: Allows you to enable or disable the LED lighting. •• Allows to you to configure - Gigabyte H610M S2 DDR4 | Unique Features Introduction - Page 12
to recover your system from the backup image •• Smart Backup only supports NTFS file system. •• You need to select the destination partition in the backup and enter the user name and password. Follow the on-screen instructions to complete. Recovering a file: Click the File Recovery button on the - Gigabyte H610M S2 DDR4 | Unique Features Introduction - Page 13
to proceed with the restore immediately or later. Once you respond "Yes" the system will restart to the Windows recovery environment. Follow the onscreen instructions to restore your system. All of your files and programs will be deleted and replaced with those on the selected backup. If needed, be - Gigabyte H610M S2 DDR4 | Unique Features Introduction - Page 14
2-5 System Information Viewer GIGABYTE System Information Viewer allows you to monitor and adjust the fan speed in the operating system. You can also display the hardware monitor information on the desktop to view the system status at any time. The System Information Viewer Interface Tabs
-
 1
1 -
 2
2 -
 3
3 -
 4
4 -
 5
5 -
 6
6 -
 7
7 -
8
-
9
-
10
-
11
-
12
-
13
-
14
 |
 |

Actual software supported may vary by motherboard model and OS verison. The software setup
menus are for reference only.
Unique Features (H610 Series)
BIOS Update Utilities
....................................................................................................
2
1-1
Updating the BIOS with the Q-Flash Utility
...............................................................
2
1-2
Updating the BIOS with the @BIOS Utility
...............................................................
5
1-3
Using Q-Flash Plus
...................................................................................................
6
APP Center
...................................................................................................................
7
2-1
EasyTune
..................................................................................................................
9
2-2
Fast Boot
................................................................................................................
10
2-3
Ambient LED
..........................................................................................................
11
2-4
Smart Backup
.........................................................................................................
12
2-5
System Information Viewer
.....................................................................................
14