Gigabyte M8600 User Manual
Gigabyte M8600 Manual
 |
View all Gigabyte M8600 manuals
Add to My Manuals
Save this manual to your list of manuals |
Gigabyte M8600 manual content summary:
- Gigabyte M8600 | User Manual - Page 1
ENGLISH - Gigabyte M8600 | User Manual - Page 2
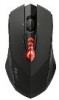
Aivia M8600 Wireless Macro Gaming Mouse Aivia, an integrated acronymic word, is derived from its key features - advanced, intuitive, and versatile interface archetype. The series is to emphasize the combination of subconscious, design and function as well as the pursuit of archetype. GIGABYTE - Gigabyte M8600 | User Manual - Page 3
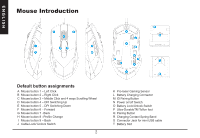
and 4 ways Scrolling Wheel D Mouse button 4 - DPI Switching Up E Mouse button 5 - DPI Switching Down F Mouse button 6 - Forward G Mouse button 7 -Back H Mouse button 8 -Profile Change I Mouse button 9 - Back J Cable Lock/ Unlock Switch 2 K Pro-laser Gaming Sensor L Battery Charging Connector M ID - Gigabyte M8600 | User Manual - Page 4
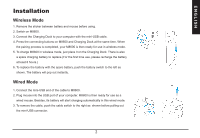
battery and mouse before using. 2. Switch on M8600. 3. Connect the Charging Dock to your computer with the mini-USB cable. 4. Press the connecting buttons on M8600 and Charging Dock at the same time. When the pairing process is completed, your M8600 is then ready for use in wireless mode. 5. To - Gigabyte M8600 | User Manual - Page 5
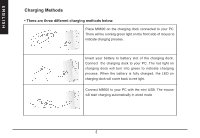
ENGLISH Charging Methods • There are three different charging methods below. Place M8600 on the charging dock connected to your PC. There will be running green light on the front side of mouse to indicate charging process. Insert your battery to battery slot of the charging dock. Connect the - Gigabyte M8600 | User Manual - Page 6
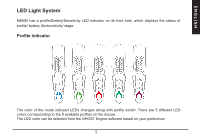
ENGLISH LED Light System M8600 has a profile/Battery/Sensitivity LED indicator on its front side, which displays the . There are 5 different LED colors corresponding to the 5 available profiles on the mouse. The LED color can be selected from the GHOST Engine software based on your preference. 5 - Gigabyte M8600 | User Manual - Page 7
ENGLISH Battery Indicator The GREEN LEDs shows the remaining battery life: • 61 - 100% Battery: 3 green LED arrows • 31 - 60% Battery: 2 green LED arrows • 11 - 30% Battery: 1 green LED arrow • Less than 10% Battery: 3 green blinking LEDs arrows Sensitivity Stage Indicator The LEDs will turn into - Gigabyte M8600 | User Manual - Page 8
with mini USB cable to PC while editing macro and assigning buttons through GHOSTTM Engine software. (In wireless mode you are only allowed to adjust sensitivity, left-handed/right-handed mode and gaming/power saving mode) Left Hand/ Right hand Mode Aivia M8600 is designed both for left-handed and - Gigabyte M8600 | User Manual - Page 9
button you would like to assign. Remember that you may edit each macro script in the "MACRO EDITING" tab. More Tips: • You can swap around two button and Backup: In case you require more profiles (button assignments) and macros and do not wish to delete the existing profiles, simply "backup" the existing - Gigabyte M8600 | User Manual - Page 10
of action mode" to change the execute mode. Step3 Click "Record" to start creating a macro and recording all the keystrokes or mouse commands. Step4 Click "Stop" to finish recording this macro when a macro is done. Step5 You can also insert additional commands on the "Quick-insert bar" left - Gigabyte M8600 | User Manual - Page 11
button. Delete You can delete a command or a whole macro script by dragging the command or the macro script to "Delete" can. Record Keyboard only Clicking this option would ignore the press of mouse and just record keystrokes when recording a macro. Press Pause Key to Stop Recording Clicking this - Gigabyte M8600 | User Manual - Page 12
ENGLISH Export To export your a macro to the PC. Import To import a macro to the macro editing in GHOST engine application program. Re-edit the macro Dragging the macro script back to macro editing allows you to re-edit this macro. Sensitivity Sensitivity: As default setting, there are four - Gigabyte M8600 | User Manual - Page 13
Temperature Range: 0°C(32°F) ~ 40°C(104°F) Power Type of wireless module: Mouse : Battery supply voltage Receiver : NB or PC USB look into the laser beam. • Risk of explosion if battery is replaced by an incorrect type • Dispose of used batteries according to the instruction Important information: - Gigabyte M8600 | User Manual - Page 14
. This equipment generates, uses and can radiated radio frequency energy and, if not installed and used in accordance with the instructions, may cause harmful interference to radio communications. However, there is no guarantee that interference will not occur in a particular installation - Gigabyte M8600 | User Manual - Page 15
繁體中文 A Mouse button 1 - 左鍵 B Mouse button 2 - 右鍵 C Mouse button 3 D Mouse button 4 - 增加DPI 切換 E Mouse button 5 - 減少DPI 切換 F Mouse button 6 G Mouse button 7 H Mouse button 8 I Mouse button 9 J USB K L M N O P Q R S mini USB T 1 - Gigabyte M8600 | User Manual - Page 16
安裝說明 無線模式 1 2. 打開M8600開關 3 USB轉 mini-USB 4 M8600 M8600 5 M8600 Alternatively, M8600 can be charged through the mini USB cable as a wired mode. 6 有線模式 1 mini-USB M8600 2 USB埠,您的M8600 3 mini-USB接頭拔出 2 - Gigabyte M8600 | User Manual - Page 17
繁體中文 LED燈光系統 M8600上方的LED DPI段數 5 5 LED GHOSTTM 3 - Gigabyte M8600 | User Manual - Page 18
61 - 100% 電量: 3 顆綠色LED箭號燈 31 - 60% 電量: 2 顆綠色LED箭號燈 11 - 30% 電量: 1 顆綠色LED 10% 電量: 3 LED箭號燈 LED DPI 1 顆紅色 LED 2 顆紅色 LED 3 顆紅色 LED LED燈全滿 4 - Gigabyte M8600 | User Manual - Page 19
繁體中文 GHOSTTM GHOSTTM Windows 98、Windows 2000、Windows XP和Windows7 GHOSTTM Aivia M8600 GHOSTTM LED 26 5 - Gigabyte M8600 | User Manual - Page 20
按鍵配置 GHOSTTM profile GHOSTTM 6 - Gigabyte M8600 | User Manual - Page 21
繁體中文 ms Step1 Step2 Step3 Step4 Step5 Step6 GHOSTTM Engine Step7 Step8 7 - Gigabyte M8600 | User Manual - Page 22
a b c 按下 Pause Pause jpg 和 bmp 8 - Gigabyte M8600 | User Manual - Page 23
繁體中文 GHOSTTM Dot Per Inch),DPI M8600 800, 1600, 3200 與 5600DPI,透過GHOSTTM Engine 100-6600DPI X軸與Y X軸和Y GHOSTTM Engine 125Hz (8ms), 250Hz (4ms), 500Hz (2ms), or 1000Hz(1ms GHOSTTM Engine 9 - Gigabyte M8600 | User Manual - Page 24
產品規格 滑鼠 Antenna Gain=0dBm 2402/ 2439/ 2450/ 2411/ 2468/ 2425/ 2447/ 2479MHz 頻道數:8 ch 0 dBm 2.4G GFSK modulator 0°C(32°F) ~ 40°C(104°F) USB USB 電池 封裝: BURNABY INTERNATIONAL TECHNOLOGY 型號: SANYO NP 80/ 3.7Vdc 1500mAh 10 - Gigabyte M8600 | User Manual - Page 25
繁體中文 安全規範 警告 9303322) 11 - Gigabyte M8600 | User Manual - Page 26
簡体中文 A Mouse button 1 - 左键 B Mouse button 2 - 右键 C Mouse button 3 D Mouse button 4 - 增加DPI切换 E Mouse button 5 - 减少DPI切换 F Mouse button 6 G Mouse button 7 H Mouse button 8 I Mouse button 9 J USB K L M N O P Q R S mini USB T 1 - Gigabyte M8600 | User Manual - Page 27
安裝說明 無線模式 1 2. 打开M8600开关 3 USB转mini-USB 4 M8600 M8600 5 M8600 Alternatively, M8600 can be charged through the mini USB cable as a wired mode. 6 有線模式 1 mini-USB M8600 2 USB M8600 3 mini-USB接头拔出 2 簡体中文 - Gigabyte M8600 | User Manual - Page 28
LED灯光系统 M8600上方的LED DPI段数 5 5 LED GHOSTTM 3 簡体中文 - Gigabyte M8600 | User Manual - Page 29
61 - 100% 电量: 3 颗绿色LED箭号灯 31 - 60% 电量: 2 颗绿色LED箭号灯 11 - 30% 电量: 1 颗绿色LED 10% 电量: 3 LED箭号灯 LED DPI 1 颗红色 LED 2 颗红色 LED 3 颗红色 LED LED灯全满 4 簡体中文 - Gigabyte M8600 | User Manual - Page 30
GHOSTTM GHOSTTM Windows 98、Windows 2000、Windows XP和Windows7 GHOSTTM Aivia M8600 GHOSTTM 簡体中文 LED 26 5 - Gigabyte M8600 | User Manual - Page 31
按键配置 GHOSTTM profile GHOSTTM 6 簡体中文 - Gigabyte M8600 | User Manual - Page 32
宏编辑器 ms Step1 Step2 Step3 Step4 Step5 Step6 GHOSTTM Engine Step7 Step8 7 簡体中文 - Gigabyte M8600 | User Manual - Page 33
a b c 按下 Pause Pause jpg 和 bmp 8 簡体中文 - Gigabyte M8600 | User Manual - Page 34
GHOSTTM Dot Per Inch),DPI M8600 800, 1600, 3200 与5600DPI,透过GHOSTTM Engine 100-6600DPI X轴与Y X轴和Y GHOSTTM Engine 125Hz (8ms), 250Hz (4ms), 500Hz (2ms), or 1000Hz(1ms)。 GHOSTTM Engine 9 簡体中文 - Gigabyte M8600 | User Manual - Page 35
产品规格 鼠标 Antenna Gain=0dBm 2402/ 2439/ 2450/ 2411/ 2468/ 2425/ 2447/ 2479MHz 频道数: 8 ch 0 dBm 2.4G GFSK modulator 0°C(32°F) ~ 40°C(104°F) USB USB 电池 封装: BURNABY INTERNATIONAL TECHNOLOGY 型号: SANYO NP 80/ 3.7Vdc 1500mAh 警告 10 簡体中文 - Gigabyte M8600 | User Manual - Page 36
6 - Vor G Mausbuton 7 -Zurück H Mausbuton 8 -Profil ändern I Mausbuton 9 - Zurück J Knopf zum sperren/entsperren des Kabels 1 K Pro-laser gaming Sensor L Akkuladestecker M ID Verbindungsknopf N Ein/Aus Schalter O Schalter zum sperren/entsperren des Akkus P Ultra-DurableTM Teflon Füße Q Knopf zum - Gigabyte M8600 | User Manual - Page 37
aus dem Akkuschacht. Kabelgebundener Modus 1. Verbinden Sie das mini USB Kabel mit der M8600. 2. Verbinden Sie das USB Kabel mit dem Computer. Die M8600 ist bereit für den Betrieb. Weiterhin wird der Akku der M8600 automatisch geladen. 3. Um das Kabel zu entfernen schieben Sie den Schalter zum - Gigabyte M8600 | User Manual - Page 38
Lademodus • Es gibt drei Möglichkeiten die M8600 aufzuladen: Legen Sie die M8600 auf die Ladestation wenn dies emit Ihrem PC verbunden ist. Eine ändig geladen wechselt das Licht zurück zu rot. Verbinden Sie die M8600 mit dem mini USB Kabel mit Ihrem PC. Die Maus wird automatisch geladen. 3 DEUTSCH - Gigabyte M8600 | User Manual - Page 39
M8600 hat eine LED Anzeige auf der Vorderseite welche den Status des Profils / des Akkus / der Empfindlichkeit anzeigt. Profilanzeige Die Farbe der LED gibt an welches Profil verwendet wird. Es gibt 5 verschiedene Farben für die 5 Profile. Die Farbe für jedes Profil kann in der Software der GHOST - Gigabyte M8600 | User Manual - Page 40
Akkuanzeige Die grünen LEDs zeigen den Ladestatus des Akkus an: • 61 - 100% Akku: 3 grüne LED Pfeile • 31 - 60% Akku: 2 grüne LED Pfeile • 11 - 30% Akku: 1 grüner LED Pfeil • Weniger als 10% Akku: 3 blinkende grüne LED Pfeile Empfindlichkeitsanzeige Die LEDs werden rot wenn die Empfindlichkeit - Gigabyte M8600 | User Manual - Page 41
mittels der GHOST Engine Software ändern. (Im kabellosen Modus können Sie nur die Empfindlichkeit einstellen, den Modus für linkshändig/rechtshändig auswählen und den Gaming-/Energiesparmodus auswählen mit der GHOST Engine auswählen) Linkshändiger/rechtshändiger Modus Die Aivia M8600 ist für den - Gigabyte M8600 | User Manual - Page 42
TASTEN ZUWEISEN Sie können den Tasten sowohl mit „BASISFUNKTION" als auch den „MAKROSKRIPTEN" verschiedene Funktionen zuweisen. Alles was Sie tun müssen, ist das Ziehen des Funktionssymbols und das einfache Ablegen auf die Taste, zu der sie zugewiesen werden soll. Vergessen Sie nicht, jedes - Gigabyte M8600 | User Manual - Page 43
MAKROBEARBEITUNG Die Registerkarte Makrobearbeitung ermöglicht Ihnen die einfache Aufnahme aller Befehle, einschließlich Tastenbelegungen und dem Druck einer Maustaste. Jedes einzelne Makro kann ebenfalls für die weitere Verwendung von Ihrer Festplatte importiert oder auf diese exportiert werden. - Gigabyte M8600 | User Manual - Page 44
Weitere Funktionen: Aufzeichnung der Dauer der Intervalle (Zeitverzögerung) Wenn diese Funktion markiert ist, können Sie die Intervalle zwischen Befehlen aufzeichnen. Wählen Sie aus den verschiedenen Aktionsmodi • yy Ein Mal ausführen: Um ein Makro ein Mal auszuführen. • yy Schleifenmodus: Zum - Gigabyte M8600 | User Manual - Page 45
Export Für den Export Ihres Makros auf den PC. Import Für den Import eines Makros in die Makrobearbeitung des GHOST Engine Programms. Überarbeitung des Makros Ziehen Sie das Makroscript zurück in die Makrobearbeitung, um das Makro zu überarbeiten. Registerkarte EMPFINDLICHKEIT / SCROLLING - Gigabyte M8600 | User Manual - Page 46
FRANÇAIS Introduction de la souris Bouton de tâches par défaut A Bouton de souris 1 - Clique de gauche K sonde du jeu Pro-laser B Bouton de souris 2 - Clique de droite L Connecteur de charge de batterie C Bouton de souris 3 - Clique de milieu et 4 manières de défilement de la roue M - Gigabyte M8600 | User Manual - Page 47
comme montré. La batterie sortira instantanément. Mode câblé 1. Relier l'extrémité du câble du mini-USB au M8600. 2. Brancher la souris au port USB de votre ordinateur. M8600 est alors opérationnel comme souris câblée. En outre, sa batterie démarrera la charge automatiquement dans ce mode câbl - Gigabyte M8600 | User Manual - Page 48
Charge • Il y a trois méthodes de charge différentes ci-dessous. Placez M8600 sur le dock de charge relié à votre PC. Une lumière verte s' la LED sur le dock de charge redeviendra rouge. Reliez M8600 à votre PC avec le mini câble USB comme mode câblé. La souris commencera à charger automatiquement. - Gigabyte M8600 | User Manual - Page 49
FRANÇAIS Système de lumière LED M8600 a un LED profil/indicateur de batterie/sensibilité sur sa partie avant, qui montre le statut de profil/de correspondant à 5 profils du changement sur la souris. La couleur du LED a pu être choisie parmi le logiciel de moteur de GHOST basé sur votre préférence. 4 - Gigabyte M8600 | User Manual - Page 50
FRANÇAIS Indicateur de batterie La LED VERTE montre la durée de vie restante de la batterie: • Batterie 61 - 100% : LED 3 flèche verte • Batterie 31 - 60% : LED 2 flèche verte • Batterie 11 - 30% : LED 1 flèche verte • Batterie moins de 10% : LED 3 flèche verte clignotantes Indicateur d'étape de - Gigabyte M8600 | User Manual - Page 51
FRANÇAIS Moteur macro de GHOST™ Le moteur de support de macro GHOSTTM Windows 98, Windows 2000, Windows XP, et Windows 7. Installez le logiciel pour assigner des boutons et pour installer votre profil personnel. Veillez vous assurer de connecter votre M8600 avec le mini câble USB au PC pendant l'é - Gigabyte M8600 | User Manual - Page 52
copier cette fonction au bouton vide. • Charge et Sauvegarde : Au cas où vous auriez besoin de plus de profils (bouton de tâches) et de macros et ne souhaitez pas effacer les profils existants, « sauvegardez » simplement les profils existants sur votre disque dur et les recharger une fois nécessaire - Gigabyte M8600 | User Manual - Page 53
vous permet d'enregistrer facilement toutes les commandes, y compris les touches d'attaches et les pression du bouton de souris. Chaque macro peut être importée et également exportée sur votre disque dur pour davantage d'utilisation. Débuter avec : Étape 1 Cliquez « Enregistrer durée ou intervalles - Gigabyte M8600 | User Manual - Page 54
interruption jusqu'à ce que vous libériez le bouton assigné. Effacer Vous pouvez effacer une commande ou un script macro entier en glissant la commande ou le script macro sur « Effacer ». N'enregistrer que le Clavier Cliquer cette option permet d'ignorer la pression de la souris et n'enregistre que - Gigabyte M8600 | User Manual - Page 55
vers le PC. Importer Pour importer une macro vers l'éditeur de macro dans le programme du moteur d'application GHOST. Rééditer une macro Re-déplacer un script de macro vers l'éditeur de macro vous permet de rééditer cette macro. Sensibilité Sensibilité : Comme configuration de défaut, il y a quatre - Gigabyte M8600 | User Manual - Page 56
Introdução ao Rato PORTUGUÉS Atribuições Predefinidas do Botão A Botão do rato 1 - Clique Esquerdo B Botão do rato 2 - Clique Direito C Botão do rato 3 - Clique do Meio e Roda de Deslocamento de 4 direções D Botão do rato 4 - Deslocamento DPI para Cima E Botão do rato 5 - Deslocamento DPI para - Gigabyte M8600 | User Manual - Page 57
a esquerda como mostrado. A bateria saltará instantâneamente. Modo Com Fio 1. Ligar a extremidade do cabo mini USB ao M8600. 2. Ligar o rato na porta USB do seu computador. M8600 estará então pronto para utilização como um rato com fio. Além disso, sua bateria iniciará o carregamento automaticamente - Gigabyte M8600 | User Manual - Page 58
Carregamento • Existem três métodos diferentes de carregamento abaixo. Coloque M8600 na plataforma de carregamento ligado ao seu PC. Haverá luz completamente carregada, o LED na plataforma de carregamento se tornará novamente vermelho. Ligar M8600 ao seu PC com o cabo mini USB como um modo com fio. O - Gigabyte M8600 | User Manual - Page 59
PORTUGUÉS Sistema de Luz LED M8600 tem um indicador LED para perfil/Bateria/Sensibilidade no seu lado dianteiro, que mostra o 5 cores diferentes de LED correspondendo aos 5 perfis para mudança no rato. A côr do LED pode ser seleccionada do software do GHOST Engine baseado na sua preferência. 4 - Gigabyte M8600 | User Manual - Page 60
PORTUGUÉS Indicador de Bateria Os LEDs VERDES mostram a vida de bateria remanescente: • 61 - 100% Bateria: 3 LED's de flecha verde • 31 - 60% Battery: 2 LED de flecha verde • 11 - 30% Battery: 1 LED de flecha verde • Menos de 10% da Bateria:3 LED's de flecha verde piscantes Indicador do Estágio de - Gigabyte M8600 | User Manual - Page 61
ao PC ao editar o macro e de atribuir botões através do software GHOST™ Engine. (Em um modo sem fio, você pode somente ajustar a sensibilidade, modo canhoto/destro, e modo de jogo/economia de energia através do GHOST™ Engine.) Modo de Mão Esquerda/Direita Aivia M8600 é desenhado para o utilizador - Gigabyte M8600 | User Manual - Page 62
ê tem a fazer é arrastar o ícone de função e simplesmente largar ao botão que deseja atribuir. Lembre-se de que você pode editar cada macro script no guia "EDIÇÃO MACRO". Mais sugestões: • Você pode alternar duas atribuições de botão arrastando um ao outro. • Você pode eliminar a atribuição do bot - Gigabyte M8600 | User Manual - Page 63
lhe permite registar facilmente todos os comandos, incluindo os vínculos de tecla e pressão do botão de rato. Cada macro simples pode também ser importado e exportado no seu disco duro para utilização posterior. Iniciar com: Passo 1 Clique "Registar a duração ou intervalos" se quiser registrar os - Gigabyte M8600 | User Manual - Page 64
"Eliminar". Registar somente o Teclado Ao fazer clique nesta opção irá ignorar a pressão do rato e simplesmente registará os batimentos de tecla ao registrar um macro. Premir Tecla de Pausa para Parar o Registo Clicar nesta opção lhe permitirá parar o registo premindo a tecla "Pausa" ao registrar um - Gigabyte M8600 | User Manual - Page 65
PORTUGUÉS Exportar Para exportar seu macro ao PC. Importar Para importar um macro para a edição no programa aplicativo do GHOST engine. Re-editar o macro Arrastar o macro script de volta para a edição de macro para permitir-lhe de re-editar este macro. Sensibilidade Sensibilidade: Como definição - Gigabyte M8600 | User Manual - Page 66
D Aumentar DPI E Disminuir DPI F Adelante G Atrás H Cambio de Perfil I Atrás J Interruptor para Trabar/Destrabar el cable 1 K Sensor Pro-laser para Gaming L Conector de carga de batería M Botón para conectar N Interruptor Encendido/Apagado O Interruptor para Trabar/Destrabar la batería P Patas de - Gigabyte M8600 | User Manual - Page 67
muestra. La batería saltará instantáneamente. Modo con Cable 1. Conecte el terminal mini-USB al M8600 2. Conecte el mouse al Puerto USB de su ordenador. El M8600 estará listo para ser usado como Mouse con cable. Además, su batería comenzará a cargarse automáticamente en este modo. 3. Para remover el - Gigabyte M8600 | User Manual - Page 68
Métodos de Carga • Existen tres métodos para cargar la batería. Coloque el M8600 en la bahía de carga conectada al PC. Se encenderá una luz verde en el frente del Mouse indicando que se está cargando. Inserte la batería en el compartimiento de la bahía de carga. Conecte la bahía de carga a su - Gigabyte M8600 | User Manual - Page 69
Sistema de Luces LED El M8600 tiene un indicador LED de perfil/Batería/Sensibilidad por el frente, que muestra el estado colores de LED correspondientes a 5 perfiles para cambiar. El color del LED puede ser personalizado desde el software GHOST Engine acorde a su preferencia. 4 E S PA Ñ O L - Gigabyte M8600 | User Manual - Page 70
Indicador de Batería El LED verde muestra lo que queda de batería: • 61 - 100% Batería: 3 flechas verdes LEDs • 31 - 60% Batería: 2 flechas verdes LEDs • 11 - 30% Batería: 1 flecha verde LED • Menos de 10% de Batería: 3 flechas verdes LEDs parpadeando Indicador de Nivel de Sensibilidad Los LEDS se - Gigabyte M8600 | User Manual - Page 71
con el cable mini-USB mientras edita macros y/o asigna botones con el software GHOSTTM Engine. (En modo inalámbrico solo se puede ajustar sensibilidad, modo diestro/zurdo y cambiar entre modo gaming/ahorro de energía) Modo Zurdo/Diestro El Aivia M8600 fue diseñado para usuarios diestros y zurdos - Gigabyte M8600 | User Manual - Page 72
arrastrar el icono de función y simplemente soltarlo en el botón en el que quiere asignarlo. Recuerde que puede editar cada macro escritura en la pestaña "MACRO EDICIÓN". Más datos: • Se pueden intercambiar las funciones asignadas entre dos botones tan solo arrastrando una sobre la otra. • Se pueden - Gigabyte M8600 | User Manual - Page 73
, incluyendo las teclas y la presión del botón del ratón. Cada macro individual también se puede importar y exportar en su disco duro para más ón. Paso 3 Haga clic en "Grabar" para empezar a crear una macro y grabar todas las pulsaciones de teclas o comandos del ratón. Paso 4 Haga clic en - Gigabyte M8600 | User Manual - Page 74
continuamente hasta que suelte el botón asignado. Borrar Puede borrar una acción o todo un macro arrastrandolo al tacho "Borrar" Grabar solamente teclado Hacer clic en esta opción ignorará el presionar botones del Mouse y solo grabará lo que se presione en el teclado. Presiones el botón Pausa para - Gigabyte M8600 | User Manual - Page 75
al PC. Importar Para importar una macro al editor de macros en el programa de aplicación GHOST engine. Re-editar la macro Arrastre la macro script de vuelta a edición de macros le permitirá reeditar esa macro. Sensibilidad Como configuración por defecto, existen cuatro niveles de sensibilidad: 800 - Gigabyte M8600 | User Manual - Page 76
A 1 B 2 C 3 4 D 4 DPI E 5 DPI F 6 G 7 H 8 I 9 J 1 K L M ID N O P Ultra-Durable™ Q R S USB T - Gigabyte M8600 | User Manual - Page 77
1 2 M8600. 3 USB. 4 M8600 M8600 5 M8600 8 6 1 USB M8600. 2 USB M8600 можно 3 USB. 2 - Gigabyte M8600 | User Manual - Page 78
M8600 M8600 USB 3 - Gigabyte M8600 | User Manual - Page 79
Мышь M8600 GHOST Engine. 4 - Gigabyte M8600 | User Manual - Page 80
61~100%: 3 31~ 60%: 2 11~ 30%: 1 10%: 3 1: 1 2: 2 3: 3 4 5 - Gigabyte M8600 | User Manual - Page 81
GHOST™ Macro Engine GHOST™ Macro Engine Windows 98, Windows 2000, Windows XP и Windows7 GHOST™ Engine M8600 USB GHOST™ Engine Мышь Aivia M8600 GHOST™ Engine 10 26 6 - Gigabyte M8600 | User Manual - Page 82
BASIC FUNCTION MACRO SCRIPTS MACRO EDITING 7 - Gigabyte M8600 | User Manual - Page 83
MACRO EDITING 1 2 3 4 Шаг 4 5 6 7 8 8 - Gigabyte M8600 | User Manual - Page 84
JPG или BMP 9 - Gigabyte M8600 | User Manual - Page 85
GHOST Engine 800, 1600, 3200 и 5600 dpi GHOST Engine X и Y X и Y. 125Гц (8мс), 250Гц (4мс), 500Гц (2 1000Гц (1мс). 10 - Gigabyte M8600 | User Manual - Page 86
한국의 A 1 B 2 C 3 4 D 4 - DPI 전환 업 E 5 - DPI F 6 G 7 - 뒤로 H 8 I 9 - 뒤로 J K L M D N O P Ultra-Durable Q R S 미니 USB T 1 - Gigabyte M8600 | User Manual - Page 87
한국의 설치 1 2. M8600 3. 미니 USB 4. M8600 M8600을 5. M8600 8 6 1. 미니 USB M8600 2 USB M8600 3 USB 2 - Gigabyte M8600 | User Manual - Page 88
한국의 PC M8600 PC LED USB M8600을 PC 3 - Gigabyte M8600 | User Manual - Page 89
한국의 LED M8600 LED LED 5 5 LED LED GHOST Engine 4 - Gigabyte M8600 | User Manual - Page 90
한국의 녹색 LED 61 - 100 3 LED • 31 - 60 2 LED • 11 - 30 1 LED • 10 3 LED LED 1: 1 빨간색 LED 2: 2 LED 3: 3 LED 4 LED 5 - Gigabyte M8600 | User Manual - Page 91
한국의 GHOST™ Macro Engine GHOST™ Macro Engine은 Windows 98, Windows 2000, Windows XP 및 Windows 7 GHOST™ Engine M8600과 PC가 미니 USB GHOST™ Engine Aivia M8600 GHOST™ Engine 5 5 LED 10 LED 26 6 - Gigabyte M8600 | User Manual - Page 92
한국의 BASIC FUNCTION MACRO SCRIPTS MACRO EDITING backup 7 - Gigabyte M8600 | User Manual - Page 93
한국의 Step 1 Record the duration or intervals Step 2 Cycle through selection of action mode Step 3 Record Step 4 Stop Step 5 또한, "Quick-insert bar Step 6 On-board script Step 7 change icon Step 8 "Button Assign Macro scrip 8 - Gigabyte M8600 | User Manual - Page 94
한국의 삭제 "Delete Pause jpg 또는 bmp Replace Remove 9 - Gigabyte M8600 | User Manual - Page 95
한국의 내보내기 PC 가져오기 GHOST engine 4 800, 1600, 3200 및 5600DPI GHOST Engine을 통해 4 DPI set X and Y axis separately[X축과 Y X-Y PC 125 Hz (8 ms), 250 Hz (4 ms), 500 Hz (2 ms) 또는 1000 Hz (1 ms 10 - Gigabyte M8600 | User Manual - Page 96
Úvod ČESKY Označení výchozích tlačítek A Tlačítko myši 1 - levé kliknutí B Tlačítko myši 2 - pravé kliknutí C Tlačítko myši 3 - prostřední kliknutí a kolečko - 4 směry D Tlačítko myši 4 - DPI zapínání E Tlačítko myši 5 - DPI vypínání F Tlačítko myši 6 - Dopředu G Tlačítko myši 7 - Dozadu H Tlačí - Gigabyte M8600 | User Manual - Page 97
í, posuňte ji doleva, jak je zobrazeno. Baterie se okamžitě vysune. Režim s kabelem 1. Připojte malý konec kabelu USB k M8600. 2. Myš zapojte do USB portu na vašem počítači. M8600 je připravená pro použití jako myš s kabelem. Kromě toho se baterie začne v tomto režimu automaticky nabíjet - Gigabyte M8600 | User Manual - Page 98
ČESKY Způsob nabíjení • Existují tři různé způsoby nabíjení. Zapojte M8600 do nabíječky připojené k vašemu PC. V přední části myši se rozsvítí baterie plně dobitá, kontrolka LED na nabíječce se znovu rozsvítí červeně. Připojte M8600 k vašemu PC mini kabelem USB. Myš se začne nabíjet automaticky. 3 - Gigabyte M8600 | User Manual - Page 99
ČESKY Systém kontrolek LED M8600 má v přední části ukazatel profilu/baterie/citlivosti, který zobrazuje stav profilu/baterie/citlivosti/fázi. Ukazatel profilu Barva kontrolky myši je 5 různých barev kontrolek LED. Kontrolku LED lze na základě vašich preferencí vybrat pomocí softwaru GHOST Engine. 4 - Gigabyte M8600 | User Manual - Page 100
ČESKY Ukazatel baterie ZELENÁ kontrolka LED ukazuje zbývající životnost baterie. • 61 - 100% baterie: 3 zelené šipky LED • 31 - 60% baterie: 2 zelené šipky LED • 11 - 30% baterie: 1 zelená šipka LED • Méně než 10%: 3 blikající zelené kontrolky LED. Ukazatel citlivosti Kontrolka LED se při nastavov - Gigabyte M8600 | User Manual - Page 101
software, přiřaďte tlačítka a nastavte váš osobní profil. Zkontrolujte, že je vaše M8600 během úprav macro a přiřazování tlačítek prostřednictvím nástroje GHOST žim). Režim levá/pravá ruka Aivia M8600 je navržená jak pro leváky, tak pro praváky. V nástroji GHOST™ Engine stačí jednoduše přepnout režim - Gigabyte M8600 | User Manual - Page 102
udělat je přetáhnout funkční ikonu na tlačítko, kterému ji chcete přiřadit. Nezapomeňte, že každý skript můžete upravit v záložce „ÚPRAVA MACRO". Další tipy: • Přetáhnutím můžete prohodit přiřazení dvou tlačítek. • Přiřazení funkce můžete smazat přetáhnutím ikony funkce z označení tlačítka. Tlačítko - Gigabyte M8600 | User Manual - Page 103
ČESKY Úprava Macro Záložka Úprava makra vám umožňuje snadno zaznamenávat všechny příkazy, včetně přiřazeni a stisknutí tlačítek na myši. Každé jednotlivé makro může být rovněž importováno a exportová - Gigabyte M8600 | User Manual - Page 104
ČESKY Další informace: Nahrávání délky trvání nebo intervalů (čas) Je-li tato funkce zaškrtnuta, umožňuje vám nahrávat intervaly mezi dvěma příkazy. Cyklus výběru režimu • Provést jednou: Provést makro jednou. • Režim smyčky: Opětovné stisknutí pro zastavení: Nepřetržité používání makra, spuštěné - Gigabyte M8600 | User Manual - Page 105
í čtyři fáze citlivosti: 800, 1600, 3200 a 5600 DPI. Preferovanou citlivost můžete nastavit ve čtyřech fázích citlivosti a to s použitím nástroje GHOST, DPI můžete jednoduše nastavit přepnutím. Pro nastavení úrovně citlivosti X-Y stiskněte „nastavit osy X a Y odděleně". Zpráva: Tato funkce určuje - Gigabyte M8600 | User Manual - Page 106
ése F 6. egérgomb - Előre G 7. egérgomb - Vissza H 8. egérgomb - Profilváltás I 9. egérgomb - Vissza J Kábelrögzítő/kábelkiengedő gomb 1 K Pro-laser érzékelő L Töltőcsatlakozó M ID-csatlakozás gomb N Bekapcsoló gomb O Akkumulátorrögzítő/-kioldó gomb P Ultra-DurableTM teflon talp Q Csatlakozás gomb - Gigabyte M8600 | User Manual - Page 107
án látható módon. A régi akkumulátor ekkor magától kiugrik. Vezetékes üzemmód 1. Csatlakoztassa a mini USB-kábel végét az M8600-ashoz. 2. Dugja be az egeret a számítógép USB portjába. Az M8600-as ezután már vezetékes használatra készen áll. Emellett az egér akkumulátora automatikusan elkezd töltődni - Gigabyte M8600 | User Manual - Page 108
• Az egeret háromféle módon lehet feltölteni. Helyezze az M8600-as egeret a számítógéphez csatlakoztatott töltőállomásra. Az eg töltőállomáson lévő LED ismét pirosra vált. Csatlakoztassa a számítógéphez az M8600-as egeret a mini USB-kábellel vezetékes üzemmódban. Az egér ekkor automatikusan elkezd töltődni - Gigabyte M8600 | User Manual - Page 109
LED-es jelzőrendszer Az M8600-as el van látva profil-/akkumulátor-/érzékenységjelző LED-ekkel, melyek az aktuális profilról/ profil van kiválasztva. Ötféle profil közül lehet választani, amit öt különböző színnel jelez a LED. A LED színét a GHOST Engine szoftverben lehet beállítani. 4 M A G YA R - Gigabyte M8600 | User Manual - Page 110
Akkumulátorjelző A zöld LED-ek jelzik az akkumulátor telepszintjét. • 61 - 100%: os telepszint: 3 zöld nyíl LED • 31 - 60%: os telepszint: 2 zöld nyíl LED • 11 - 30%: os telepszint: 1 zöld nyíl LED • Kevesebb, mint 10%-os telepszint: a 3 zöld nyíl LED villog Érzékenységi szint jelző A világító LED- - Gigabyte M8600 | User Manual - Page 111
GHOSTTM Macro Engine A GHOSTTM Macro Engine a Windows 98, Windows 2000, Windows XP és Windows 7 operációs rendszert játékos/energiatakarékos üzemmód közti váltásra van mód). Balkezes/jobbkezes üzemmód Az Aivia M8600-as egeret bal- és jobbkezesek egyaránt használhatják. Az üzemmódok között a GHOSTTM - Gigabyte M8600 | User Manual - Page 112
Gombkiosztás Lehetőség van a gombok funkcióinak megváltoztatására. A gombokhoz alapvető funkciókat és makrókat egyaránt hozzá lehet rendelni. Önnek mindössze annyit kell tennie, hogy megfogja a kívánt funkció ikonját, és ráhúzza azt a hozzárendelni kívánt gombra. Ne feledje, hogy a makrók módosításá - Gigabyte M8600 | User Manual - Page 113
Makrószerkesztés A makrószerkesztés lapon könnyedén rögzítheti az összes parancsot, ideértve a billentyűparancsokat vagy az egérkattintásokat is. Ezenkívül lehetőség van a makrók importálására és exportálására is. A makrók beállításának menete: 1. lépés Kattintson az „Időtartam vagy intervallum rögz - Gigabyte M8600 | User Manual - Page 114
Tudjon meg többet: Időtartam vagy intervallum rögzítése (Lag) Ha ez a funkció ki van választva, akkor a program rögzíti a parancsok között eltelt időt is. Váltás a különböző akciómódok között • Végrehajtás egyszer: A makró csak egyszer kerül végrehajtásra. • Ismétlés mód: Leállás ismételt megnyomá - Gigabyte M8600 | User Manual - Page 115
négy érzékenységi szint van: 800, 1600, 3200 és 5600 DPI. Ezenkívül azonban lehetőség van a négy érzékenységi szint értékének módosítására a is a GHOST Engine szoftver segítségével. Az értékek beállítása után egyetlen gombnyomással lehet váltani a különböző DPI-szintek között. Az X-Y érzékenységi - Gigabyte M8600 | User Manual - Page 116
Przedstawienie myszy Standardowe przypisanie przycisków A Przycisk 1 - Lewe kliknięcie B Przycisk 2 - Prawe kliknięcie C Przycisk 3 - Środkowe kliknięcie i przewijanie w 4 kierunkach D Przycisk 4 - Zwiększanie DPI E Przycisk 5 - Zmniejszanie DPI F Przycisk 6 - Do przodu G Przycisk 7 -Cofnij H - Gigabyte M8600 | User Manual - Page 117
w lewo, tak, jak na rysunku. Bateria natychmiast wyskoczy. Tryb przewodowy 1. Podłącz kabel końcówką mini USB do M8600. 2. Podłącz myszkę do portu USB w komputerze. M8600 jest gotowa do użycia jako mysz przewodowa. Dodatkowo, po podłączeniu bateria automatycznie zacznie się ładować. 3. Aby odłączy - Gigabyte M8600 | User Manual - Page 118
Sposób ładowania • Poniżej są wymienione trzy różne sposoby ładowania myszy. Umieść M8600 na stacji dokującej podłączonej do komputera. Z przodu myszki zapali się zielona dioda sygnalizująca proces ładowania. Włóż baterię do gniazda baterii w stacji dokującej. - Gigabyte M8600 | User Manual - Page 119
parametrów. Wskaźnik profilu Ledowy wskaźnik zmieni kolor wraz ze zmianą profilu. 5 różnych kolorów reprezentuje 5 odmiennych profili, pomiędzy którymi można wybierać w M8600. Kolory można ustawić zgodnie z własnymi preferencjami korzystając z oprogramowania - Gigabyte M8600 | User Manual - Page 120
Wskaźnik baterii Zielone diody LED pokazują stan naładowania baterii: • 61 - 100% baterii: 3 zielone diody w kształcie strzałki • 31 - 60% baterii: 2 zielone diody w kształcie strzałki • 11 - 30% baterii: 1 zielona dioda w kształcie strzałki • Poniżej 10% baterii: 3 zielone migające diody w kształ - Gigabyte M8600 | User Manual - Page 121
ręczny i wybierać pomiędzy trybem oszczędzania energii i do grania.) Tryb lewo/prawo ręczny Aivia M8600 została zaprojektowana zarówno dla użytkowników leworęcznych, jak i praworęcznych. W edytorze makr GHOST™ można przełączać pomiędzy trybem leworęcznym i praworęcznym. Definicje przycisków zamieni - Gigabyte M8600 | User Manual - Page 122
". Wystarczy przeciągnąć ikonę funkcji do wybranego przycisku i tam upuścić. Pamiętaj o możliwości tworzenia makr w zakładce edytora makr - „MACRO EDITING". Więcej wskazówek: • Funkcje przypisane dwóm przyciskom można zamieniać przeciągając jedną ikonę na drugą. • Przypisanie przycisku można skasowa - Gigabyte M8600 | User Manual - Page 123
ę swojego makra, w tym celu kliknij „change icon". Krok8 Wróć do zakładki przypisania przycisków - „Button Assign", makro, które zostało stworzone będzie jednym z dostępnych w „Macro scrip". 8 POLSKI - Gigabyte M8600 | User Manual - Page 124
Więcej szczegółów: Record the duration or intervals - Zapisz przerwy czasowe (opóźnienia) Funkcja ta pozwala zapisać opóźnienia czasowe pomiędzy komendami. Cycle through selection of action mode • Execute once - wykonaj raz: Wykonuje makro raz. • Loop mode - pętla: Ponowne naciśniecie, by wyłączyć: - Gigabyte M8600 | User Manual - Page 125
Export Eksportuje makro do komputera. Import Importuje makro do edytora makr GHOST. Re-edit the macro Przeciągnięcie zapisanego makra z powrotem do edytora pozwala na wprowadzenie zmian w tym makrze. Sensitivity - Czułość Sensitivity - Czułość: Jako ustawienie domyślne, są cztery warianty czułoś
-
 1
1 -
 2
2 -
 3
3 -
 4
4 -
 5
5 -
 6
6 -
 7
7 -
8
-
9
-
10
-
11
-
12
-
13
-
14
-
15
-
16
-
17
-
18
-
19
-
20
-
21
-
22
-
23
-
24
-
25
-
26
-
27
-
28
-
29
-
30
-
31
-
32
-
33
-
34
-
35
-
36
-
37
-
38
-
39
-
40
-
41
-
42
-
43
-
44
-
45
-
46
-
47
-
48
-
49
-
50
-
51
-
52
-
53
-
54
-
55
-
56
-
57
-
58
-
59
-
60
-
61
-
62
-
63
-
64
-
65
-
66
-
67
-
68
-
69
-
70
-
71
-
72
-
73
-
74
-
75
-
76
-
77
-
78
-
79
-
80
-
81
-
82
-
83
-
84
-
85
-
86
-
87
-
88
-
89
-
90
-
91
-
92
-
93
-
94
-
95
-
96
-
97
-
98
-
99
-
100
-
101
-
102
-
103
-
104
-
105
-
106
-
107
-
108
-
109
-
110
-
111
-
112
-
113
-
114
-
115
-
116
-
117
-
118
-
119
-
120
-
121
-
122
-
123
-
124
-
125
 |
 |
ENGLISH