Gigabyte P2532N Manual
Gigabyte P2532N Manual
 |
View all Gigabyte P2532N manuals
Add to My Manuals
Save this manual to your list of manuals |
Gigabyte P2532N manual content summary:
- Gigabyte P2532N | Manual - Page 1
- Gigabyte P2532N | Manual - Page 2
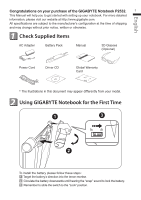
or otherwise. 1 Check Supplied Items AC Adapter Battery Pack Manual 3D Glasses (Optional) Power Cord Driver CD Global Warranty Card * The illustrations in this document may appear differently from your model. 2 Using GIGABYTE Notebook for the First Time 1 3 2 To install the battery - Gigabyte P2532N | Manual - Page 3
cord to the power outlet. Switching on the Power After you turn on the P2532 for the very first time, do not turn it off until the operating audio will not function until Windows Setup has completed. Booting Up the P2532 for the First Time Depending on your configuration, the Microsoft Windows Boot - Gigabyte P2532N | Manual - Page 4
English 3 Your GIGABYTE Notebook Tour 3 Top View 12 1 Webcam 2 Microphone 3 Power Button 4 Smart+ Button 11 5 Volume Setting or Push "Smart+" to enter "smart setup" menu in off mode. You can choose BIOS Setup Utility system recovery in the setup menu. Smart Manager- In Windows Mode Press - Gigabyte P2532N | Manual - Page 5
4 Right View 3 1 2 7 4 56 1 Microphone Jack 2 Headphone Jack 3 USB Port x 2 4 Multi Card Reader 5 HDMI Port 6 Ethernet Port 7 Kensington Lock Slot Supports Secure Digital (SD), Multi Media Card (MMC), Memory Stick (MS), Memory Stick PRO (MS PRO). Base View 1 4 3 1 Battery Bay 2 Woofer - Gigabyte P2532N | Manual - Page 6
: Flashing red indicates less than two hours of charge remaining. After connecting the charged glasses. (Light is amber when charging) Keyboard The P2532 features a Windows Compatible Keyboard. The set language of the keyboard will depend on the region. This section is for the English Qwerty - Gigabyte P2532N | Manual - Page 7
6 English Hotkeys The computer employs hotkeys or key combinations to access most of the computer's controls like screen brightness and volume output. To activate hotkeys, press and hold the key before pressing the other key in the hotkey combination. Hotkey Fn+F1 Fn+F2 Fn+F3 Fn+F4 Fn+F5 Fn+ - Gigabyte P2532N | Manual - Page 8
English 4 Accessing the NVIDIA Control Panel 7 (Optional, for 3D Model Use Only) To open the NVIDIA Control Panel, right click on the desktop and select the NVIDIA Control Panel. Enable Stereoscopic 3D To enable stereoscopic 3D mode, check the box. - Gigabyte P2532N | Manual - Page 9
English 8 Adjusting the Depth The depth amount in a game is the depth that the farthest object is placed in a scene. When NVIDIA® 3D Vision™ is first installed on your system, the Depth is set at the default of 15%. You can also change the depth amount by adjusting - or + button. Any adjustments - Gigabyte P2532N | Manual - Page 10
Manager interface, icons, utilities and software versions may vary based on the purchased models. Please operate GIGABYTE Smart Manager according to the actual version built-in. ● GIGABYTE Smart Switch: GIGABYTE Smart Switch allows users to switch Windows® 7 system to either 64-bit or 32-bit. The - Gigabyte P2532N | Manual - Page 11
Advanced Option"). (See figure icon) 4. Press "Exit" to quit from Smart Recovery. ● GIGABYTE Smart Setup: During the off mode, press SMART button to enter "Smart Setup" menu. You can choose BIOS Setup Utility, System Recovery, and other functions in this setup menu. Press"Continue to OS - Gigabyte P2532N | Manual - Page 12
Chipset Video Graphics ● Intel® HD Graphics 3000 ● NVIDIA® GeForce® GT550M 2GB Supports NVIDIA® Optimus Technology ● NVIDIA® GeForce® GT550M 2GB Supports NVIDIA® 3D Vision™ Hard Disk Drive 2.5" 9.5mm SATA HDD 7200rpm (Supports capacities of 500/750 GB) Optical Disk Drive Slim-Body DVD- Super - Gigabyte P2532N | Manual - Page 13
English 7 12 Appendix ■ Warranty & Service For Warranty, Service and related information, please refer to the warranty card or GIGABYTE service website as the following link: http://www.gigabyte.com/support-downloads/technical-support.aspx ■ FAQ For FAQ (Frequent Asked Questions), please refer - Gigabyte P2532N | Manual - Page 14
-
 1
1 -
 2
2 -
 3
3 -
 4
4 -
 5
5 -
 6
6 -
 7
7 -
8
-
9
-
10
-
11
-
12
-
13
-
14
 |
 |