Graco 1A05ABB Owners Manual
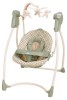
Graco 1A05ABB - Lovin' Hug Open Top Swing Manual
 |
UPC - 047406096756
View all Graco 1A05ABB manuals
Add to My Manuals
Save this manual to your list of manuals |
Graco 1A05ABB manual content summary:
- Graco 1A05ABB | Owners Manual - Page 1
Lovin' Hug TM www.gracobaby.com OWNER'S MANUAL MANUEL D'UTILISATEUR MANUAL DEL PROPIETARIO ©2011 Graco PD161994B 03/11 - Graco 1A05ABB | Owners Manual - Page 2
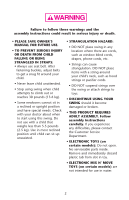
USING YOUR SWING should it become damaged or broken. • THIS PRODUCT REQUIRES ADULT ASSEMBLY. Follow assembly instructions carefully. If you experience any difficulties, please contact the Customer Service Department. • ELECTRONIC TOYS (on certain models): Do not open. No serviceable parts inside - Graco 1A05ABB | Owners Manual - Page 3
kg). • CE PRODUIT EXIGE ASSEMBLAGE PAR UN ADULTE. Suivre soigneusement les instructions d'assemblage. • Il y a des nouveau-nés qui ne Si vous du position inclinée ou assise et ont des besoins spéciaux. Vérifiez service à la clientèle. avec votre docteur pour savoir • LES JOUETS ÉLECTRONIQUES - Graco 1A05ABB | Owners Manual - Page 4
Si no se cumplen estas advertencias y se siguen las instrucciones de armado, podría resultar en lesiones graves o la muerte. • POR FAVOR, CONSERVE EL MANUAL DEL PROPIETARIO PARA UTILIZARLO EN EL FUTURO. • PARA EVITAR LESIONES GRAVES O LA MUERTE DEBIDO A LA CAÍDA DEL NIÑO O LA ESTRANGULACIÓN CON LAS - Graco 1A05ABB | Owners Manual - Page 5
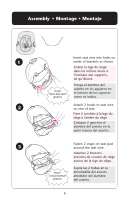
al parts are missing, communiquez avec notre Departamento de call Customer service à la clientèle. Servicio al Cliente. Service. Tools required: Outils nécessaires: Screwdriver Tournevis Herramientas necesarias: Destornillador ALL MODELS • TOUS MODÈLES • TODOS MODELOS 2X 42X 42X 42X - Graco 1A05ABB | Owners Manual - Page 6
du siège dans les orifices situés à l'intérieur des supports, tel qu'illustré. SNAP! ENCLENCHEZ! ¡RUIDO! Ponga el alambre del asiento en los agujeros en el interior de los soportes como se indica. F Attach 2 hooks to seat wire on rear of seat. Fixer 2 crochets à la tige du siège à l'arrière du - Graco 1A05ABB | Owners Manual - Page 7
H Snap 2 straps on lower edge of seat pad around the seat wire. Attacher 2 courroies situées sur le rebord inférieur du into brackets on each side as shown. Insérer les accoudoirs dans les supports de chaque côté, tel qu'illustré. Ponga los brazos en los soportes en cada costado como se indica. - Graco 1A05ABB | Owners Manual - Page 8
J Snap rear tube onto the curved part of the hanger tubes. Tube ends should snap into holes on curved part of hanger tubes. Enclencher le tube arrière sur la portion incurvée des tubes de suspension. Les extrémités du tube doivent s'enclencher dans les orifices situés sur la partie incurvée des - Graco 1A05ABB | Owners Manual - Page 9
de fixer le plateau. Apriete la manija de reclinación del asiento y baje el asiento antes de L instalar la bandeja. Line up tray on edge of seat and insert peg into hole and close tray. SNAP! ENCLENCHEZ! ¡RUIDO! Aligner le plateau avec le rebord du siège, insérer la cheville dans - Graco 1A05ABB | Owners Manual - Page 10
Attaching Rear Legs • Installation des pattes arrière • Colocación de las patas traseras 1E2N 2X SNAP! ENCLENCHEZ! ¡RUIDO! Rear leg Patte arrière Pata trasera One button Seul bouton Solo botón 1E3E SNAP! ENCLENCHEZ! ¡RUIDO! Insert rear legs into holes in housings as shown. Button MUST snap - Graco 1A05ABB | Owners Manual - Page 11
través del agujero. Los botones dobles deben caber en los canales en el interior del armazón de las pilas. Le bouton DOIT s'enclencher dans l'orifice. Swing the leg outward until the single button snaps into its notch. CHECK that the leg is properly attached by twisting them in the housings. Faire - Graco 1A05ABB | Owners Manual - Page 12
1E5G SNAP! ENCLENCHEZ! ¡RUIDO! Front leg Patte avant Pata delantero REPEAT step 12 with other housing and leg. Button MUST snap through hole. RÉPÉTER l'étape 12 avec l'autre boîtier et patte. Le bouton DOIT s'enclencher dans l'orifice REPITA l paso 12 con la otra pata y armazón. El botón DEBE - Graco 1A05ABB | Owners Manual - Page 13
Front tube • Tube avant • Tubo delantero Front tube Tube avant 2X 2X Tubo delantero 1E3H Place feet with the Installer les pieds text "FRONT portant l'inscription « BOTTOM" onto the FRONT BOTTOM » sur front tube as shown. le tube avant, tel The text "FRONT qu'illustré. Le texte « BOTTOM" - Graco 1A05ABB | Owners Manual - Page 14
EJ SNAP! ENCLENCHEZ! ¡RUIDO! Front base tube Tube de la base avant Tubo de la base delantera CHECK that all tubes are securely attached. CHECK that the parts of the frame are assembled in the positions shown. S'ASSURER que tous les tubes sont bien fixés. S'ASSURER que toutes les pièces de l' - Graco 1A05ABB | Owners Manual - Page 15
Rear tube • Tube arrière • Tubo trasero Rear tube Tube arrière EK Tubo trasero Motor housing Boîtier du moteur Armazón del motor SNAP! ENCLENCHEZ! ¡RUIDO! Rear base tube Tube de la base arrière Tubo de la base trasera CHECK that all tubes are securely attached. CHECK that the parts of the - Graco 1A05ABB | Owners Manual - Page 16
of housing. NOTE: You may need to start one hanger tube into swing mount while inserting the other. CHECK that hanger tubes are secure in brackets by pulling firmly on them. Enclencher les tubes de suspension dans les supports situés de chaque côté du boîtier. REMARQUE : Il peut être né - Graco 1A05ABB | Owners Manual - Page 17
To Secure Child • Attacher l'enfant • Para asegurar al niño WARNING Falling Hazard: Always use the seat belt. MISE EN GARDE Danger de chute: Toujours utiliser la ceinture du siège. ADVERTENCIA Peligro de caida: Use siempre el cinturón de seguridad. EM - Graco 1A05ABB | Owners Manual - Page 18
FF When changing harness strap slots, MAKE SURE harness straps are going through same slots in seat pad. Lorsque vous changez les fentes du passage de la courroie, ASSUREZ-VOUS que la courroie du harnais passe à travers la même fente dans le - Graco 1A05ABB | Owners Manual - Page 19
(4 posiciones) Use the most reclined position for newborn and young babies. Use the more upright position for older, more active infants. niños más grandes y más activos. FH To recline, squeeze handle at top of seat. Pour incliner, serrer la poignée au sommet du siège. Para reclinarlo, apriete - Graco 1A05ABB | Owners Manual - Page 20
• Instalación de las pilas (no se incluyen) FJ +- With baby out of swing, open the battery compartment lid by inserting a screwdriver into the coin -1.5V) cell batteries. CHECK that the batteries are put in correctly. Your swing will not run if the batteries are put in backwards. Lorsque le bébé - Graco 1A05ABB | Owners Manual - Page 21
For Safe Battery Use Keep the batteries out of children's reach. Any battery may leak battery acid if mixed with a different battery type, if inserted incorrectly (put in backwards) or if all batteries are not replaced or recharged at the same time. Do not mix old and new batteries. Do not mix - Graco 1A05ABB | Owners Manual - Page 22
installation. This equipment generates, uses and can radiate radio frequency energy and, if not installed and used in accordance with the instructions, may cause harmful interference to radio communications. However, there is no guarantee that interference will not occur in a particular installation - Graco 1A05ABB | Owners Manual - Page 23
Pour un usage sécuritaire des piles Gardez les piles hors de la portée des enfants. Une pile peut avoir une fuite d'électrolyte si mélangée avec un type de pile différent, si elle est insérée incorrectement (insérée du mauvais côté) ou si toutes les piles ne sont pas remplacées ou rechargées en même - Graco 1A05ABB | Owners Manual - Page 24
résidentielle. Cet équipement produit, utilise peut émettre des émissions radioélectriques et si il n'est pas installé et utilisé selon les instructions, peut causer de l'interférence nocive aux radiocommunications. Cependant, il n'y a aucune garantie que l'interférence ne se produira pas lors d'une - Graco 1A05ABB | Owners Manual - Page 25
Para el uso seguro de las pilas Mantenga las pilas fuera del alcance de los niños. Cualquier pila puede sufrir una fuga de electrolito si se combina con otro tipo de pila, si se coloca incorrectamente (al revés) o si todas las pilas no se remplazan o recargan al mismo tiempo. No mezcle pilas viejas - Graco 1A05ABB | Owners Manual - Page 26
ADVERTENCIA Los cambios o modificaciones a esta unidad que no hayan sido expresamente aprobados por la parte responsable por el cumplimiento de las normas podría cancelar el derecho del usuario a usar el equipo. NOTA: Este equipo ha sido probado y se ha determinado que cumple con los límites de un - Graco 1A05ABB | Owners Manual - Page 27
a setting. Change setting if needed. A small, quiet baby will swing higher on each setting than a larger, more active baby. Your seat may be stopped at any time the motor is running without damaging the motor. Push swing to restart. If your swing motor stops operating by itself, a protective device - Graco 1A05ABB | Owners Manual - Page 28
MISE EN GARDE Afin d'éviter que l'enfant ne se blesse gravement en tombant ou en glissant hors du siège : toujours se servir de la ceinture de sécurité. Après avoir attaché les boucles, régler les ceintures pour qu'elles s'ajustent parfaitement au corps de l'enfant. MISE EN MARCHE DE LA BALANÇOIRE : - Graco 1A05ABB | Owners Manual - Page 29
, it automatically starts with the last speed setting that 5 3 was selected before the swing was turned off. 4 VITESSE - Appuyer sur le bouton « On/Off » ou ON/OFF POWER - Press to turn ON and turn OFF. Press button to stop swing motion. MISE EN MARCHE « ON/OFF » - Appuyer sur le bouton « ON - Graco 1A05ABB | Owners Manual - Page 30
MUSIC/NATURE OFF - Press button to turn OFF. ARRÊT MUSIQUE/BRUITS DE LA NATURE Appuyer sur ce bouton pour éteindre. APAGADO DE LA MÚSICA/NATURALEZA - Oprima el botón para APAGARLA. VOLUME- Press the plus (+) to raise the volume and the minus (-) to lower the volume. There are 5 volume settings. - Graco 1A05ABB | Owners Manual - Page 31
the music/nature off button is pushed. When using the timer with the swing on, if the button is pushed once, the red speed light will flash on, the timer will set to 10, 20 or 30 minutes as described for the swing, but there will be no flashing light. MINUTERIE - Appuyer sur le poussoir « minuterie - Graco 1A05ABB | Owners Manual - Page 32
For Storage • Pour l'entreposage • Para guardarlo FL Push buttons to fold. Se replie en appuyant sur les boutons. Empuje los botones para plegarlo. FM 32 - Graco 1A05ABB | Owners Manual - Page 33
modelos This model may Il est possible que not include some ce modèle ne comprenne features. pas certaines caractéristiques. Este modelo podría no incluir algunas de las características. Head support • Appui-tête • Apoyacabeza OR OU O GN Only use this head support on this swing. Never use - Graco 1A05ABB | Owners Manual - Page 34
Assembling Mobile • Montage du mobile • Armado del móvil 3X Styles may vary Les modèles peuvent varier Los estilos pueden variar GE GF 34 - Graco 1A05ABB | Owners Manual - Page 35
GG SNAP! ENCLENCHEZ! ¡RUIDO! GH GI GJ 35 - Graco 1A05ABB | Owners Manual - Page 36
Problem Solving SWING WON'T OPERATE: 1. No batteries in swing. 2. Batteries dead. 3. Speed setting too low. 4. Batteries in or steel wool if corrosion is severe. 6. Baby leaning too far forward. 7. Baby grabbing swing legs. (Discontinue use.) 8. Seat not pushed high enough for a good start. - Graco 1A05ABB | Owners Manual - Page 37
Solutions aux problèmes LA BALANÇOIRE NE DÉMARRE PAS: 1. Aucune piles dans la balançoire. 2. Piles épuisées. 3. Vitesse trop lente. 4. Piles installées à l'envers - vérifiez "+" et "-". 5. Corrosion sur les bornes à pile. Tourner les piles contre les bornes, ou nettoyez les bornes avec un papier de - Graco 1A05ABB | Owners Manual - Page 38
Resolución de problemas EL COLUMPIO NO FUNCIONA: 1. El columpio no tiene pilas. 2. Las pilas están gastadas. 3. El valor de la velocidad está demasiado bajo. 4. Las pilas están puestas al revés, verifique los polos positivos y negativos. 5. Los terminales de la pila están herrumbrados. Gire las - Graco 1A05ABB | Owners Manual - Page 39
'N Move® (se vende por separado) GK Styles may vary Les modèles peuvent varier Los estilos pueden variar GL USA To find out more about Graco's Mix 'N Move toys, visit our website at www.gracobaby.com or call 1-800-345-4109. Canada Pour en savoir plus au sujet des jouets Mix - Graco 1A05ABB | Owners Manual - Page 40
Care and Maintenance • FROM TIME TO TIME CHECK YOUR SWING for loose screws, worn parts, torn material or stitching. Replace or repair the parts as needed. Use only Graco replacement parts. • REMOVABLE CLOTH SEAT COVER may be machine washed in cold water on delicate cycle and drip-dried. NO BLEACH. • - Graco 1A05ABB | Owners Manual - Page 41
Notes • Notas 41 - Graco 1A05ABB | Owners Manual - Page 42
Notes • Notas 42 - Graco 1A05ABB | Owners Manual - Page 43
Notes • Notas 43 - Graco 1A05ABB | Owners Manual - Page 44
fournie avec le produit. Pour le moment nous n'acceptons pas d'inscriptions de produits des résidents hors des États-Unis. Para registrar su producto Graco desde dentro de los EE.UU., visítenos en línea en www.gracobaby.com/productregistration o envíe la tarjeta de registro provista con su producto
-
 1
1 -
 2
2 -
 3
3 -
 4
4 -
 5
5 -
 6
6 -
 7
7 -
8
-
9
-
10
-
11
-
12
-
13
-
14
-
15
-
16
-
17
-
18
-
19
-
20
-
21
-
22
-
23
-
24
-
25
-
26
-
27
-
28
-
29
-
30
-
31
-
32
-
33
-
34
-
35
-
36
-
37
-
38
-
39
-
40
-
41
-
42
-
43
-
44
 |
 |

TM
Lovin' Hug
www.gracobaby.com
OWNER'S MANUAL
MANUEL D'UTILISATEUR
MANUAL DEL PROPIETARIO
©2011 Graco
PD161994B
03/11