Graco 2M13 Instruction Manual
Graco 2M13 - Digital Imonitor Mini Baby Monitor Manual
 |
UPC - 047406089130
View all Graco 2M13 manuals
Add to My Manuals
Save this manual to your list of manuals |
Graco 2M13 manual content summary:
- Graco 2M13 | Instruction Manual - Page 1
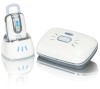
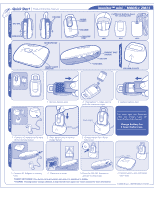
Instruction Manual ON/OFF VOLUME vibe VIBRATION MICROPHONE NIGHT LIGHT BUTTON R SOUND LIGHTS imonitor™ mini MODEL# 2M13 3 different battery 3.7V Docking Station 1 Remove battery door. 2 Plug battery in. Make sure to push the connector tight. 3 Replace battery door. Dock Light The dock - Graco 2M13 | Instruction Manual - Page 2
Appareil pour adulte Quick Start Manuel de directives de production MARCHE /ARRÊT vibe VIBRATION VOLUME MICROPHONE BOUTON DE VEILLEUSE R imonitor™ mini MODÈLE# 2M13 SIGNAL SONORE ET LUMINEUX 3 différents couvercles de compartiment à pile pour le module portable. HAUT-PARLEUR PRISE DE - Graco 2M13 | Instruction Manual - Page 3
Unidad para padres Quick Start Manual de instrucciones para la producción ENCENDIDO /APAGADO VOLUMEN LUCES DEL SONIDO imonitor™ mini MODELO# 2M13 3 puertas diferentes para las pilas en la unidad de transporte. vibe VIBRACIÓN MICRÓFONO BOTÓN DE LA LUZ NOCTURNA R PARLANTE PUERTO DEL CARGADOR - Graco 2M13 | Instruction Manual - Page 4
imonitor™ mini www.gracobaby.com Owner's Manual Keep Instructions For Future Reference ©2008 Graco ISPM027BA 3/08 - Graco 2M13 | Instruction Manual - Page 5
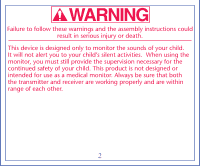
Failure to follow these warnings and the assembly instructions could result in serious injury or death. This device is designed only to monitor the sounds of your child. It will not alert you to your child's silent activities. When using the monitor, you must still provide the supervision necessary - Graco 2M13 | Instruction Manual - Page 6
• STRANGULATION HAZARD. such as a blanket. Do not place Keep the AC adapter cords out them in a drawer or in any of the reach of children. Do not location which would muffle use with extension cords. the sound or interfere with the • DO NOT place the Nursery normal flow of air. Units or their - Graco 2M13 | Instruction Manual - Page 7
exposed to liquids. • The units have been dropped or are damaged. • DO NOT OPEN THE NURSERY UNITS, PARENT UNITS, DOCKING STATIONS OR ADAPTERS. No user-serviceable parts inside. Risk of electrical shock, fire or death. 4 - Graco 2M13 | Instruction Manual - Page 8
or more of the following measures: • Reorient or relocate the receiving antenna. • Increase the separation between the equipment and receiver. used in accordance with the instructions, may cause harmful 5 - Graco 2M13 | Instruction Manual - Page 9
• Connect the equipment into an outlet on a circuit different from that to which the receiver is connected. • Consult the dealer or an experienced radio/TV technician for help. This device complies with part 15 of the FCC Rules. Operation is subject to the following two conditions: (1) This device - Graco 2M13 | Instruction Manual - Page 10
Parent Unit Overview ON/OFF VOLUME vibe VIBRATION SOUND LIGHTS VIBE LINK SPEAKER CHARGER PORT 7 SPEAKER/LIGHTS - Graco 2M13 | Instruction Manual - Page 11
Nursery Unit Overview MICROPHONE NIGHT LIGHT BUTTON ch 8 pf PARENT UNIT FINDER ON/OFF CHANNEL - Graco 2M13 | Instruction Manual - Page 12
Battery Door Options 1 ARM BELT NECK Select one of 3 battery doors according to your preference in carrying the parent unit. You can carry the parent unit around your arm, belt, or neck. All 3 choices can be used on the parent unit. 9 - Graco 2M13 | Instruction Manual - Page 13
Remove battery door. 2 GSP523040 600mAh 3.7V GSP523040 600mAh 3.7V Replace battery door with 3 one of the 2 other door selections. 10 - Graco 2M13 | Instruction Manual - Page 14
Installing Battery Remove battery door. 4 Plug battery in. Make sure to 5 push the connector tight. 11 - Graco 2M13 | Instruction Manual - Page 15
Re-attach battery door. 6 GSP523040 600mAh 3.7V Battery installation is 7 complete. 12 - Graco 2M13 | Instruction Manual - Page 16
Docking Station 8 Connect AC adapter to the back of the docking station. 9 13 - Graco 2M13 | Instruction Manual - Page 17
. The dock light will illuminate while unit charges. Light will turn off when fully charged. Charge battery for 5 hours before use. To use while charging, press the power 11 button to activate unit. Make sure unit charges for 5 hours before removing from - Graco 2M13 | Instruction Manual - Page 18
12 vibe Activating Vibration Press "Vibe" button briefly to vibe activate vibration feature. To turn off vibration, press button again. "Vibe" Icon will appear when vibration is on. 15 - Graco 2M13 | Instruction Manual - Page 19
To adjust vibration 13 vibe NOTE: Vibration will automatically shut off when parent unit is in dock. vibe To adjust the level at which the vibration alert is activated, press and hold the "Vibe" button on the side of the parent unit. The sound lights will illuminate to show the vibration alert - Graco 2M13 | Instruction Manual - Page 20
Volume Press + or - buttons to change 14 the volume level. Auto Dimming Sound Lights Sound lights will automatically dim in 15 dark room. 17 - Graco 2M13 | Instruction Manual - Page 21
Nursery Unit The front of the unit has the 16 Graco logo. Place unit in the room with the 17 baby. NEVER place the nursery unit within the baby's reach. pf ch 18 - Graco 2M13 | Instruction Manual - Page 22
184 pf ch Connect AC adapter to nursery unit and plug into wall. Use AC adapter for normal power usage - batteries intended for power outage. 19 pf ch Press the ON/OFF button to activate. 19 - Graco 2M13 | Instruction Manual - Page 23
20 VIBE LINK LIGHTS Parent/nursery units will locate each other. Green "LINK" icon indicates that you are connected to nursery unit. SPEAKER Optional Battery Back-up 21 CHA Unfasten both screws on the back of the Nursery Unit as shown. 20 - Graco 2M13 | Instruction Manual - Page 24
22 Remove Battery Cover. 23 You will need 3 AAA (LR03) batteries (Not included). 21 - Graco 2M13 | Instruction Manual - Page 25
24 Insert batteries as shown. 25 Replace battery lid and fasten both screws. 22 - Graco 2M13 | Instruction Manual - Page 26
Changing Channels 26 pf ch If you experience some interference, press the "Ch" button to change channels. The parent unit will automatically scan all available channels and lock on to the nursery unit. Press the "Ch" button until a working channel is found. Parent Finder Press button to locate - Graco 2M13 | Instruction Manual - Page 27
Night Light 28 To use night light: 1. Press once to turn on. 2. Press again to make the night light brighter. 3. Press again to turn off. 24 - Graco 2M13 | Instruction Manual - Page 28
Trouble Shooting DO NOT ATTEMPT to modify the unit. Any modifications to the transmitter and/or receiver can void the operator's authority to operate the equipment. Most problems have a simple solution. First, check that: • Power is turned ON for both units • Both units are plugged in (or batteries - Graco 2M13 | Instruction Manual - Page 29
Weak Sound • Nursery Unit too far from baby - move closer. • Large objects blocking the signal - try repositioning Nursery Unit. • Volume setting too low - turn it up. Static • Interference from other electrical equipment - eliminate - Graco 2M13 | Instruction Manual - Page 30
Pairing Parent Unit and Child Unit. To ensure privacy, your Parent Unit is paired with your Nursery Unit at the factory. Your Parent Unit will not work with any other Nursery Unit. If Parent Unit won't lock onto the Nursery Unit, or you purchased a new Nursery Unit, follow the procedure below to - Graco 2M13 | Instruction Manual - Page 31
2. Pair the Parent Unit with Nursery. •Turn OFF Nursery Unit and turn ON again. •Place Nursery Unit in the same room, five (5) feet (1.5 meters) away from the Parent Unit. •Turn on Nursery Unit using the On/Off Button on the side. The green power light should come on. •Within a few seconds, the - Graco 2M13 | Instruction Manual - Page 32
Notes 29 - Graco 2M13 | Instruction Manual - Page 33
Notes 30 - Graco 2M13 | Instruction Manual - Page 34
Product Registration (USA) To register your Graco product from within the U.S.A. visit us online at www.gracobaby.com/productregistration. We currently do not accept product registrations from those living outside the United States of America. 31 - Graco 2M13 | Instruction Manual - Page 35
Replacement Parts Warranty Information (USA) To purchase parts or accessories or for warranty information in the United States, please contact us at the following: www.gracobaby.com OR 1-800-345-4109 Graco Children's Products 150 Oaklands Blvd. Exton, PA 19341 32 - Graco 2M13 | Instruction Manual - Page 36
imonitor™ mini www.gracobaby.com MANUAL DE DUEÑO Guarde las instrucciones para uso futuro. ©2008 Graco ISPM027BA 3/08 - Graco 2M13 | Instruction Manual - Page 37
sido diseñado solamente para monitorizar los sonidos de su niño. No le enviará alertas sobre las actividades silenciosas de su niño. Cuando usa el monitor, todavía debe proporcionar la supervisión necesaria para la continua seguridad de su niño. Este producto no ha sido diseñado ni debe usarse como - Graco 2M13 | Instruction Manual - Page 38
• PELIGRO DE apretados por muebles u otros ESTRANGULACIÓN. Mantenga artículos. los cordones del adaptador de • Permita una adecuada corriente alternada lejos del ventilación cuando usa las alcance de los niños. No lo use unidades. No tape las unidades con cordones de extensión. del - Graco 2M13 | Instruction Manual - Page 39
• NO ponga las unidades cerca • Las unidades se han caído o del agua o humedad. No use han resultado dañadas. las unidades a la intemperie. • NO ABRA LAS UNIDADES DEL No use las unidades cerca de DORMITORIO, UNIDADES PARA posibles lugares húmedos, tales PADRES, ESTACIONES DE como bañeras, - Graco 2M13 | Instruction Manual - Page 40
instalación residencial. Este DECLARACIÓN DE LA COMISIÓN FEDERAL DE COMUNICACIONES equipo genera, usa y puede emitir energía de radiofrecuencia y si no se lo instala y usa de acuerdo a las ADVERTENCIA Las modificaciones no autorizadas por el fabricante instrucciones, podría causar interferencias - Graco 2M13 | Instruction Manual - Page 41
• Reorientar o cambiar de lugar la antena de recepción. • Aumentar la distancia entre el equipo y el receptor. • Conectar el equipo a un tomacorriente en un circuito diferente del que está conectado el receptor. • Consultar al minorista o a un técnico experimentado de radio y televisión para obtener - Graco 2M13 | Instruction Manual - Page 42
Reseña de la unidad para padres ENCENDIDO /APAGADO vibe VIBRACIÓN VOLUMEN LUCES DEL SONIDO VIBE LINK PARLANTE PUERTO DEL CARGADOR 7 LUCES DEL PARLANTE - Graco 2M13 | Instruction Manual - Page 43
Unidad del dormitorio MICRÓFONO BOTÓN DE LA LUZ NOCTURNA pf BUSCADOR DE LA UNIDAD ch PARA PADRES ENCENDIDO/APAGADO CANAL 8 - Graco 2M13 | Instruction Manual - Page 44
Opciones de la puerta de las pilas 1 BRAZO CINTURÓN CUELLO Seleccione una de las 3 puertas de la pila según la forma en que prefiera transportar la unidad para padres. Puede transportar la unidad para padres en el brazo, el cinturón o el cuello. Todas las 3 opciones pueden usarse en la unidad - Graco 2M13 | Instruction Manual - Page 45
Saque la puerta de la pila. 2 GSP523040 600mAh 3.7V GSP523040 600mAh 3.7V Cambie la puerta de las pilas 3 con una de las 2 otras selecciones de la puerta. 10 - Graco 2M13 | Instruction Manual - Page 46
Instalación de la pila Saque la puerta de la pila. 4 Ponga la pila. Asegúrese de 5 empujar apretadamente el conector. 11 - Graco 2M13 | Instruction Manual - Page 47
Vuelva a colocar la puerta de 6 las pilas. GSP523040 600mAh 3.7V Ha completado la instalación 7 de la pila. 12 - Graco 2M13 | Instruction Manual - Page 48
La estación de conexión 8 Conecte el adaptador de corriente alternada a la parte trasera de la estación de conexión. 9 13 - Graco 2M13 | Instruction Manual - Page 49
Ponga la unidad para padres en la 10 estación de conexión para cargar la pila. La luz de la estación se iluminará mientras la unidad se carga. La luz se apagará cuando esté completamente cargada. Cargue la pila durante 5 horas antes del uso. Para usarla mientras se carga, oprima el botón de - Graco 2M13 | Instruction Manual - Page 50
Activación de la unidad vibratoria 12 vibe Oprima brevemente el botón para activar la función de la vibración. Apague la vibración, oprima de nuevo el botón. El ícono de "Vibe" aparecerá vibe cuando la vibración esté activada. 15 - Graco 2M13 | Instruction Manual - Page 51
13 vibe Para ajustar la vibración NOTA: La vibración se apagará vibe automáticamente cuando la unidad para padres esté en la estación. Para ajustar el nivel al que se activa la alerta de vibración, presione y mantenga presionado el botón de Vibración ("Vibe"), al costado de la unidad para - Graco 2M13 | Instruction Manual - Page 52
Volumen Oprima los botones + o - para cambiar 14 el nivel del volumen. Luces del sonido con atenuador automático Las luces del sonido se atenuarán 15 automáticamente en una sala oscura. 17 - Graco 2M13 | Instruction Manual - Page 53
Unidad del dormitorio El frente de la unidad tiene el 16 logo tipo de Graco. Ponga la unidad en la sala 17 donde está el bebé. NUNCA ponga la unidad del dormitorio al alcance del bebé. pf ch 18 - Graco 2M13 | Instruction Manual - Page 54
184 pf ch 19 pf ch Conecte el adaptador de corriente alternada a la unidad del dormitorio y enchúfelo en la pared. Use el adaptador de corriente alternada para el uso normal con electricidad - las pilas tienen por objeto ser respaldo en caso de que se corte la electricidad. Oprima el botón de - Graco 2M13 | Instruction Manual - Page 55
20 VIBE LINK LIGHTS Las unidades del dormitorio y para padres se comunicarán. El icono verde de "Link" indica que está conectado a la unidad del dormitorio. SPEAKER Pila de respaldo opcional 21 CHA Destornille los dos tornillos de atrás de la Unidad del dormitorio como se indica. 20 - Graco 2M13 | Instruction Manual - Page 56
22 Saque la tapa de las pilas. 23 Necesitará 3 pilas tamaño AAA (LR03) (No se incluyen). 21 - Graco 2M13 | Instruction Manual - Page 57
24 Ponga las pilas como se indica. 25 Vuelva a poner la tapa de las pilas y atornillo los dos tornillos. 22 - Graco 2M13 | Instruction Manual - Page 58
Cambio de canales 26 pf ch Si experimenta interferencia, oprima el botón "Ch" para cambiar de canales. La unidad para padres automáticamente buscará todos los canales disponibles y se comunicará con la unidad del dormitorio. Oprima el botón "Ch" hasta que encuentre un canal que funcione. - Graco 2M13 | Instruction Manual - Page 59
Luz nocturna 28 Para usar la luz nocturna: 1. Oprímala una vez para encenderla. 2. Oprímala de nuevo para hacer que la luz nocturna sea más brillante. 3. Oprímala de nuevo para apagarla. 24 - Graco 2M13 | Instruction Manual - Page 60
Solución de desperfectos NO INTENTE modificar la unidad. Cualquier modificación al transmisor y/o receptor puede cancelar la autoridad del operador para usar el equipo. La mayoría de los problemas tienen una simple solución. Primero, verifique que: • La electricidad esté ENCENDIDA en ambas unidades. - Graco 2M13 | Instruction Manual - Page 61
Bajo sonido • La unidad del dormitorio está demasiado lejos del bebé - muévala más cerca. • Objetos grandes bloquean la señal - trate de poner la unidad del dormitorio en otro lugar. • Volumen demasiado bajo - súbalo. Estática • Interferencia de otros equipos eléctricos - elimine la causa de la está - Graco 2M13 | Instruction Manual - Page 62
Programación de la unidad para padres y la unidad del dormitorio. Para asegurar la privacidad, la unidad para padres se programa con la unidad del dormitorio en la fábrica. La unidad para padres no funcionará con ninguna otra unidad del dormitorio. Si la unidad para padres no conecta con una unidad - Graco 2M13 | Instruction Manual - Page 63
1. Borrar la programación de la unidad para padres • Apague la unidad para padres. • Oprima el botón para bajar el volumen en la unidad para padres mientras oprime el botón de encendido/apagado. Continúe oprimiendo el botón para bajar el volumen hasta que escuche un solo sonido y todas las luces de - Graco 2M13 | Instruction Manual - Page 64
2. Programar la unidad para padres con la unidad del dormitorio • Apague la unidad del dormitorio y vuelva a prenderla. • Ponga la unidad del dormitorio en la misma habitación, a cinco (5) pies (1,5 metros) de distancia de la unidad para padres. • Encienda la unidad del dormitorio usando el botón de - Graco 2M13 | Instruction Manual - Page 65
3. Repetir este procedimiento si necesita programar otra unidad para padres con la unidad del dormitorio. • No pasó nada cuando encendí la unidad del dormitorio. ¿Qué debo hacer? • Primero, pruebe apagar la unidad del dormitorio y volver a encenderla. • Si la unidad para padres no se programa con la - Graco 2M13 | Instruction Manual - Page 66
Registro del producto (USA) Para registrar su producto Graco desde dentro de los EE.UU., visítenos en línea en www.gracobaby.com/productregistration. Actualmente no aceptamos registros de los productos de quienes viven fuera de los Estados Unidos de América. 31 - Graco 2M13 | Instruction Manual - Page 67
Piezas de repuesto Información sobre la garantía (EE.UU) Para comprar piezas o accesorios o para obtener información sobre la garantía en los Estados Unidos, por favor comuníquese con nosotros en: www.gracobaby.com O 1-800-345-4109 Graco Children's Products 150 Oaklands Blvd. Exton, PA 19341 32
-
 1
1 -
 2
2 -
 3
3 -
 4
4 -
 5
5 -
 6
6 -
 7
7 -
8
-
9
-
10
-
11
-
12
-
13
-
14
-
15
-
16
-
17
-
18
-
19
-
20
-
21
-
22
-
23
-
24
-
25
-
26
-
27
-
28
-
29
-
30
-
31
-
32
-
33
-
34
-
35
-
36
-
37
-
38
-
39
-
40
-
41
-
42
-
43
-
44
-
45
-
46
-
47
-
48
-
49
-
50
-
51
-
52
-
53
-
54
-
55
-
56
-
57
-
58
-
59
-
60
-
61
-
62
-
63
-
64
-
65
-
66
-
67
 |
 |

©2008 Graco
ISPM026AA
04/08
*PARENT UNIT FINDER: Press button to locate parent unit when it is misplaced or hidden.
**CHANNEL: Pressing button changes channels to help find the best signal. See owners manual for more information.
imonitor™ mini
MODEL# 2M13
1
Connect AC Adapter to nursery
Unit.
2
Place unit in room.
3
Press the ON/OFF buttons to
activate or deactivate.
4
Parent/nursery units will locate
each other.
ch
pf
ch
pf
ch
pf
Parent Unit
VOLUME
SOUND
LIGHTS
SPEAKER
VIBRATION
CHARGER
PORT
ARM
BELT
NECK
3 different battery doors
for carrying unit
vibe
ON/OFF
Nursery Unit
MICROPHONE
NIGHT LIGHT
BUTTON
Docking Station
ON/OFF
SPEAKER/LIGHTS
*PARENT UNIT
FINDER
**CHANNEL
ch
pf
1
Remove battery door.
2
Plug battery in. Make sure to
push the connector tight.
3
Replace battery door.
Parent Unit
GSP523040
600mAh
3.7V
GSP523040
600mAh
3.7V
GSP523040
600mAh
3.7V
2
Place parent unit in dock to
charge battery.
1
Connect AC adapter to the back
of the docking station.
3
Charge battery for 5 hours
before use.
Docking Station
The dock light will illuminate
while unit charges. Light will
turn off when fully charged.
Charge battery for
5 hours before use.
Dock Light
Nursey Unit
Quick Start
Product Instruction Manual