Graco 3001643-043 Assembly Instructions - Page 6
Crib Assembly
 |
UPC - 654582316341
View all Graco 3001643-043 manuals
Add to My Manuals
Save this manual to your list of manuals |
Page 6 highlights
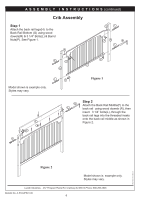
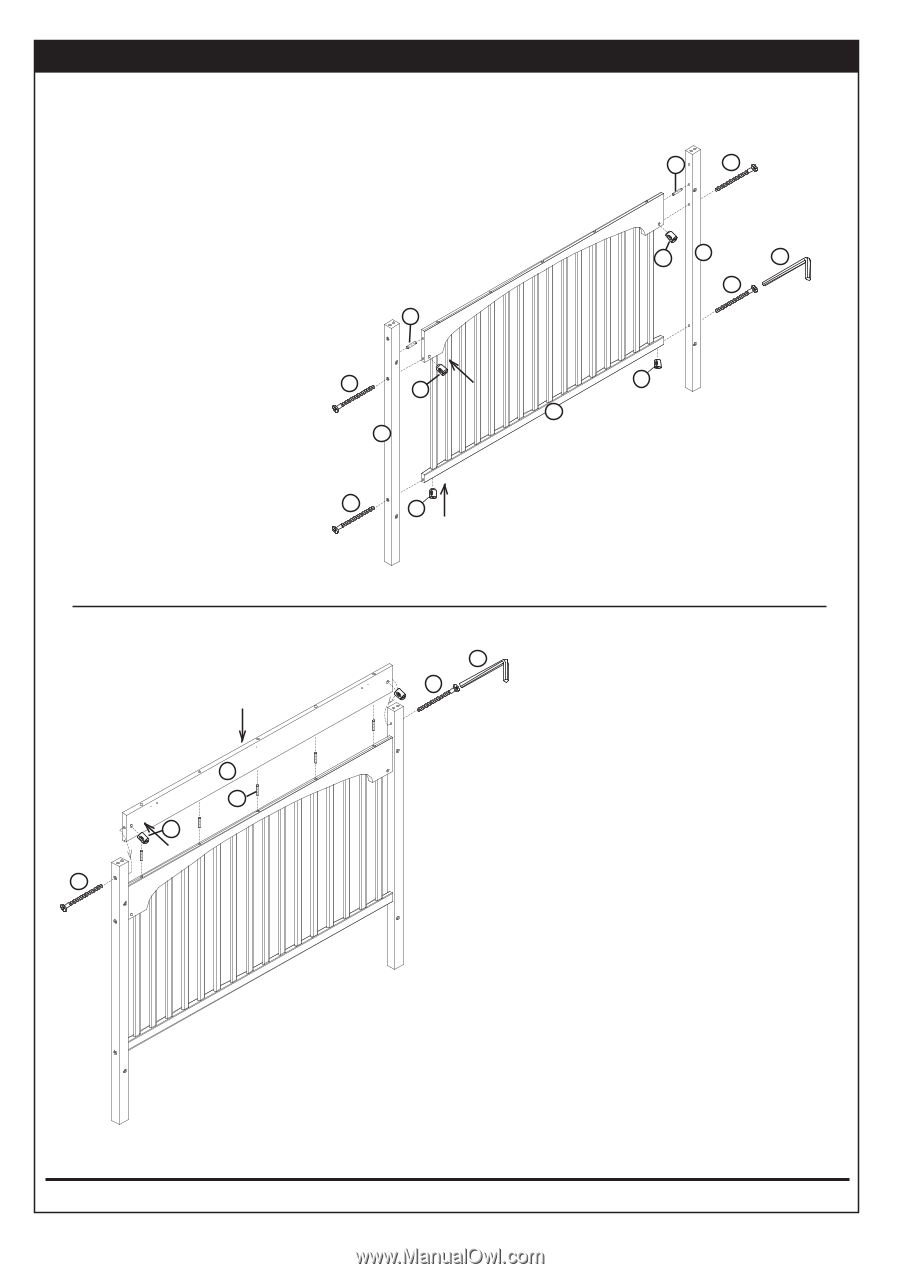
A S S E M B L Y I N S T R U C T I O N S (continued) Crib Assembly Step 1 Attach the back rail legs(H) to the Back Rail Bottom (G) using wood dowels(R) & 3 1/4" Bolts(L) & Barrel Nuts(P). See Figure 1. R R L P H Q L L P H P G L P Model shown is example only. Styles may vary. Figure 1 F R P L Q L Step 2 Attach the Back Rail Middle(F) to the back rail using wood dowels (R), then insert 3 1/4" bolts(L) ,through the back rail legs into the threaded insets onto the back rail middle as shown in Figure 2. PRINTED IN CHINA Figure 2 Model shown is example only. Styles may vary. LaJobi Industries. - 257 Prospect Plains Rd. Cranbury,NJ 08512-Phone: 888-266-2848 Bulletin No. A-RTAUPS01-00 6
-
 1
1 -
 2
2 -
 3
3 -
 4
4 -
 5
5 -
 6
6 -
 7
7 -
 8
8 -
 9
9 -
 10
10 -
 11
11 -
 12
12 -
13
 |
 |
ASSEMBLY INSTRUCTIONS
(continued)
PRINTED IN
CHINA
Step 1
Attach the back rail legs(H)
to the
Back Rail Bottom (G) using wood
dowels(R) & 3 1/4” Bolts(L) & Barrel
Nuts(P). See Figure 1.
Step 2
Attach the Back Rail Middle(F) to the
back rail
using wood dowels (R), then
insert
3 1/4” bolts(L) ,through the
back rail legs into the threaded insets
onto the back rail middle as shown in
Figure 2.
6
Figure 1
Crib Assembly
Figure 2
LaJobi Industries. - 257 Prospect Plains Rd. Cranbury,NJ 08512-Phone: 888-266-2848
Model shown is example only.
Styles may vary.
Model shown is
example only.
Styles may vary.
Bulletin No. A-RTAUPS01-00
H
H
G
L
L
P
P
P
P
L
L
Q
R
R
F
R
L
L
Q
P