Graco 3250235 Assembly Instructions
Graco 3250235 - Lauren Dropside Convertible Crib Manual
 |
UPC - 654582325237
View all Graco 3250235 manuals
Add to My Manuals
Save this manual to your list of manuals |
Graco 3250235 manual content summary:
- Graco 3250235 | Assembly Instructions - Page 1
that you follow the steps below: 1. Please read the instructions thoroughly 2. Identify all parts and hardware. 3. You will Rail Leg 2 I. Wooden connecting block 3 J. Bottom Stretcher 1 K. Metal Spring support platform 1 L. 3 1/4 " Bolt 14 M. 2 1/4" Bolt 2 N. 1 No. A-RTAUPS01-00 1 - Graco 3250235 | Assembly Instructions - Page 2
Instructions Room Climate Control Wood, when first cut contains more than 50 Fine Furniture Fine wood furniture will have fewer problems when its environment is controlled at a the furniture, do it only two or three times a year. Over polishing can distort the natural finish of the product. 00 2 - Graco 3250235 | Assembly Instructions - Page 3
STOP IF YOU EXPERIENCE ANY ISSUES WITH THIS PRODUCT BEFORE YOU RETURN THIS TO THE RETAILER PLEASE FOLLOW PROCEDURES ON THE REVERSE SIDE OF THIS FORM. BULLETIN NO. PAP00-00 3 - Graco 3250235 | Assembly Instructions - Page 4
us at any time. Procedures to follow should you have any questions: For best and most timely service please contact us by e-mail at [email protected] Please provide the following information in your e-mail. all the above information ready to give to your Client Service Specialist. BULLETIN NO. PAP01 - Graco 3250235 | Assembly Instructions - Page 5
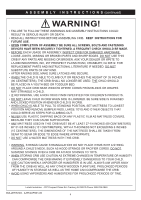
257 PROSPECT PLAINS ROAD, CRANBURY, NJ 08512. FOR REPLACEMENT PARTS AND INSTRUCTIONAL LITERATURE IF NEEDED. DO NOT SUBSTITUTE PARTS OF ANY KIND. • AFTER WHEN THE CHILD IS ABLE TO CLIMB OUT OR REACHES THE HEIGHT OF 35 INCHES (90 CENTIMETERS), THE CRIB SHALL NO LONGER BE USED. THE CHILD SHOULD BE 00 5 - Graco 3250235 | Assembly Instructions - Page 6
Figure 2 Model shown is example only. Styles may vary. LaJobi Industries. - 257 Prospect Plains Rd. Cranbury,NJ 08512-Phone: 888-266-2848 Bulletin No. A-RTAUPS01-00 6 - Graco 3250235 | Assembly Instructions - Page 7
4A Model shown is example only. Styles may vary. LaJobi Industries. - 257 Prospect Plains Rd. Cranbury,NJ 08512-Phone: 888-266-2848 Bulletin No. A-RTAUPS01-00 7 PRINTED IN CHINA - Graco 3250235 | Assembly Instructions - Page 8
Figure 6 Model shown is example only. Styles may vary. LaJobi Industries. - 257 Prospect Plains Rd. Cranbury,NJ 08512-Phone: 888-266-2848 Bulletin No. A-RTAUPS01-00 8 - Graco 3250235 | Assembly Instructions - Page 9
the Figure 8A. O Q PRINTED IN CHINA Figure 8 K Figure 8A LaJobi Industries. - 257 Prospect Plains Rd. Cranbury,NJ 08512-Phone: 888-266-2848 Bulletin No. A-RTAUPS01-00 9 - Graco 3250235 | Assembly Instructions - Page 10
. T Figure 9B PRINTED IN CHINA S S Figure 9A S Figure 9C LaJobi Industries. - 257 Prospect Plains Rd. Cranbury,NJ 08512-Phone: 888-266-2848 Bulletin No. A-RTAUPS01-00 10 - Graco 3250235 | Assembly Instructions - Page 11
the side when removing the child from the crib. LaJobi Industries. - 257 Prospect Plains Rd. Cranbury,NJ 08512-Phone: 888-266-2848 Bulletin No. A-RTAUPS01-00 11 PRINTED IN CHINA - Graco 3250235 | Assembly Instructions - Page 12
! FOR TODDLER BED USE • Failure to follow these warnings and assembly instructions could result in serious injury or death from entrapment or strangulation. • and the maximum weight shall not be greater than 50 Lbs. (22.7Kg). LaJobi Industries. - 257 Prospect Plains Rd. Cranbury,NJ 08512- - Graco 3250235 | Assembly Instructions - Page 13
shown is example only. Styles may vary. Figure 12 LaJobi Industries. - 257 Prospect Plains Rd. Cranbury,NJ 08512-Phone: 888-266-2848 Bulletin No. A-RTAUPS01-00 13 PRINTED IN CHINA
-
 1
1 -
 2
2 -
 3
3 -
 4
4 -
 5
5 -
 6
6 -
 7
7 -
8
-
9
-
10
-
11
-
12
-
13
 |
 |

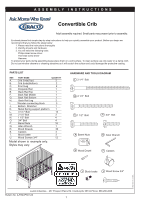
ASSEMBLY INSTRUCTIONS
PRINTED IN CHINA
HARDWARE AND TOOLS DIAGRAM
1
LaJobi Industries. - 257 Prospect Plains Rd. Cranbury,NJ 08512-Phone: 888-266-2848
Bulletin No. A-RTAUPS01-00
Convertible Crib
Adult assembly required. Small parts may present prior to assembly.
PARTS LIST
REF.
PART NAME
QUANTITY
A
.
Crib Ends(Top)
2
B.
Crib Ends(Bottom)
2
C.
Front Leg
2
D
.
Dropside Rail
1
E
.
Back Rail Top
1
F.
Back Rail Middle
1
G
.
Back Rail Bottom
1
H
.
Back Rail Leg
2
I.
Wooden connecting block
3
J.
Bottom
Stretcher
1
K.
Metal Spring support platform
1
L.
3 1/4 " Bolt
14
M.
2 1/4" Bolt
2
N.
1 1/2" Bolt
4
O.
3/4" Bolt
4
P.
Barrel Nuts
16
Q.
Allen Wrench
1
R.
Wood Dowels
30
S.
Casters
4
T.
Block brake
2
U.
Wood Screws 3/4″
12
M
L
Enclosed please find simple step-by-step instructions to help you quickly assemble your product. Before you begin we
recommend that you follow the steps below:
1. Please read the instructions thoroughly
2. Identify all parts and hardware.
3. You will need the following tools:
Philips Head screw driver
Flat head screw driver
Hammer.
To protect your parts during assembly please place them on a soft surface. To clean surface use only water on a damp cloth.
Do not use window cleaners or cleaning abrasives as it will scratch the surface and could damage the protective coating.
3 1/4"
Bolt
Barrel Nuts
Allen Wrench
Casters
Block brake
Wood Dowel
2 1/4"
Bolt
3/4"
Bolt
N
O
Model shown is
example only.
Styles may vary.
Wood Screw 3/4″
T
P
Q
R
S
1 1/2"
Bolt
U