Haier HWR65XC8 HWR06XC7 User Manual
Haier HWR65XC8 HWR06XC7 Manual
 |
View all Haier HWR65XC8 HWR06XC7 manuals
Add to My Manuals
Save this manual to your list of manuals |
Haier HWR65XC8 HWR06XC7 manual content summary:
- Haier HWR65XC8 HWR06XC7 | User Manual - Page 1
strong enough to hold the weight of the air conditioner. Extra brackets or supports may be needed depending on your windows. (Brackets or supports not provided in all models) 3) The windowsill and track are strong enough to hold the weigh of the air conditioner. 4) The wall is strong enough to hold - Haier HWR65XC8 HWR06XC7 | User Manual - Page 2
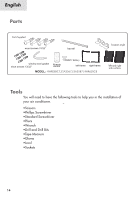
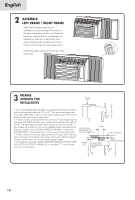
top rail window seal gasket short screws 13/32" "CR2025" battery Remote control left frame right frame MODEL: HWR08XC7,ESA3067,ESA3087,HWR65XC8 basepan angle left and right side curtains Tools You will need to have the following tools to help you in the installation of your air conditioner - Haier HWR65XC8 HWR06XC7 | User Manual - Page 3
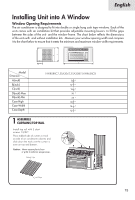
Requirements The air conditioner is designed to fit into double or single hung sash type windows. Each of the units comes with an installation kit that provides adjustable mounting louvers to fill the gaps between the sides of the unit and the window frame. The chart below reflects the dimensions of - Haier HWR65XC8 HWR06XC7 | User Manual - Page 4
. Slide the frame as close to the air conditioner as possible so that the curtain locks into place. Gently pull the frame out until it is the correct length for your application. • Install the right curtains and frames in the same way 3 PREPARE WINDOW FOR INSTALLATION 1. This unit is designed for - Haier HWR65XC8 HWR06XC7 | User Manual - Page 5
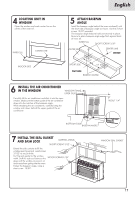
INSIDE SHORT SIDE 511 ,5" OUTSIDE BASEPAN ANGLE A INSTALL THE AIR CONDITIONER 6 IN THE WINDOW WINDOW FRAME UPPER GUIDE Carefully lift the air conditioner and slide it into the open window. Make sum the bottom guide of the air conditioner drops into the notches of the basepan angle. While - Haier HWR65XC8 HWR06XC7 | User Manual - Page 6
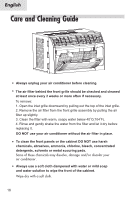
English Care and Cleaning Guide 5...m.. riNE-g- 1"111 • Always unplug your air conditioner before cleaning. • The air filter behind the front grille should be checked and cleaned at least once every 2 weeks or more often if necessary. To remove: 1. Open the inlet grille - Haier HWR65XC8 HWR06XC7 | User Manual - Page 7
window as per the installation guide. Repack the unit in its original box and store. If you do not intend to remove it from the window then cover the outside with a winter cover. This can be purchased from the retailer where you purchased your air conditioner unit BTU may be too high for the room. 19 - Haier HWR65XC8 HWR06XC7 | User Manual - Page 8
. • All doors and windows need to be closed so cool air does not escape the room. • The air filter may need cleaning. • The unit BTU may be too low for the required cooling area. • On extreme hot & humid days , air conditioners may take a little longer to cool. Air conditioner is making noise when - Haier HWR65XC8 HWR06XC7 | User Manual - Page 9
item purchase. Customer shall provide Haier with proof of the date of purchase, brand, model and serial number for verification prior to any warranty service being provided. EXCEPTIONS: Commercial or Rental Use warranty: 90 days for labor 90 days for parts No other warranty applies. What is covered
-
 1
1 -
 2
2 -
 3
3 -
 4
4 -
 5
5 -
 6
6 -
 7
7 -
8
-
9
 |
 |
English
Installations
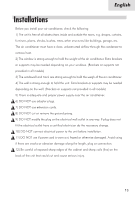
Before
you
install
your
air
conditioner,
check
the
following:
1)
The
unit
is
free
of
all
obstrucitons
inside
and
outside
the
room,
e.g.
drapes,
curtains,
furniture,
plants,
shrubs,
bushes,
trees,
other
structures
like
buildings,
garage,
etc.
The
air
conditioner
must
have
a
clear,
unbostructed
airflow
through
the
condenser
to
remove
heat.
2)
The
window
is
strong
enough
to
hold
the
weight
of
the
air
conditioner.
Extra
brackets
or
supports
may
be
needed
depending
on
your
windows.
(Brackets
or
supports
not
provided
in
all
models)
3)
The
windowsill
and
track
are
strong
enough
to
hold
the
weigh
of
the
air
conditioner.
4)
The
wall
is
strong
enough
to
hold
the
unit.
Extra
brackets
or
supports
may
be
needed
depending
on
the
wall.
(Brackets
or
supports
not
provided
in
all
models)
5)
There
is
adequate
and
proper
power
supply
near
the
air
conditioner.
A
6)
DO
NOT
use
adapter
plugs.
A
7)
DO
NOT
use
extension
cords.
A
8)
DO
NOT
cut
or
remove
the
ground
prong.
A9)
DO
NOT
modify
the
plug
or
the
electrical
wall
outlet
in
any
way.
If
plug
does
not
fit
the
electrical
outlet
have
a
certified
electrician
do
the
necessary
change.
A
10)
DO
NOT
connect
electrical
power
to
the
unit
before
installation.
A
ll)
DO
NOT
use
if
power
cord
is
worn
out,
frayed
or
otherwise
damaged.
Avoid
using
if
there
are
cracks
or
abrasion
damage
along
the
length,
plug
or
connection.
A
l2)
Be
careful
of
exposed
sharp
edges
of
the
cabinet
and
sharp
coils
(fins)
on
the
back
of
the
unit
that
could
cut
and
cause
serious
injury.
13