Haier RRTG18PAB Product Manual
Haier RRTG18PAB - 18.2 Cu Ft Frost Free Refrigerator Manual
 |
View all Haier RRTG18PAB manuals
Add to My Manuals
Save this manual to your list of manuals |
Haier RRTG18PAB manual content summary:
- Haier RRTG18PAB | Product Manual - Page 1
problem with this product, please contact the "Haier Customer Satisfaction Center" at 1-877-337-3639. DATED PROOF OF PURCHASE REQUIRED FOR WARRANTY SERVICE contacter le service des consommateurs 'Haier Customer Satisfaction el "Centro de Servicio al Consumidor de Haier" al 1-877-337-3639 (Válido solo - Haier RRTG18PAB | Product Manual - Page 2
® What The World Comes Home To TM Top Mount No Frost Refrigerators Réfrigérateur à Congélateur Anti Givre Refrigeradores con Congelador Superior sin Escarcha User Manual- (Features may vary by model) 14, 16, 18, 21 cu. ft. models Guide de l'Utilisateur- modèles à 0,4 (Les caractéristiques - Haier RRTG18PAB | Product Manual - Page 3
guide. 2) This refrigerator must be properly installed in accordance with the installation instructions before it is used. See grounding instructions in the installation section. 3) Never unplug your refrigerator refrigerator is in operation, do not touch the cold surfaces in the freezer compartment - Haier RRTG18PAB | Product Manual - Page 4
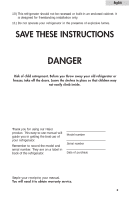
. SAVE THESE INSTRUCTIONS DANGER Risk of child entrapment. Before you throw away your old refrigerator or freezer, take off the doors. Leave the shelves in place so that children may not easily climb inside. Thank you for using our Haier product. This easy-to-use manual will guide you in getting - Haier RRTG18PAB | Product Manual - Page 5
Cover 14 Refrigerator Door Shelves 16 Freezer Features 17 Food Storage Information 19 Normal Operating Sounds 21 Proper Refrigerator Care and Cleaning 22 Cleaning and Maintenance 22 Light Bulb Replacement 23 Power Interruptions 23 Vacation and Moving Care 23 Troubleshooting 24 Warranty - Haier RRTG18PAB | Product Manual - Page 6
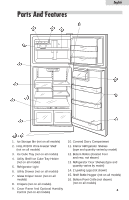
English Parts And Features 11 3 4 2 1 5 10 6 13 7 9 15 8 12 & 14 1. Ice Storage Bin (not on all models) 2. FULL WIDTH Wire Freezer Shelf (not on all models) 3. Ice Cube Tray (not on all models) 4. Utility Shelf/Ice Cube Tray Holder (not on all models) 5. Refrigerator Light 6. Utility Drawer - Haier RRTG18PAB | Product Manual - Page 7
base and all adhesive tape holding the refrigerator accessories inside and outside. 2. Inspect and remove any remains of packing, tape or printed materials before powering on the refrigerator. Adjusting Your Refrigerator Leveling Your Refrigerator: • Your refrigerator has two leveling legs which are - Haier RRTG18PAB | Product Manual - Page 8
off the third grounding in order to accommodate a two plug outlet. This is a dangerous practice since it provides no effective grounding for the refrigerator and may result in shock hazard. Use of Extension Cords • Avoid the use of an extension cord because of potential safety hazards under certain - Haier RRTG18PAB | Product Manual - Page 9
Installation (handle style varies by model) Handle installation of freezer door: 1. Take out door handle, screws and screw covers from refrigerator accessory bag. 2. Align the lower part of door handle with the screw hole of the lower edge of freezer door, and fix them by screws. 3. Align the upper - Haier RRTG18PAB | Product Manual - Page 10
hinge screws using a phillips head screwdriver. 4. Adjust the door or put a spacer in between and then tighten the screws. 5. Replace the top hinge cover. Reversing the Door Swing Note: Door reversal not available on stainless steel door models. Left/right door opening method: This product provides - Haier RRTG18PAB | Product Manual - Page 11
English Dismantling: (see fig. # 4) 1. Fix refrigerator and freezer door by sticking adhesive tape on both sides to hold doors in place. 2. As shown in fig. 3, dismantle the hinge box cover on the upper part of freezer door with a phillips head screwdriver. Then remove the two screws from the hinge. - Haier RRTG18PAB | Product Manual - Page 12
Bottom hinge fig. # 5 2. Install refrigerator door: make the left bottom hole of the refrigerator compartment door fall over the lower hinge axle part of the freezer door; adjust door to make it straight and level. Tighten the screws of upper hinge. 5. As shown in Fig. 3, install the upper freezer - Haier RRTG18PAB | Product Manual - Page 13
remove the inside screw and both the screws at the bottom of the freezer door that holds the handle. 3. Install the handle on the opposite side head screwdriver, remove the inside screw and both screws from the top of the refrigerator door that holds the handle. 3. Install the handle on the - Haier RRTG18PAB | Product Manual - Page 14
Turning the dial to OFF stops cooling in both the refrigeration and freezer sections. At first, set the Interior Light: Your refrigerator is equipped with an automatic interior light in the fresh locked in place in the rear metal shelf supports. 2. Pull the shelf gently until it is removed. 12 - Haier RRTG18PAB | Product Manual - Page 15
: (see fig. # 9) 1. Guide the rear shelf hooks into the desired slots in the metal shelf supports located on the back refrigerator wall. 2. Tilt up front of . # 11) 1. Remove utility drawer first following the above instructions. 2. Tilt up front of the shelf until the rear shelf hooks are no - Haier RRTG18PAB | Product Manual - Page 16
English To install utility drawer cover shelf: (see fig. #11) 1. Guide the rear shelf hooks into the desired slots in the metal shelf supports located on the back refrigerator wall. 2. Tilt up front of the shelf to set the shelf hooks in place. 3. Lower the front of the shelf into position until the - Haier RRTG18PAB | Product Manual - Page 17
1. Insert the rear of the crisper cover frame into the support bracket the side walls of the refrigerator. 2. Lower the front of the crisper cover frame into place. Replace the crispers as previously instructed. Crisper Humidity Control: (see fig. # 14) Your refrigerator model may be equipped with - Haier RRTG18PAB | Product Manual - Page 18
may be equipped with gallon door storage shelves. This feature will allow for the storage of gallon size containers. To remove refrigerator door shelves: (see fig. # 15) 1. Remove all items stored on the shelf. 2. Gently push up each side until the shelf is clear of the door - Haier RRTG18PAB | Product Manual - Page 19
end of the door shelf until it is locked in place in the refrigerator door brackets. upper door shelf lower door shelf fig. # 15 To shelf is free of the brackets on the right side wall of the freezer. 3. To replace the freezer shelf insert the shelf into the left side brackets as far as possible - Haier RRTG18PAB | Product Manual - Page 20
shelf until it is locked in place in the freezer door brackets. Ice Storage Bin: (see fig # 19) The ice storage bin can be used to store additional ice cubes in your freezer. It can also be used to store items in the refrigeration section such as eggs or other small items. ice - Haier RRTG18PAB | Product Manual - Page 21
with high humidity setting. • Hot food should be allowed to cool before storing in the refrigeration. This will prevent unnecessary energy use. • Fresh seafood should be used the same day as others 1-2 Days If longer periods of storage are required, store immediately in the freezer section. 19 - Haier RRTG18PAB | Product Manual - Page 22
freezer storage requires correct packaging. All foods must be in packages, which do not allow the flow of air or moisture in, or out. Improper storage will result in odor and taste transfer and will result in the drying out of the improperly packaged food. • Follow package or container instructions - Haier RRTG18PAB | Product Manual - Page 23
your unit to maintain the temperature you have selected. • Boiling water, gurgling sounds or slight vibrations that are the result of the refrigerant circulating through the cooling coils. • Sizzling or popping sounds resulting from frost melting during the defrost cycle and dripping on the defrost - Haier RRTG18PAB | Product Manual - Page 24
solvents or metal scouring pads. SOME of these chemicals may dissolve, damage and/or discolor your refrigerator. Door Gaskets: • Clean door gaskets every three months according to general instructions. Gaskets must be kept clean and pliable to assure a proper seal. • Petroleum jelly applied lightly - Haier RRTG18PAB | Product Manual - Page 25
is for a prolonged period, inspect and discard spoiled or thawed food in freezer and refrigerator. Clean refrigerator before reusing. Vacation and Moving Care • For long vacations or absences, empty food from refrigerator and freezer, move the temperature DIAL to the OFF position and clean the - Haier RRTG18PAB | Product Manual - Page 26
TroubleShooting Refrigerator Does Not Operate • Check thermostat control is not in the "OFF" position. • Check refrigerator is plugged in. • Check there is power at the ac outlet, by checking the circuit breaker. • Wait for 30-40 minutes to see whether refrigerator • Check freezer compartment for - Haier RRTG18PAB | Product Manual - Page 27
light does not work: • Check power supply. • Tighten bulb in socket. • Replace burned out bulb. Refrigerator/Freezer door does not shut properly: • Level the refrigerator. • Re align refrigerator/freezer door. • Check for blockages e.g. food containers, crisper cover, shelves, bins etc. 25 - Haier RRTG18PAB | Product Manual - Page 28
be presented to the authorized service center before warranty repairs are rendered. EXCEPTIONS: Commercial or Rental Use warranty 90 days labor (carry-in only) 90 days parts No other warranty applies What you may have other rights, which vary, from state to state. Haier America New York, NY 10018 26 - Haier RRTG18PAB | Product Manual - Page 29
lequel il est prévu, tel qu'il est indiqué dans le guide d'utilisation et d'entretien. 2) Ce réfrigérateur doit être correctement installé conformément aux instructions d'installation avant d'être utilisé. Consulter les instructions de mise à la terre du chapitre Installation. 3) Ne jamais tirer sur - Haier RRTG18PAB | Product Manual - Page 30
se présente. 11) Ne pas faire marcher le congélateur en présence de fumées pouvant entraîner une explosion. VEUILLEZ CONSERVER CES INSTRUCTIONS 2 - Haier RRTG18PAB | Product Manual - Page 31
puissent pas grimper facilement à l'intérieur". Nous vous remercions d'avoir choisi ce produit Haier. Ce guide d'utilisation facile d'emploi permet une utilisation optimum du réfrigérateur. Ne pas oublier de caisse au guide. Il devra être présenté pour tout service après-vente sous garantie. 3 - Haier RRTG18PAB | Product Manual - Page 32
Francais Table des Matiéres PAGE Mesures de Sécurit 1-2 Pièces et Caractéristiques de l'Appareil 5 Installation du Réfrigérateur 6 Désemballage du Réfrigérateur 6 Réglages du Réfrigérateur 6 Circulation d'Air Adéquate 6 Caractéristiques Electriques 7 Installation de la Poignée de Porte 8 - Haier RRTG18PAB | Product Manual - Page 33
Francais Piéces et Charactéristique11s de l'Appareil 3 4 2 1 5 10 6 13 7 9 15 8 12 & 14 1. Plateau à Glace (sur certains modèles uniquement) 2. Etagère de Congélateur INTEGRALE en câble métallique Etagère de Congélation (sur certains modèles uniquement) 3. Bac à Glace (sur certains modè - Haier RRTG18PAB | Product Manual - Page 34
Francais Installation du Réfrigérator Désemballage du Réfrigérateur 1. Retirer l'ensemble du matériel d'emballage. Ceci comprend la base en mousse ainsi que l'ensemble du matériel adhésif qui maintient les accessoires du réfrigérateur à l'intérieur tout comme à l'extérieur. 2. Inspecter et retirer - Haier RRTG18PAB | Product Manual - Page 35
Francais Caractéristiques Electriques • Pour l'alimentation du réfrigérateur, veiller à utiliser une prise de courant convenable (prise de 115 volts,15 amp) raccordée à la terre. • Eviter d'utiliser des adaptateurs à trois fiches ou de sectionner la troisième fiche reliée à la terre dans le but d' - Haier RRTG18PAB | Product Manual - Page 36
Francais Installation de la Poignée de Porte Installation de la poignée du congélateur: 1. Sortie la poignée de porte, les vis et protection des vis du sac à accessoires du réfrigérateur. 2. Aligner la partie inférieure de la poignée de porte à l'aide du trou de vis situé sur le rebord inférieur de - Haier RRTG18PAB | Product Manual - Page 37
Francais Installation de la poignée du réfrigérateur: 1. Retirer la poignée de porte, les vis et protections des vis des accessoires du réfrigérateur. 2. Aligner la partie inférieure de la poignée de porte à l'aide du trou de vis situé sur le rebord inférieur de la porte du congélateur, puis fixer - Haier RRTG18PAB | Product Manual - Page 38
Francais Désassemblage : (consulter le schéma n°4) 1. Fixer la porte du réfrigérateur et du congélateur à l'aide de papier adhésif encollé des deux côtés afin de maintenir les portes en place. 2. Comme il est décrit au schéma 3, désassembler la couverture de la boîte à charnières située sur la - Haier RRTG18PAB | Product Manual - Page 39
Francais Réinstallation: (consulter les schémas n°5 et n°6) 1. En fonction du schéma 5, désassembler la charnière inférieure et le coussinet en plastique situés sur à droite, puis les installer du côté gauche. Essieu de la charnière du bas Coussinet en plastique Coussinet de la charnière inférieure - Haier RRTG18PAB | Product Manual - Page 40
Inverser les Poignées de Porte Congélateur: (consulter le schéma n°7a) 1. Retirer la protection des vis des poignées. 2. A l'aide d'un tournevis cruciforme, retirer la vis intérieure ainsi que les deux vis situées en bas de la porte du congélateur qui servent à maintenir la poignée. 3. Installer - Haier RRTG18PAB | Product Manual - Page 41
'7' est la plus froide. Lorsque l'on tourne le cadran sur la position 'OFF'(arrêt), le réfrigérateur et le congélateur ne refroidissent plus. Au départ, mettre le cadran sur la position '4'puis attendre 24 heures avant de régler la température sur la position de votre choix. (Remarque: Si le - Haier RRTG18PAB | Product Manual - Page 42
les crochets de l'étagère arrière ne soient plus enclenchés à l'arrière des supports d'étagère en métal. 2. Tirer doucement sur l'étagère jusqu'à ce qu' Guider les crochets de l'étagère arrière sur les encoches souhaitées des supports d'étagère en métal situés sur le panneau arrière du réfrigérateur - Haier RRTG18PAB | Product Manual - Page 43
éma 10 Pour retirer le couvercle du tiroir de rangement: (consulter le schéma n°11) 1. Retirer tout d'abord le tiroir de rangement en suivant les instructions ci-dessus. 2. Incliner l'avant de l'étagère jusqu'à ce que les crochets de l'étagère arrière ne soient plus enclenchés à l'arrière des - Haier RRTG18PAB | Product Manual - Page 44
crochets se mettent en place. 3. Abaisser la partie avant de l'étagère jusqu'à ce que les crochets situés à l'arrière s'enclenchent dans les encoches des supports d'étagère en métal. Remettre le tiroir de rangement à sa place. schéma 11 Bac à Légumes et Couvercle du Bac Pour retirer et installer le - Haier RRTG18PAB | Product Manual - Page 45
consulter le schéma n°13) 1. Insérer la partie arrière du compartiment couvert du bac dans le support situé sur la partie latérale du réfrigérateur. 2. Abaisser la partie avant du compartiment couvert du place. 4. Remettre les bacs à leur place en fonction des instructions données précédemment. 17 - Haier RRTG18PAB | Product Manual - Page 46
n°15) 1. Retirer l'ensemble des articles stockés sur l'étagère. 2. Pousser chaque côté vers le haut avec précaution jusqu'à ce que l'étagère soit séparée des supports de la porte de l'étagère, puis la retirer. Pour replacer les étagères de la portière du réfrigérateur: (consulter le schéma - Haier RRTG18PAB | Product Manual - Page 47
caution, jusqu'à ce qu'elle se trouve bien en place à l'intérieur des supports de la porte du réfrigérateur. étagère supérieure de la porte . 2. Soulever le côté droit jusqu'à ce que l'étagère soit séparée des supports situés sur la partie latérale droite du congélateur. 3. Pour replacer l'étagè - Haier RRTG18PAB | Product Manual - Page 48
l'étagère de la porte. 2. Abaisser chaque côté de l'étagère de la porte avec précaution, jusqu'à ce qu'elle se trouve enclenchée dans les supports de la porte du congélateur. Plateau à Glace (consulter le schéma n°19) Le plateau à glace peut être utilisé pour stocker une quantité supplémentaire - Haier RRTG18PAB | Product Manual - Page 49
préemballés, veiller à bien les envelopper ou les stocker dans un matériel hermétique résistant à l'humidité, excepté dans le cas d'instructions contraires. Ceci permet de conserver les aliments correctement et d'éviter le transfert d'odeurs et de saveurs. • Avant de stocker des aliments, essuyer - Haier RRTG18PAB | Product Manual - Page 50
Le mauvais stockage d'aliments entraîne des transferts d'odeurs et de saveurs qui font sécher les aliments mal emballés. • Suivre les instructions de bonne utilisation indiquées sur le paquet ou le container. • Recommandations concernant l'emballage: Containers en plastique avec couvercles étanches - Haier RRTG18PAB | Product Manual - Page 51
Francais Témoins Habituels de Bon Fonctionnement qui Peuvent se Faire Entendre • Le ventilateur faisant circuler l'air à l'intérieur de l'appareil afin de maintenir la température sélectionnée. • De l'eau en train de bouillir, des glouglous ou de faibles vibrations proviennent du liquide réfrigérant - Haier RRTG18PAB | Product Manual - Page 52
dissoudre, endommager et/ou décolorer le réfrigérateur. Joints de porte: Nettoyer les joints de porte tous les trois mois en suivant les instructions générales fournies. Les joints doivent rester propres et flexibles afin d'assurer une bonne étanchéité. Une fine couche de gelée de pétrole appliqu - Haier RRTG18PAB | Product Manual - Page 53
Francais Changement d'Ampoule 1. Débrancher l'alimentation du réfrigérateur. 2. Retirer l'étagère la plus haute. 3. Laisser l'ampoule refroidir avant de la retirer. 4. Retirer l'ampoule en la dévissant dans le sens inverse des aiguilles d'une montre. 5. Toujours remplacer à l'aide d'une ampoule pour - Haier RRTG18PAB | Product Manual - Page 54
Francais Dépannage Le Réfrigérateur ne fonctionne pas: • Vérifier que le programmateur du thermostat ne se trouve pas sur la position 'OFF' (arrêt). • Veiller à ce que le réfrigérateur soit bien branché. • Veiller à ce que la prise de courant CA fonctionne bien en vérifiant le disjoncteur. • - Haier RRTG18PAB | Product Manual - Page 55
Francais Accumulation d'humidité à l'intérieur ou à l'extérieur du réfrigérateur: • Ceci est normal pendant les périodes de grande chaleur humide. • Ouvertures de la porte prolongée ou trop fréquente. • Vérifier l'étanchéité des joints. L'intérieur du réfrigérateur dégage une odeur: • Nettoyer l'int - Haier RRTG18PAB | Product Manual - Page 56
. EXCEPTIONS : Garantie pour usage commercial ou location. 90 jours pour la main d'œuvre (service en atelier uniquement) 90 jours pour les pièces Aucune autre garantie n'est applicable Couverture. -ci peut bénéficier d'autres droits qui varient selon les états. Haier America New York, NY 10018 28 - Haier RRTG18PAB | Product Manual - Page 57
Español INSTRUCCIONES PRECAUTORIAS Lea todas las instrucciones antes de utilizar este aparato. Cuando utilice este aparato, siempre ejerza las precauciones de seguridad básicas, incluyendo las siguientes: 1) Utilice este aparato exclusivamente para su uso especificado, según se describe en esta guía - Haier RRTG18PAB | Product Manual - Page 58
Español 9) No congele alimentos que hayan sido previamente descongelados en su totalidad. El Departamento de Agricultura de los Estados Unidos, en su Boletín de Casa y Jardín No. 69 indica que: "...Usted puede volver a congelar, sin correr ningún riesgo, aquellos alimentos congelados que hayan sido - Haier RRTG18PAB | Product Manual - Page 59
en el interior." Gracias por utilizar nuestro producto Haier. Este sencillo manual le orientará con respecto al mejor uso que puede parte posterior del refrigerador. Número de Modelo Número de Serie Fecha de Compra Agrafer le ticket de caisse au guide. Il devra être présenté pour tout service - Haier RRTG18PAB | Product Manual - Page 60
Español Indice PAGINA Instrucciones Precautorias 1 Partes y Funciones 5 Instalación de su Refrigerador 7-13 Desempaquetado de su Refrigerador 7 Ajustamiento de su Refrigerador 7 Circulación Adecuada del Aire 7 Requerimientos Eléctricos 8 Instalación de la Manija - Haier RRTG18PAB | Product Manual - Page 61
Tapa 11. Entrepaños Interiores del Refrigerador (el tipo y la cantidad varían con el mod elo) 12. Ruedas Inferiores (ubicadas en el frente y la parte posterior, no se muestran) 13. Entrepaños de la Puerta del Refrigerador (el tipo y la cantidad varían con el modelo) 14. 2 Patas Niveladoras (no - Haier RRTG18PAB | Product Manual - Page 62
Español 6 - Haier RRTG18PAB | Product Manual - Page 63
haya una circulación de aire adecuada, conexiones eléctricas y de tubería. • Estas son las distancias recomendadas que deben dejarse alrededor del refrigerador: Lados 19 mm Parte Superior........25 mm Parte Posterior........25 mm 7 - Haier RRTG18PAB | Product Manual - Page 64
Español Requerimientos Eléctricos • Asegúrese de que haya un tomacorriente apropiado (115 V, 15 A) con una conexión a tierra apropiada para hacer funcionar el refrigerador. • Evite el uso de adaptadores de tres patas o el cortar la tercer pata de conexión a tierra para poder conectar en un - Haier RRTG18PAB | Product Manual - Page 65
del congelador: 1. Saque la manija de la puerta, los tornillo y las cubiertas de los ornillos de la bolsa de accesorios del refrigerador. 2. Alinee la parte inferior de la manija de la puerta con el orificio del tornillo del borde inferior de la puerta del congelador y fíjelos con los tornillos - Haier RRTG18PAB | Product Manual - Page 66
Español Alineación de la Puerta (vea la figura # 3) 1. Quite la cubierta de los tornillos. 2. Quite la cubierta de la bisagra superior. 3. Afloje los tornillos de la bisagra superior usando un destornillador de punta de cruz. 4. Ajuste la puerta o coloque un espaciador entremedio y luego vuelva a - Haier RRTG18PAB | Product Manual - Page 67
adhesiva en ambos lados para mantener las puertas en su lugar. 2. Como se muestra en la figura 3, desmantele la cubierta de la bisagra en la parte superior de la puerta del congelador con un destornillador de punta de cruz. Después retire los dos tornillos de la bisagra. Saque la bisagra jal - Haier RRTG18PAB | Product Manual - Page 68
sobre el eje central, levante la bisagra superior, de manera que el eje de la bisagra pueda ser instalada en el orificio superior de la parte superior de la puerta del congelador, ajuste la puerta para enderezarla y nivelarla. Apriete los tornillos de la bisagra superior. 5. Como se muestra en la - Haier RRTG18PAB | Product Manual - Page 69
1. Quite la cubierta de tornillo de las manijas. 2. Usando un destornillador de punta de cruz, quite el tornillo interior y ambos tornillos de la parte inferior de la puerta del congelador que sostienen la manija. 3. Instale la manija en el lado opuesto. 4. Quite los tapones de tornillo. 5. Instale - Haier RRTG18PAB | Product Manual - Page 70
Español Uso Funsiones del Refrigerador Funciones Generales Dial de Temperatura Ajustable Su refrigerador mantendrá automáticamente el nivel de temperatura que seleccione. El dial de control de temperatura tiene 7 ajustes además del ajuste "off" (apagado). El ajuste 1 es el más tibio. El ajuste 7 - Haier RRTG18PAB | Product Manual - Page 71
Español Para volver a colocar un entrepaño voladizo de ancho completo o medio: (vea la figura # 9) 1. Inserte los ganchos posteriores dentro de las ranuras deseadas en los soportes metálicos ubicados en la pared posterior del refrigerador. 2. Levante el frente del entrepaño para encajar los ganchos - Haier RRTG18PAB | Product Manual - Page 72
Español Para instalar la cubierta del cajón de uso general: (vea la figura # 11) 1. Inserte los ganchos posteriores del entrepaño dentro de las ranuras deseadas en los soportes metálicos ubicados en la pared posterior del refrigerador. 2. Levante el frente del entrepaño para encajar los ganchos en - Haier RRTG18PAB | Product Manual - Page 73
marco de la cubierta del cajón y sáquelo. fig. # 13 Para volver a colocar la cubierta del cajón para frutas y verduras: (vea la figura # 13) 1. Inserte la parte posterior de la cubierta del cajón dentro del soporte de apoyo en las paredes laterales del refrigerador. 2. Baje el frente del marco de la - Haier RRTG18PAB | Product Manual - Page 74
Español • El ajuste "LOW" (bajo) permite que el aire húmedo salga del cajón para un almacenamiento óptimo de las frutas y/o vegetales con piel. • El ajuste "HIGH" (alto) retiene el aire húmedo en el cajón para frutas y verduras para un óptimo almacenamiento de vegetales frescos y frondosos. Ajustes - Haier RRTG18PAB | Product Manual - Page 75
Español 2. Presione cuidadosamente cada extremo del entrepaño de la puerta hasta que se enganche en los soportes de entrepaño de la puerta. entrepaño superior de la puerta entrepaño inferior de la puerta fig. # 15 Para ajustar el retenedor de botellas del entrepaño de la puerta: (vea la figura # - Haier RRTG18PAB | Product Manual - Page 76
Español fig. # 17 1 2 Para quitar los entrepaños de las puertas del congelador: (vea la figura # 18) 1. Quite todos los artículos almacenados en el entrepaño. 2. Levante cuidadosamente cada lado hasta que el entrepaño se desenganche de los soportes del entrepaño de la puerta y luego quítelo. - Haier RRTG18PAB | Product Manual - Page 77
Español Charola para Cubos de Hielo: Su refrigerador está equipado con una o dos charolas para cubos de hielo dependiendo del modelo que haya adquirido. Información sobre el Almacenamiento de Alimentos Alimentos Frescos • Cuando almacene alimentos frescos que no estén preempacados, asegúrese de - Haier RRTG18PAB | Product Manual - Page 78
Español Alimentos Congelados • Un almacenamiento adecuado en el congelador requiere un embalaje correcto. Todos los alimentos deben estar en paquetes que no permitan el flujo de aire o la humedad interior o exterior. Un almacenamiento incorrecto resultará en la contaminación de olores y sabores y - Haier RRTG18PAB | Product Manual - Page 79
Español Ruidos de Operación Normales que Pueda Escuchar • El ventilador circulando el aire en el interior de su unidad para mantener la temperatura que ha seleccionado. • Agua hirviendo, ruidos gorgoteantes o ligeras vibraciones que son el resultado del gas refrigerante circulando a través del - Haier RRTG18PAB | Product Manual - Page 80
Español Cuidados y Limpieza Asecuada del Refrigerador Limpieza y Mantenimiento Advertencia: Para evitar una descarga eléctrica siempre desenchufe su refrigerador antes de limpiarlo. El ignorar esta advertencia puede causar esiones o la muerte. Precaución: Antes de usar productos de limpieza, siempre - Haier RRTG18PAB | Product Manual - Page 81
Español Reemplazo del Foco 1. Apague el interruptor del refrigerador. 2. Saque el entrepaño más alto. 3. Permita que el foco se enfríe antes de quitarlo. 4. Quite el foco destornillándolo hacia la izquierda. 5. Siempre reemplácelo con el tipo de foco incluido con la unidad, que tenga una capacidad - Haier RRTG18PAB | Product Manual - Page 82
Español Verificación de Problemas El Refrigerador no Funciona: • Revise que el control del termostato no esté en la posición de "OFF" (apagado). • Revise que el refrigerador esté conectado. • Revise que haya corriente eléctrica en el tomacorriente de corriente alterna, revisando el interruptor de - Haier RRTG18PAB | Product Manual - Page 83
Español Acumulación de humedad en el interior o exterior del refrigerador: • Esto es normal durante periodos de alta humedad. • Apertura constante o prolongada de la puerta. • Revise que los empaques de la puerta estén bien sellados. El refrigerador despide un olor: • Necesita limpiar el interior. • - Haier RRTG18PAB | Product Manual - Page 84
cualesquier artículos cubiertos durante el periodo inicial de 12 meses. Al término de este periodo solo las partes son cubiertas en la garantía restante. La mano de obra no está provista y debe ser cubierta de otros derechos, los cuales varían de estado a estado. Haier America New York, NY 10018 28
-
 1
1 -
 2
2 -
 3
3 -
 4
4 -
 5
5 -
 6
6 -
 7
7 -
8
-
9
-
10
-
11
-
12
-
13
-
14
-
15
-
16
-
17
-
18
-
19
-
20
-
21
-
22
-
23
-
24
-
25
-
26
-
27
-
28
-
29
-
30
-
31
-
32
-
33
-
34
-
35
-
36
-
37
-
38
-
39
-
40
-
41
-
42
-
43
-
44
-
45
-
46
-
47
-
48
-
49
-
50
-
51
-
52
-
53
-
54
-
55
-
56
-
57
-
58
-
59
-
60
-
61
-
62
-
63
-
64
-
65
-
66
-
67
-
68
-
69
-
70
-
71
-
72
-
73
-
74
-
75
-
76
-
77
-
78
-
79
-
80
-
81
-
82
-
83
-
84
 |
 |

115V, 60 Hz
Haier America
New York, NY 10018
Printed in China
tmnfr141618-2
Issued: July-03
IMPORTANT
Do Not Return This Product To The Store
If you have a problem with this product, please contact the "Haier Customer
Satisfaction Center" at 1-877-337-3639.
DATED PROOF OF PURCHASE REQUIRED FOR WARRANTY SERVICE
IMPORTANT
Ne pas Réexpédier ce Produit au Magasin
Pour tout problème concernant ce produit, veuillez contacter le service des
consommateurs ‘Haier Customer Satisfaction Center’ au 1-877-337-3639.
UNE PREUVE D’ACHAT DATEE EST REQUISE POUR BENEFICIER DE LA GARANTIE.
IMPORTANTE
No regrese este producto a la tienda
Si tiene algún problema con este producto, por favor contacte el "Centro de Servicio al
Consumidor de Haier" al 1-877-337-3639 (Válido solo en E.U.A).
NECESITA UNA PRUEBA DE COMPRA FECHADA PARA EL SERVICIO DE LA GARANTIA
Part #:RF-9999-82
®
What The World Comes Home To
TM