Haier XQB40-F Use and Care Guide
Haier XQB40-F Manual
 |
View all Haier XQB40-F manuals
Add to My Manuals
Save this manual to your list of manuals |
Haier XQB40-F manual content summary:
- Haier XQB40-F | Use and Care Guide - Page 1
Haier COMPACT,PORTABLE WASHING MACHINE XQB40-F Contents Important safeguards Parts Installation Instructions Operating Instructions Maintenance Trouble Shooting Warranty Pg. 1 Pg.2 Pg.2 Pg.6 Pg.8 Pg.9 Pg. 1 0 USE AND CARE GUIDE - Haier XQB40-F | Use and Care Guide - Page 2
or circuitry 10) Do not repair or replace any part or attempt any servicing unless it is specifically recommended in this use and care guide. 11) Do not use hot water that exceeds 131F (55° C) in temperature. 12) Do not overload your electrical outlet.Machine should be plugged dorectly into wall - Haier XQB40-F | Use and Care Guide - Page 3
plug. The plug must be plugged into an outlet that is properly installed and grounded. Consult a qualified electrician or service center if the grounding instructions are not completely understood. If doubt exists as to weather the appliance is properly grounded, have a qualified. electrician check - Haier XQB40-F | Use and Care Guide - Page 4
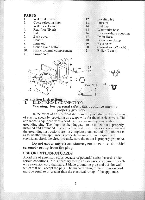
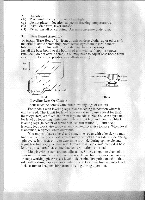
O Base Board Soft ?dam-jai White Outer Huh Tighten Loosen C" High I ow ILL.1 ILL.2 4. Leveling Legs Or Castors Your machine comes with either leveling legs or castors. For models with leveling legs. place maching in position where it will be used. Check unit for level (you may want to use - Haier XQB40-F | Use and Care Guide - Page 5
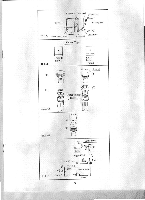
check your connections and if necessary, call our service hotline for assistance. (2) One end of the inlet hose is marked with red color, this end should be connected to the washing machine. 7. Mounting of castors(See ILLS) (1) Lay down the washer carefully on the,floor, To avoid any damage to - Haier XQB40-F | Use and Care Guide - Page 6
hand Goose neck To faucot r7 Laundry Tub ILL.3 Water Supply Hose Dra n Hose Hose Band Faucot Type A B ILL.4 Outside Thread ( l ) Large Inside Thread Faucet fl) (3) 0 (2) e Water Supply ^ Hose ILL.4A (2) 0 OC D II.I,.4B ILL.5 W-1 Screw/ Roller Screwdriver %> ,...Slit Tapped Hole - Haier XQB40-F | Use and Care Guide - Page 7
Instructions 1. Know Your Machine This compact washing machine is probably smaller than machines you have used in the past. It washes less clothes and requires less detergent. You will probably use the machine amounts per pounds of clothes washed. Detergent Chart XQB40-F Garment Weight In Pounds - Haier XQB40-F | Use and Care Guide - Page 8
Wash", the machine will wash only. It will not spin to extract water from garments. Wash Cycles XQB40-F Cycle Selection Knob Setting Heavy Wash Normal Wash Wash (only) Wash stops machine), adjust setting (clockwise only )and pull knob back out to restart. IMPORTANT: To avoid possible problems, - Haier XQB40-F | Use and Care Guide - Page 9
, keep this in mind when determining how much softener to use). 4. Wash Sequence A. Connect water inlet hose and drain hose as explained in the "Installation Instructions" section. B. Plug machine into a properly grounded electrical outlet. C. Turn on the water to faucet. (Note: that you may want - Haier XQB40-F | Use and Care Guide - Page 10
Trouble Shooting Sometimes your machine won't function properly. Often this is due to something simple and it usually can be rectified easily. The chart helov, illustrates potential problems and their solutions. Problem Machine won't work After wash.& rinse. machine won't spin Machine won't drain - Haier XQB40-F | Use and Care Guide - Page 11
Warranty Compact Washing Machines-CARRY-IN SERVICE What is covered and for how long? This warranty covers all defects in materials and workmanship in mechanical and electrical parts (including labor costs) conntained in this Haier® product for a period of 12 months from the date of purchase
-
 1
1 -
 2
2 -
 3
3 -
 4
4 -
 5
5 -
 6
6 -
 7
7 -
8
-
9
-
10
-
11
 |
 |

Haier
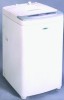
COMPACT,PORTABLE
WASHING
MACHINE
XQB40-F
Contents
Important
safeguards
Pg.
1
Parts
Pg.2
Installation
Instructions
Pg.2
Operating
Instructions
Pg.6
Maintenance
Pg.8
Trouble
Shooting
Pg.9
Warranty
Pg.
1
0
USE
AND
CARE
GUIDE