Hamilton Beach 14414 Use & Care
Hamilton Beach 14414 - Easy Touch Iron Manual
 |
UPC - 040094144143
View all Hamilton Beach 14414 manuals
Add to My Manuals
Save this manual to your list of manuals |
Hamilton Beach 14414 manual content summary:
- Hamilton Beach 14414 | Use & Care - Page 1
amables representantes están listos para ayudar. MEX: 01 800 71 16 100 Le invitamos a leer cuidadosamente este instructivo antes de usar su aparato. Easy-Touch Iron Fer à commandes tactiles Plancha de Fácil Pulsación English 2 Français 11 Español 20 - Hamilton Beach 14414 | Use & Care - Page 2
iron with a damaged cord or if the iron has been dropped or damaged. To avoid the risk of electric shock, do not disassemble the iron. Call our toll-free customer service when you turn a steam iron upside down - there may be hot water in the reservoir. SPECIAL INSTRUCTIONS 1. To avoid a circuit - Hamilton Beach 14414 | Use & Care - Page 3
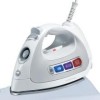
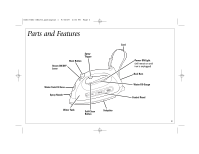
3 Parts and Features Blast Button Spray Trigger Steam ON/OFF Lever Water Tank Fill Area Spray Nozzle Cord Power ON Light (will remain on until iron is unplugged) Heel Rest Water Fill-Gauge Control Panel Water Tank Self-Clean Button Soleplate 3 - Hamilton Beach 14414 | Use & Care - Page 4
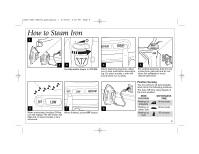
position. 5 6 7 When motionless, the Auto Off feature will engage. The OFF button will flash and, on select models, a tone will sound. When finished, press OFF button. 4 IRON POSITION Resting on soleplate Resting on either side Resting on heel MOTIONLESS TIME 30 seconds 30 seconds 15 minutes - Hamilton Beach 14414 | Use & Care - Page 5
. 6 7 8 When motionless, the Auto Off fea- When finished, press OFF button. ture will engage. The OFF button will flash and, on select models, a tone will sound. Position Sensing The iron will turn off automatically when left in the following positions. The Auto Off time varies based on the - Hamilton Beach 14414 | Use & Care - Page 6
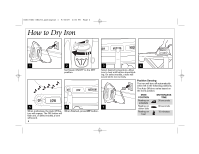
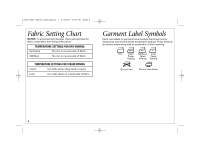
, check garment label for fabric composition and ironing instructions. TEMPERATURE SETTINGS FOR DRY IRONING Synthetics Dry iron on reverse side of fabric. Silk/Wool Dry iron on reverse side of fabric. TEMPERATURE SETTINGS FOR STEAM IRONING Cotton Iron while damp using steam or spray. Linen - Hamilton Beach 14414 | Use & Care - Page 7
840172602 ENnv02.qxd:Layout 1 9/30/09 2:06 PM Page 7 Care and Cleaning 1 Allow iron to cool. 2 3 Set Adjustable Steam to DRY. NOTICE: To avoid damage to the iron soleplate: • Never iron over zippers, pins, metal rivets, or snaps. • Wipe with a soapy cloth to clean occasional buildup on the - Hamilton Beach 14414 | Use & Care - Page 8
To keep the steam vents clear of any buildup, follow these instructions each time you iron using steam. 1 2 3 4 Set Adjustable Steam to DRY. Allow iron to heat on HIGH for 2 minutes. 5 Turn iron OFF and unplug. 8 6 Hold iron over sink. 7 Set Adjustable Steam to STEAM. 8 Press and hold the - Hamilton Beach 14414 | Use & Care - Page 9
840172602 ENnv02.qxd:Layout 1 9/30/09 2:06 PM Page 9 Troubleshooting PROBLEM Iron won't heat. Water is leaking out of the iron. Iron won't steam. Iron leaves spots on clothing. Wrinkles not removed. Fabric/clothing scorched. Twisted cord. All temperature selection buttons and OFF button blinking. - Hamilton Beach 14414 | Use & Care - Page 10
call 1.800.851.8900 in the U.S. or 1.800.267.2826 in Canada or visit hamiltonbeach.com in the U.S. or hamiltonbeach.ca in Canada. For faster service, locate the model, type, and series numbers on your appliance. 10 - Hamilton Beach 14414 | Use & Care - Page 11
éviter les risques d'électrocution, ne pas démonter ce fer. Appeler notre service à la clientèle au numéro de téléphone sans frais pour un examen à l'envers, car son réservoir pourrait encore contenir de l'eau chaude. INSTRUCTIONS SPÉCIALES 1. Pour éviter la surchauffe d'un circuit électrique, ne - Hamilton Beach 14414 | Use & Care - Page 12
840172602 FRnv02.qxd:Layout 1 9/30/09 2:07 PM Page 12 Pièces et caractéristiques Bouton de jet de vapeur Gâchette du vaporisateur Levier de vapeur « ON/OFF » Orifice de remplissage du réservoir Vaporisateur Réservoir d'eau Bouton Semelle d'autonettoyage 12 Cordon d'alimentation Témoin - Hamilton Beach 14414 | Use & Care - Page 13
840172602 FRnv02.qxd:Layout 1 9/30/09 2:07 PM Page 13 Repassage à sec 1 2 3 4 Régler le levier de vapeur Choisir la température désirée. Permettre le préchauffage du fer jusqu'à « ON/OFF » à la position « DRY ». ce que le bouton cesse de clignoter. Sur certains modèles, un signal sonore - Hamilton Beach 14414 | Use & Care - Page 14
840172602 FRnv02.qxd:Layout 1 9/30/09 2:07 PM Page 14 Repassage à la vapeur 1 OU 23 4 5 Positionner le levier de vapeur à STEAM. Choisir la température désirée. Permettre le préchauffage du fer jusqu'à ce que le bouton cesse de clignoter. Sur certains modèles, un signal sonore retentira pour - Hamilton Beach 14414 | Use & Care - Page 15
réglage de température pour les tissus NOTE : Vérifier l'étiquette du vêtement pour obtenir les informations de composition des tissus et les instructions de repassage pour éviter les dommages aux vêtements. RÉGLAGES DE TEMPÉRATURES POUR LE REPASSAGE À SEC Synthétiques Repasser à sec sur l'envers - Hamilton Beach 14414 | Use & Care - Page 16
840172602 FRnv02.qxd:Layout 1 9/30/09 2:07 PM Page 16 Entretien et nettoyage 1 Laisser refroidir le fer. 2 3 Abaisser le niveau de vapeur à « DRY ». NOTE : Pour éviter les dommages à la semelle du fer : • Ne jamais repasser les fermetures à glissière, épingles, rivets métalliques ou boutons- - Hamilton Beach 14414 | Use & Care - Page 17
840172602 FRnv02.qxd:Layout 1 9/30/09 2:07 PM Page 17 Caractéristique d'autonettoyage Pour garder les évents de vaporisation propres, suivre ces instructions chaque fois que vous utilisez la vapeur du fer. 1 2 3 4 Abaisser le niveau de vapeur à « DRY ». Positionner le degré de température à « - Hamilton Beach 14414 | Use & Care - Page 18
préchauffé ? • Pendant le repassage à sec, s'assurer que le réglage de vapeur est positionné à « DRY IRON ». Il n'y a pas de vapeur. • Vérifier le niveau d'eau. • Est-ce que le temps de chauffage du . Si le problème persiste, appeler le Service à la clientèle (voir numéros sur la page couverture). - Hamilton Beach 14414 | Use & Care - Page 19
aux É.-U. ou au 1.800.267.2826 au Canada ou visiter le site internet www.hamiltonbeach.com aux É.-U. ou www.hamiltonbeach.ca au Canada. Pour un service plus rapide, trouvez le numéro de modèle, le type d'appareil et les numéros de série sur votre appareil. 19 - Hamilton Beach 14414 | Use & Care - Page 20
840172602 SPnv02.qxd:Layout 1 9/30/09 2:07 PM Page 20 INSTRUCCIONES DE SEGURIDAD IMPORTANTES Cuando use su plancha plana, siempre se debe seguir siempre las precauciones básicas de seguridad, incluyendo las siguientes: LEA TODAS LAS INSTRUCCIONES ANTES DE USAR 1. Use la plancha sólo para el uso - Hamilton Beach 14414 | Use & Care - Page 21
840172602 SPnv02.qxd:Layout 1 9/30/09 2:07 PM Page 21 Partes y Características Botón de Rocío Botón de Ráfaga Palanca de Encendido de vapor Área de Llenado de Tanque de Agua Boquilla de Rocío Tanque de Agua Botón de Auto-Limpieza Placa Cable Luz de ENCENDIDO (Permanecerá encendida hasta que la - Hamilton Beach 14414 | Use & Care - Page 22
840172602 SPnv02.qxd:Layout 1 9/30/09 2:07 PM Page 22 Cómo Secar la Plancha 1 2 Coloque el Encendido de Vapor en posición de SECO. 5 6 Cuando esté sin movimiento, la carac- Cuando termine, presione el terística de Auto-Apagado funcionará. botón de OFF (APAGADO). El botón de APAGADO parpadeará, - Hamilton Beach 14414 | Use & Care - Page 23
840172602 SPnv02.qxd:Layout 1 9/30/09 2:07 PM Page 23 Cómo Planchar con Vapor 1 O 23 Coloque el Vapor Ajustable en VAPOR. 6 7 Cuando esté sin movimiento, la carac- Cuando termine, presione el terística de Auto-Apagado funcionará. botón de OFF (APAGADO). El botón de APAGADO parpadeará, y en - Hamilton Beach 14414 | Use & Care - Page 24
840172602 SPnv02.qxd:Layout 1 9/30/09 2:07 PM Page 24 Tabla de ajuste según tela AVISO: Para evitar daños en la prenda, revise la etiqueta de la prenda para la composición de la tela y las instrucciones de planchado. AJUSTES DE TEMPERATURA PARA PLANCHADO EN SECO Sintéticos Planche en seco por la - Hamilton Beach 14414 | Use & Care - Page 25
840172602 SPnv02.qxd:Layout 1 9/30/09 2:07 PM Page 25 Cuidado y Limpieza 1 2 3 Deje que la plancha se enfríe. Coloque el Vapor Ajustable en SECO. AVISO: Para evitar un daño en la suela de la plancha: • Nunca planche sobre cierres, clavijas, remaches metálicos o broches. • Limpie con una tela - Hamilton Beach 14414 | Use & Care - Page 26
840172602 SPnv02.qxd:Layout 1 9/30/09 2:07 PM Page 26 Característica de Auto-Limpieza Para mantener las ventilas de vapor libres de cualquier acumulación, siga estas instrucciones cada vez que planche con vapor. 1 2 3 4 Coloque el Vapor Ajustable en SECO. Deje que la plancha se caliente en - Hamilton Beach 14414 | Use & Care - Page 27
840172602 SPnv02.qxd:Layout 1 9/30/09 2:07 PM Page 27 Resolviendo Problemas PROBLEMA PROBABLE CAUSA/SOLUCIÓN La plancha no calienta. • ¿Está conectada la plancha y la toma funciona? Revise la toma conectando una lámpara. • ¿Se ha seleccionado una temperatura? Seleccione el botón BAJO, MEDIO o - Hamilton Beach 14414 | Use & Care - Page 28
840172602 SPnv02.qxd:Layout 1 9/30/09 2:07 PM Page 28 Grupo HB PS, S.A. de C.V. Monte Elbruz No. 124 Int. 601 Col. Palmitas Polanco México, D.F. C.P. 11560 01-800-71-16-100 PRODUCTO: MARCA: PÓLIZA DE GARANTÍA MODELO: Grupo HB PS, S.A. de C.V. cuenta con una Red de Centros de Servicio - Hamilton Beach 14414 | Use & Care - Page 29
en alguno de nuestros Centros de Servicio Autorizados, por favor dirigirse a: GERENCIA INTERNACIONAL DE SERVICIO 01 800 71 16 100 Email: [email protected] RED DE CENTROS DE SERVICIO AUTORIZADA GRUPO HB PS, S.A. DE C.V. Distrito Federal ELECTRODOMÉSTICOS Av. Plutarco Elias Cailes - Hamilton Beach 14414 | Use & Care - Page 30
840172602 SPnv02.qxd:Layout 1 9/30/09 2:07 PM Page 30 30 - Hamilton Beach 14414 | Use & Care - Page 31
840172602 SPnv02.qxd:Layout 1 9/30/09 2:07 PM Page 31 31 - Hamilton Beach 14414 | Use & Care - Page 32
840172602 SPnv02.qxd:Layout 1 9/30/09 2:07 PM Page 32 Modelos: 14413 14413C 14414 14415 14416 Tipo: I71 I71 I71 I71 I71 Características Eléctricas: 120V~ 60Hz 1500W 120V~ 60Hz 1500W 120V~ 60Hz 1500W 120V~ 60Hz 1500W 120V~ 60Hz
-
 1
1 -
 2
2 -
 3
3 -
 4
4 -
 5
5 -
 6
6 -
 7
7 -
8
-
9
-
10
-
11
-
12
-
13
-
14
-
15
-
16
-
17
-
18
-
19
-
20
-
21
-
22
-
23
-
24
-
25
-
26
-
27
-
28
-
29
-
30
-
31
-
32
 |
 |
English
......................
2
Français
..................
11
Español
..................
20
Easy-Touch Iron
Fer à commandes tactiles
Plancha de Fácil Pulsación
READ BEFORE USE
LIRE AVANT UTILISATION
LEA ANTES DE USAR
Questions?
Please call us – our friendly
associates are ready to help.
USA: 1.800.851.8900
¿Preguntas?
Por favor llámenos – nuestros
amables representantes están
listos para ayudar.
MEX: 01 800 71 16 100
Le invitamos a leer cuidadosamente
este instructivo antes de usar su
aparato.
Visit
hamiltonbeach.com
for delicious
recipes, tips, and to register your
product online!
Consultez
hamiltonbeach.ca
pour de
délicieuses recettes, des conseils pratiques
et pour enregistrer votre produit !
¡Visite
hamiltonbeach.com.mx
para
recetas deliciosas, consejos, y para
registrar su producto en línea!
Questions ?
N’hésitez pas à nous appeler –
nos associés s’empresseront
de vous aider.
CAN : 1.800.267.2826
840172602 ENnv02.qxd:Layout 1
9/30/09
2:06 PM
Page 1