Harman Kardon DP 1US Owners Manual
Harman Kardon DP 1US Manual
 |
View all Harman Kardon DP 1US manuals
Add to My Manuals
Save this manual to your list of manuals |
Harman Kardon DP 1US manual content summary:
- Harman Kardon DP 1US | Owners Manual - Page 1
Owner's Manual - Harman Kardon DP 1US | Owners Manual - Page 2
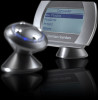
Thank you for purchasing Harman Kardon's Drive + Play™, an elegant mobile audio solution that provides the driver with total iPod® control, including full music browsing capability. We've organized this manual to make installation and operation as simple and trouble-free as possible. Please - Harman Kardon DP 1US | Owners Manual - Page 3
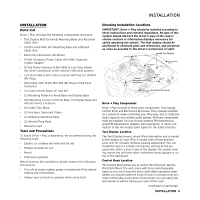
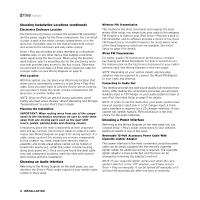
eyewear when using tools. Choosing Installation Locations IMPORTANT: Drive + Play should be installed according to these instructions and relevant regulations. No part of this system should obstruct the driver's view of the road or vehicle controls or information displays necessary for safely - Harman Kardon DP 1US | Owners Manual - Page 4
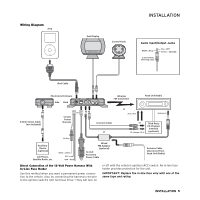
Diagram on the next page, you can connect Drive + Play's power connections to your vehicle's electrical system in one of two ways: Removable 12-Volt Accessory Power Cable With Cigarette Lighter Adaptor This power interface is the most convenient, since the power cable can be simply plugged into the - Harman Kardon DP 1US | Owners Manual - Page 5
Cable Antenna Cable (disconnect from Head Unit/Radio) Direct Connection of the 12-Volt Power Harness With In-Line Fuse Holder Use this method when you want a permanent power connection to the vehicle. Also, by connecting the harness's red wire to the ignition switch's ACC terminal, Drive + Play - Harman Kardon DP 1US | Owners Manual - Page 6
the Electronics Enclosure At the selected site, install the Electronics Enclosure. Use either the enclosed cable ties or mounting screws, as shown below. b. Select another viewing angle position (middle or top). Reassemble the parts in reverse order and tighten the recessed - Harman Kardon DP 1US | Owners Manual - Page 7
the hex setscrew at the back of the base. 5. Route the attached cable to the Electronics Enclosure. Installing the Control Knob NOTE: The Control Knob's cable can be routed differently for adhesive or screw mounting. The default cable route is through the back of the base and should be used when - Harman Kardon DP 1US | Owners Manual - Page 8
the Electronics Enclosure. Installing the iPod Cable Route the iPod dock connector cable to the chosen iPod site (e.g., the center console compartment or the glove box). Be sure to leave enough cable exposed to make connecting and disconnecting the iPod easy. Making the System Connections With all - Harman Kardon DP 1US | Owners Manual - Page 9
entire mobile audio system and then turn on Drive + Play by pressing the (bottom) Play/Pause Button. If everything is operating correctly, the iPod screen will display the following message: OK to disconnect. 2. Drive + Play's Text Display will show the Harman Kardon splash screen first, followed - Harman Kardon DP 1US | Owners Manual - Page 10
system: • To enable or disable automatic sensing and switching of audio signals on Drive + Play's auxiliary input: Drive + Play Menu > Settings > select Auto audio sense check box to enable or to disable (default) it. • To select Auxiliary input signals manually with iPod connected: 1. Drive + Play - Harman Kardon DP 1US | Owners Manual - Page 11
a few seconds, you will see the Harman Kardon splash screen, followed by the Now Playing screen. At this point, all Drive + Play settings have been reset. Browsing and Playing Songs Browsing and playing songs using Drive + Play works much like an iPod. Using the Control Knob (see Overview on page - Harman Kardon DP 1US | Owners Manual - Page 12
with one of the same type and rating. Problem: Message = Please update your iPod software Solution: • Download and install the latest software version for your iPod (see Apple.com). Technical Support If you are having other problems with Drive + Play, please contact us at: 1 - (516) - 255 - HKHK
-
 1
1 -
 2
2 -
 3
3 -
 4
4 -
 5
5 -
 6
6 -
 7
7 -
8
-
9
-
10
-
11
-
12
 |
 |

Owner’s Manual