HealthRider 225p Instruction Manual
HealthRider 225p Manual
 |
View all HealthRider 225p manuals
Add to My Manuals
Save this manual to your list of manuals |
HealthRider 225p manual content summary:
- HealthRider 225p | Instruction Manual - Page 1
, Ltd. Customer Service Department Unit 4 Revie Road Industrial Estate Revie Road, Beeston Leeds, LS118JG UK email: [email protected] CAUTION Read all precautions and instructions in this manual before using this equipment. Save this manual for future reference. USER'S MANUAL Visit our website - HealthRider 225p | Instruction Manual - Page 2
TABLE OF CONTENTS IMPORTANT PRECAUTIONS 3 BEFORE YOU BEGIN 5 ASSEMBLY 6 OPERATION AND ADJUSTMENT 9 HOW TO FOLD AND MOVE THE TREADMILL 13 TROUBLESHOOTING 15 CONDITIONING GUIDELINES 17 ORDERING REPLACEMENT PARTS Back Cover Note: An EXPLODED DRAWING and a PART LIST are attached in the centre of - HealthRider 225p | Instruction Manual - Page 3
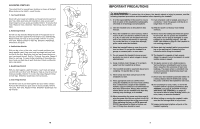
no longer than 1.5 m (5 ft.). 2. Use the treadmill only as described in this manual. 12. Keep the power cord away from heated surfaces. 3. Place the treadmill on a loose clothes that could become caught in the treadmill. Athletic support clothes are recommended for both men and women. Always wear - HealthRider 225p | Instruction Manual - Page 4
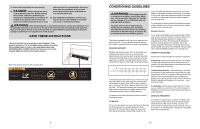
manual. Never remove the motor hood unless instructed to do so by an authorised service representative. Servicing other than the procedures in this manual should be performed by an authorised service heart rate as a guide. The chart below shows help prevent post-exercise problems. To measure your - HealthRider 225p | Instruction Manual - Page 5
, call our Customer Service Department. PROBLEM: The walking belt is PROBLEM: The heart rate monitor does not function properly SOLUTION: a. If the heart rate monitor does not function properly, refer to CHEST PULSE SENSOR TROUBLESHOOTING manual for the location). For your benefit, read this manual - HealthRider 225p | Instruction Manual - Page 6
Long Screw (3)-6 11 11 108 34 40 11 1 6 TROUBLESHOOTING Most treadmill problems can be solved by following the steps below. Find the symptom If the treadmill still will not run, please call our Customer Service Department. PROBLEM: The displays of the console do not function properly SOLUTION: - HealthRider 225p | Instruction Manual - Page 7
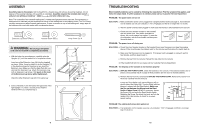
HOW TO LOWER THE TREADMILL FOR USE 1. Hold the upper end of the treadmill with your right hand as shown. Using your left thumb, press the storage latch and hold it. Pivot the treadmill until the frame and foot rail are past the storage latch. 2. Hold the treadmill firmly with both hands, and lower - HealthRider 225p | Instruction Manual - Page 8
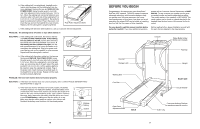
7. Place the Console Base (46) on the Handrails (1) (only the Right Handrail is shown). Pull out just enough of the two Wires (21) to connect them to the receptacles in the Console Base. Make a loop with the indicated plastic tie and insert the two Wires through the loop. Locate the Wire that has a - HealthRider 225p | Instruction Manual - Page 9
3 Adjust the incline of the treadmill as desired. To change the incline of the treadmill, press the top or bottom of the incline control until the desired incline level is reached. 4 Follow your progress with the four displays. Speed display-This display shows the speed of the walking belt. Time - HealthRider 225p | Instruction Manual - Page 10
unit to a position against your chest. CHEST PULSE SENSOR TROUBLESHOOTING The instructions on the following pages explain how the chest pulse sensor power lines or other sources. If it is suspected that this is a problem, try relocating the treadmill. • The CR2032 battery may need to be replaced - HealthRider 225p | Instruction Manual - Page 11
Filter Grommet Pulse Wire Power Cord Set Console Screw/ Endcap Screw Guide Belt Screw Filter Wires Base Leg Assembly Console Base Cover Fastener are not illustrated. REMOVE THIS EXPLODED DRAWING AND PART LIST FROM THE MANUAL Save this EXPLODED DRAWING and PART LIST for future reference. Note: - HealthRider 225p | Instruction Manual - Page 12
EXPLODED DRAWING-Model No. HETL40530 R0603A 97 62 46 99 2 10* 9 8 12 33 11 3 53 21 3 17 93 96 23 105 102* 24 99 14 66 18 19 3 1 99 103 34 39 20* 53 27 70 25 70 4 99 74 13 112 75 59 36 76 48 47 38 37 45 44 73 40 25 38 33 59 78 43 65 72 50 31 30 29 93
-
 1
1 -
 2
2 -
 3
3 -
 4
4 -
 5
5 -
 6
6 -
 7
7 -
8
-
9
-
10
-
11
-
12
 |
 |

Serial Number
Decal
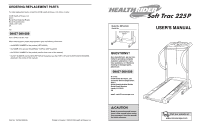
USER'S MANUAL
Model No. HETL40530
Serial No.
CAUTION
Read all precautions and instruc-
tions in this manual before using
this equipment. Save this manual
for future reference.
www.iconeurope.com
Visit our website at
Part No. 197433 R0603A
Printed in Canada © 2003 ICON Health & Fitness, Inc.
ORDERING REPLACEMENT PARTS
To order replacement parts, contact the ICON Health & Fitness, Ltd. office, or write:
ICON Health & Fitness, Ltd.
Unit 4
Revie Road Industrial Estate
Revie Road, Beeston
Leeds, LS11 8JG
UK
Tel:
Fax: 0 (044) 113 387 7125
When ordering parts, please be prepared to give the following information:
•
the MODEL NUMBER of the product (HETL40530)
•
the NAME of the product (HealthRider
®
SoftTrac 225P treadmill)
•
the SERIAL NUMBER of the product (see the front cover of this manual)
•
the KEY NUMBER and the DESCRIPTION of the part(s) (see the PART LIST and the EXPLODED DRAWING
attached in the centre of this manual)
08457 089 009
QUESTIONS?
As a manufacturer, we are com-
mitted to providing complete
customer satisfaction. If you
have questions, or if there are
missing or damaged parts,
please call:
Or write:
ICON Health & Fitness, Ltd.
Customer Service Department
Unit 4
Revie Road Industrial Estate
Revie Road, Beeston
Leeds, LS118JG
UK
email: [email protected]
08457 089 009