HealthRider H550i Treadmill English Manual
HealthRider H550i Treadmill Manual
 |
View all HealthRider H550i Treadmill manuals
Add to My Manuals
Save this manual to your list of manuals |
HealthRider H550i Treadmill manual content summary:
- HealthRider H550i Treadmill | English Manual - Page 1
questions, or if parts are damaged or missing, PLEASE CONTACT OUR CUSTOMER SERVICE DEPARTMENT DIRECTLY. CALL TOLL-FREE: 1-888-922-4222 Mon.-Fri., 6 a.m.-6 p.m. MST ON THE WEB: www.healthriderservice.com USER'S MANUAL CAUTION Read all precautions and instructions in this manual before using this - HealthRider H550i Treadmill | English Manual - Page 2
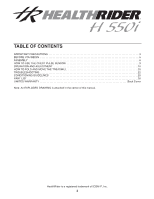
PULSE SENSOR 9 OPERATION AND ADJUSTMENT 10 HOW TO FOLD AND MOVE THE TREADMILL 20 TROUBLESHOOTING 22 CONDITIONING GUIDELINES 25 PART LIST 26 LIMITED WARRANTY Back Cover Note: An EXPLODED DRAWING is attached in the center of this manual. HealthRider is a registered trademark of ICON IP, Inc. 2 - HealthRider H550i Treadmill | English Manual - Page 3
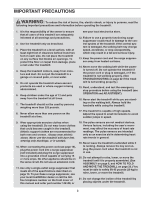
away from heated surfaces. 14. Never move the walking belt while the power is turned off. Do not operate the treadmill if the power cord or plug is damaged, or if the treadmill is not working properly. (See TROUBLESHOOTING on page 22 if the treadmill is not working properly.) 15. Read, understand - HealthRider H550i Treadmill | English Manual - Page 4
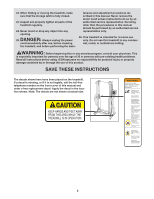
35 or persons with pre-existing health problems. Read all instructions before using. ICON assumes no responsibility for personal injury or property damage sustained by or through the use of this product. SAVE THESE INSTRUCTIONS The decals shown here have been placed on the treadmill. If a decal is - HealthRider H550i Treadmill | English Manual - Page 5
please review the drawing below and familiarize yourself with the labeled parts. Water Bottle Holder (no water bottle is included) Handgrip Pulse Sensor Latch Knob Walking Belt Foot Rail Book Holder Console Key/Clip Handrail Reset/Off Circuit Breaker Front Wheel Power Cord Rear Roller Adjustment - HealthRider H550i Treadmill | English Manual - Page 6
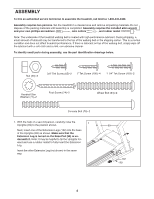
normal condition and does not affect treadmill performance. If there is lubricant on top of the walking belt, simply wipe off the lubricant with a soft cloth and a mild, non-abrasive cleaner. To identify small parts during assembly, use the part identification drawings below. Nut (20)-2 3/4" Tek - HealthRider H550i Treadmill | English Manual - Page 7
2. Insert the tab on one of the Handrail Brackets (70) into 2 the indicated slot in the right Upright (69). Attach the Handrail Bracket with a 3/4" Tek Screw (65). Attach the other Handrail Bracket (not shown) to the left Upright (not shown) the same way. While a second person holds the console - HealthRider H550i Treadmill | English Manual - Page 8
69 7. Place the treadmill in the storage position (see HOW TO FOLD THE TREADMILL FOR STORAGE on page parts are properly tightened before you use the treadmill. Note: Extra hardware may be included. Keep the included allen wrench in a secure place; the allen wrench is used to adjust the walking belt - HealthRider H550i Treadmill | English Manual - Page 9
run on the treadmill, position yourself near the center of the walking belt. For the console to display heart rate readings, the user must be within arm's length of the console. • The chest pulse sensor is designed to work with people who have normal heart rhythms. Heart rate reading problems may be - HealthRider H550i Treadmill | English Manual - Page 10
being damaged, always use a surge suppressor with your treadmill (see drawing 1 at the right). To purchase a surge suppressor, see your local HealthRider dealer or call the toll-free telephone number on the front cover of this manual and order part number 146148, or see your local electronics store - HealthRider H550i Treadmill | English Manual - Page 11
of the console, remove the plastic. To prevent damage to the walking platform, always wear clean shoes while using the treadmill. The first time the treadmill is used, observe the alignment of the walking belt, and center the walking belt if necessary (see page 23). The console also offers four - HealthRider H550i Treadmill | English Manual - Page 12
in speed until it reaches the selected speed setting. To stop the walking belt, press the Stop button. To restart the walking belt, press the Start button, the Speed increase button, or one of the twelve numbered buttons. 4 Change the incline of the treadmill as desired. To change the incline of the - HealthRider H550i Treadmill | English Manual - Page 13
Note: For simplicity, all instructions in this section refer to miles the fans are left on when the walking belt is stopped, the fans will automatically turn treadmill to the lowest setting. The incline must be at the lowest setting when the treadmill is folded to the storage position or the treadmill - HealthRider H550i Treadmill | English Manual - Page 14
The walking belt will then slow to a stop. If the speed or incline setting for the current segment is too high or too low, you can manually Speed increase button. The walking belt will begin to move at 1 mph. When the next segment of the program begins, the treadmill will automatically adjust to - HealthRider H550i Treadmill | English Manual - Page 15
key from the console. When the program ends, make sure that the incline of the treadmill is at the lowest setting. Next, remove the key from the console and put after the button is pressed, the walking belt will begin to move. Hold the handrails and begin walking. Refer to the matrix. Each custom - HealthRider H550i Treadmill | English Manual - Page 16
, and the treadmill will automatically adjust to the second speed and incline settings that you programmed previously. The program will continue in this way until the speed setting for the last segment is shown in the Current Segment column and the last segment ends. The walking belt will then slow - HealthRider H550i Treadmill | English Manual - Page 17
increase button to start the program. A moment after the button is pressed, the treadmill will automatically adjust to the first speed and incline settings of the program. Hold the handrails and begin walking. Heart rate program 13 is divided into 100 oneminute segments. The same target heart - HealthRider H550i Treadmill | English Manual - Page 18
and the speed of the treadmill may automatically decrease. If this occurs, see CHEST PULSE SENSOR TROUBLESHOOTING on page 9. To stop the program at any time, press the Stop button. To restart the program, press the Start button or the Speed increase button. The walking belt will begin to move at - HealthRider H550i Treadmill | English Manual - Page 19
disappears. The priority display will show the total number of hours that the treadmill has been operated. The lower right corner of the display will show the total number of miles or kilometers that the walking belt has moved. An "E" for English miles or an "M" for metric kilometers will appear - HealthRider H550i Treadmill | English Manual - Page 20
HOW TO FOLD AND MOVE THE TREADMILL HOW TO FOLD THE TREADMILL FOR STORAGE Before folding the treadmill, adjust the incline to the lowest position. If this is not done, the treadmill may be permanently damaged. Next, unplug the power cord. CAUTION: You must be able to safely lift 45 pounds (20 kg) to - HealthRider H550i Treadmill | English Manual - Page 21
until the frame is past the pin on the lock knob. Slowly release the latch knob. 2. Hold the treadmill firmly with both hands, and lower the treadmill to the floor. Do not drop the treadmill frame to the floor. CAUTION: To decrease the possibility of injury, bend your legs and keep your back - HealthRider H550i Treadmill | English Manual - Page 22
TROUBLESHOOTING Most treadmill problems can be solved by following the steps below. Find the symptom that applies, and follow the steps listed. If further assistance is needed, see the front cover of this manual. PROBLEM: The power does not turn on SOLUTION: a. Make sure that the power cord is - HealthRider H550i Treadmill | English Manual - Page 23
key, and run the treadmill for a few minutes. Repeat until the walking belt is properly tightened. c. If the walking belt still slows when walked on, see the front cover of this manual. b 3"-4" Rear Roller Bolts PROBLEM: The walking belt is off-center or slips when walked on SOLUTION: a. If the - HealthRider H550i Treadmill | English Manual - Page 24
PROBLEM: The chest pulse sensor does not function properly SOLUTION: a. If the chest pulse sensor does not function properly, see CHEST PULSE SENSOR TROUBLESHOOTING on page 9. b. If the chest pulse sensor still does not function properly, the battery should be changed. To replace the battery, - HealthRider H550i Treadmill | English Manual - Page 25
or individuals with preexisting health problems. The pulse sensors are by using your heart rate as a guide. The chart below shows recommended heart rates the speed and incline of the treadmill until your heart rate is near workout should include the following three parts: A Warm-up-Start each workout - HealthRider H550i Treadmill | English Manual - Page 26
Incline Motor Stop 38 1 Motor Belly Pan 39 1 Idler Pulley Washer 40 1 Static Decal 41 1 Front Roller Bushing 42 1 Power Cord 43 1 Reset/Off Circuit Breaker 44 2 Short Hood Cover Screw 45 4 Belt Guide Screw 46 2 Belt Guide 47 2 Isolator 48 1 Pulse Wire 49 1 Left Endcap Foot 50 1 Right Endcap Foot 51 - HealthRider H550i Treadmill | English Manual - Page 27
Warning Decal Console Fan Right Cup Holder Left Cup Holder Book Holder Power Cord Grommet Frame 3/4" Screw Roller Star Washer Right Fan Grill Isolator Strip 115 1 116 1 117 4 118 2 # 1 Wire, 2 Ring 4" Green Wire, F/2 Ring 8" Red Wire, M/F User's Manual # These parts are not illustrated 27 - HealthRider H550i Treadmill | English Manual - Page 28
EXPLODED DRAWING-Model No. HRTL77105.0 R1005A 60 35 61 96 110 67 59 112 111 1 46 45 87 64 114 14 35 62 16 11 34 116 15 18 88 35 4 26 17 22 10 25 39 27 13 12 19 9 21 2 111 47 5 53 6 7 8 9 41 88 51 37 36 32 3 1 2 9 9 6 24 38 53 27 29 27 27 57 28 27 30 20 27 54 83 40 - HealthRider H550i Treadmill | English Manual - Page 29
EXPLODED DRAWING-Model No. HRTL77105.0 R1005A 108 107 81 87 105 87 87 101 87 87 88 87 106 117 79 117 78 77 55 68 117 117 98 84 72 73 79 115 85 90 76 63 85 87 88 82 80 87 88 87 40 87 71 87 111 87 66 88 87 87 111 113 87 105 87 102 63 48 90 79 103 87 99 85 90 65 63 63 - HealthRider H550i Treadmill | English Manual - Page 30
of sale; store, operate, and maintain the Product as specified in the Manual; notify our Customer Service Department of any defect within 10 days after discovery of the defect; as instructed, return any defected part for replacement or, if necessary, the entire product, for repair. USER'S MANUAL-It
-
 1
1 -
 2
2 -
 3
3 -
 4
4 -
 5
5 -
 6
6 -
 7
7 -
8
-
9
-
10
-
11
-
12
-
13
-
14
-
15
-
16
-
17
-
18
-
19
-
20
-
21
-
22
-
23
-
24
-
25
-
26
-
27
-
28
-
29
-
30
 |
 |

USER'S MANUAL
Visit our website at
www.healthrider.com
new products, prizes,
fitness tips, and much more!
Serial
Number
Decal
Model No. HRTL77105.0
Serial No.
CAUTION
Read all precautions and instruc-
tions in this manual before using
this equipment. Save this manual
for future reference.
QUESTIONS?
As a manufacturer, we are com-
mitted to providing complete
customer satisfaction. If you
have questions, or if parts are
damaged or missing, PLEASE
CONTACT OUR CUSTOMER
SERVICE DEPARTMENT
DIRECTLY.
CALL TOLL-FREE:
1-888-922-4222
Mon.–Fri., 6 a.m.–6 p.m. MST
ON THE WEB:
www.healthriderservice.com