HealthRider Rc270 English Manual
HealthRider Rc270 Manual
 |
View all HealthRider Rc270 manuals
Add to My Manuals
Save this manual to your list of manuals |
HealthRider Rc270 manual content summary:
- HealthRider Rc270 | English Manual - Page 1
you have questions, or if there are missing or damaged parts, we will guarantee complete satisfaction through direct assistance from our and instructions in this manual before using this equipment. Keep this manual for future reference. USER'S MANUAL Visit our website at www.healthrider.com - HealthRider Rc270 | English Manual - Page 2
YOU BEGIN 4 ASSEMBLY 5 ADJUSTMENT AND OPERATION 9 MAINTENANCE AND TROUBLE-SHOOTING 19 CONDITIONING GUIDELINES 20 PART LIST 22 EXPLODED DRAWING 23 HOW TO ORDER REPLACEMENT PARTS Back Cover LIMITED WARRANTY Back Cover HealthRider is a registered trademark of ICON Health & Fitness, Inc. 2 - HealthRider Rc270 | English Manual - Page 3
rate trends in general. WARNING: Before beginning this or any exercise program, consult your physician. This is especially important for persons over the age of 35 or persons with pre-existing health problems. Read all instructions before using. ICON assumes no responsibility for personal injury or - HealthRider Rc270 | English Manual - Page 4
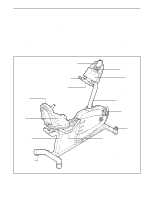
, and toning the entire body. The HealthRider® RC270 offers an impressive array of features designed to let you enjoy this healthful exercise in the comfort and privacy of your home. For your benefit, read this manual carefully before you use the exercise cycle. If you have questions after reading - HealthRider Rc270 | English Manual - Page 5
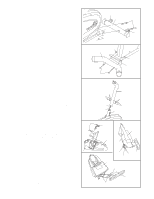
requires two persons. Place all parts of the exercise cycle in a cleared area and remove the packing materials. Do not dispose of the packing materials until assembly is completed. Assembly requires the included tools and your own adjustable wrench . Use the part drawings below to identify the - HealthRider Rc270 | English Manual - Page 6
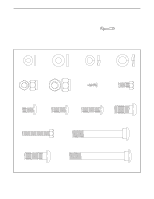
and then attach it with four M8 x 25mm Button Screws (27) and four M8 Split Washers (70). Note: The height of the Upright can be adjusted later if desired. 75 2 1 45 45 3 63 72 75 45 1 6 70 27 70 16 27 77 1 4. The Console (9) requires four "D" batteries (not 4 included); alkaline batteries - HealthRider Rc270 | English Manual - Page 7
5. Connect the Upper Wire Harness (16) to the wire harness on the Console (9). Insert both wire har- 5 nesses into the Upright (6). Attach the Console (9) to the Upright (6) with two M10 x 25mm Button Screws (55), an M10 x 30mm Button Screw (39), and three M10 Split Washers (69) as shown. 6. - HealthRider Rc270 | English Manual - Page 8
press the Pedal Strap onto the tab on the Right Pedal (37). Adjust the Left Pedal Strap (not shown) in the same way. 80 Knob 65 38 37 Tab 12. Make sure that all parts are properly tightened before you use the exercise cycle. Place a mat beneath the exercise cycle to protect the floor. 8 - HealthRider Rc270 | English Manual - Page 9
the front of the Console (9) with the four screws. Make sure that no wires are pinched. A Cylinder Jack B ADJUSTMENT AND OPERATION HOW TO ADJUST THE POSITION OF THE SEAT For effective exercise, the seat should be in the proper position. As you pedal, there should be a slight bend in your - HealthRider Rc270 | English Manual - Page 10
manual mode of the console is selected, the resistance of the exercise cycle can be adjusted with a touch of a button. As you exercise, the console will provide continuous exercise the resistance of the exercise cycle and prompts you to increase or decrease your pace as it guides you through an - HealthRider Rc270 | English Manual - Page 11
Pace bar graphs-When the manual mode is selected, only the left bar graph will appear. This bar graph represents your exercise pace. As you increase or the target pace will periodically change. As the right bar graph changes, simply adjust your pace so that the same number of bars appear in both bar - HealthRider Rc270 | English Manual - Page 12
has been selected, select the manual mode by pressing the Program button repeatedly until the upper right corner of the display is blank. 3 Begin exercising and adjust the resistance of the exercise cycle. As you exercise, adjust the resistance of the exercise cycle as desired by pressing the - HealthRider Rc270 | English Manual - Page 13
one of the eight Smart programs. Each time the console is turned on, the manual mode will be selected. To select a Smart program, press the Program button repeatedly (The Increase Arrow left bar graph will show your actual exercise pace.) As the right bar graph changes during the program, - HealthRider Rc270 | English Manual - Page 14
cycle must be connected to your VCR. See page 16 for connecting instructions. To use iFIT.com programs directly from our Web site, the exercise cycle must be connected to your home computer. See page 15 for connecting instructions. HOW TO CONNECT YOUR PORTABLE CD PLAYER Note: If your CD player - HealthRider Rc270 | English Manual - Page 15
If your stereo has an unused LINE OUT jack, see instruction A below. If the LINE OUT jack is being used, see instruction B. Note: If your computer has a 1/8" LINE OUT jack, see instruction A. If your computer has only a PHONES jack, see instruction B. A. Plug one end of a 1/8" to RCA stereo audio - HealthRider Rc270 | English Manual - Page 16
HOW TO CONNECT YOUR VCR Note: If your VCR has an unused AUDIO OUT jack, see instruction A below. If the AUDIO OUT jack is being used, see instruction B. If you have a TV with a built-in VCR, see instruction B. If your VCR is connected to your home stereo, see HOW TO CONNECT YOUR HOME STEREO - HealthRider Rc270 | English Manual - Page 17
videocassettes, the exercise cycle must Each time the console is turned on, the manual mode will be selected. To select the iFIT begin guiding you through your workout. Simply follow your personal trainer's instructions. The the iFIT.com button is lit. • Adjust the volume of your CD player or VCR - HealthRider Rc270 | English Manual - Page 18
an internet connection and an internet service provider. A list of specific system the console is turned on, the manual mode will be selected. To select instructions to start the program. When you start the program, an on-screen countdown will begin. 7 Return to the exercise cycle and begin exercising - HealthRider Rc270 | English Manual - Page 19
MAINTENANCE AND TROUBLE-SHOOTING The exercise cycle can be cleaned with a soft, damp cloth. To prevent damage to the console, keep liquids away from the console and keep the console out of direct sunlight. Inspect and properly tighten all parts of the exercise cycle regularly. Make sure to keep - HealthRider Rc270 | English Manual - Page 20
rest are essential for successful results. WARNING: Before beginning this or any exercise program, consult your physician. This is especially important for persons over the age of 35 or persons with pre-existing health problems. The pulse sensor is not a medical device. Various factors may affect - HealthRider Rc270 | English Manual - Page 21
SUGGESTED STRETCHES The correct form for several basic stretches is shown at the right. Move slowly as you stretch-never bounce. 1. Toe Touch Stretch Stand with your knees bent slightly and slowly bend forward from your hips. Allow your back and shoulders to relax as you reach down toward your - HealthRider Rc270 | English Manual - Page 22
38mm Bolt Flywheel Bearing M10 x 25mm Button Screw M8 Nylon Locknut M8.5 Washer Adjustment Bracket Eye Bolt M4 x 12mm Screw Flywheel Idler Bearing M10 x 82mm Carriage Bolt 16mm Button Screw User's Manual Note: "#" indicates a non-illustrated part. Specifications are subject to change without notice. See - HealthRider Rc270 | English Manual - Page 23
EXPLODED DRAWING-Model No. HREX04210 R1201A 23 20 4 21 72 75 41 76 40 20 24 21 39 5 55 38 21 69 69 9 13 25 55 16 60 37 6 65 36 25 21 70 70 27 71 33 60 19 32 35 78 25 70 27 73 50 48 49 12 25 78 20 70 21 74 22 47 62 56 44 32 75 45 45 83 76 42 2 42 73 32 35 36 - HealthRider Rc270 | English Manual - Page 24
HEALTHRIDER® RC270 exercise cycle) • The SERIAL NUMBER of the product (see the front cover of this manual) • The KEY NUMBER and DESCRIPTION of the part(s) (see the PART LIST on page 22). LIMITED WARRANTY ICON Health usage or repairs not provided by an ICON authorized service center, products
-
 1
1 -
 2
2 -
 3
3 -
 4
4 -
 5
5 -
 6
6 -
 7
7 -
8
-
9
-
10
-
11
-
12
-
13
-
14
-
15
-
16
-
17
-
18
-
19
-
20
-
21
-
22
-
23
-
24
 |
 |
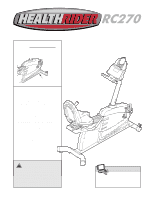
CAUTION
Read all precautions and instruc-
tions in this manual before using
this equipment. Keep this manual
for future reference.
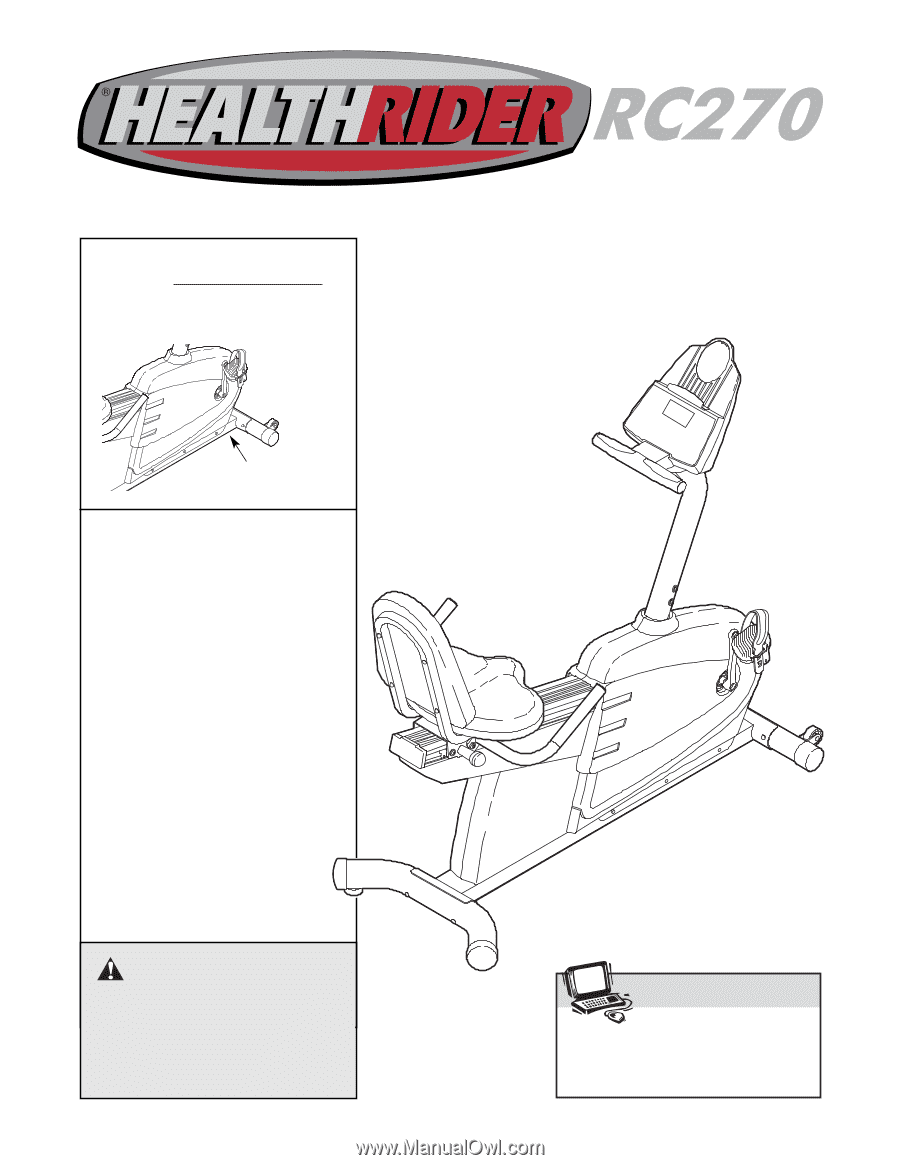
Serial Number
Decal
Model No. HREX04210
Serial No.
Write the serial number in the
space above for future reference.
QUESTIONS?
If you have questions, or if there
are missing or damaged parts,
we will guarantee complete sat-
isfaction through direct assis-
tance from our factory.
TO AVOID UNNECESSARY
DELAYS, PLEASE CALL DIRECT
TO OUR TOLL-FREE CUSTOMER
HOT LINE. The trained techni-
cians on our customer hot line
will provide immediate assis-
tance, free of charge to you.
CUSTOMER HOT LINE:
1-800-999-3756
Mon.–Fri., 6 a.m.–6 p.m. MST
USER’S MANUAL
Visit our website at
www.healthrider.com
new products, prizes,
fitness tips, and much more!