HP 1022n HP LaserJet 1022nw - Wireless Getting Started Guide - Page 28
Join a Specific Network, IP Address Configuration - default password
 |
UPC - 829160711102
View all HP 1022n manuals
Add to My Manuals
Save this manual to your list of manuals |
Page 28 highlights
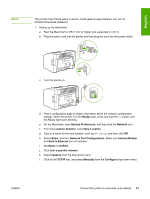
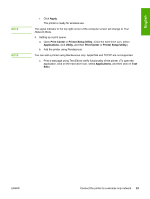
NOTE NOTE m. Find the current IP address on the configuration page. Configure the Macintosh IP address to an IP address that matches the number on the configuration page, except for the last digit. Change the last digit to one above the number shown on the configuration page. For example, if the HP network IP address is 192.0.0.192, then use 192.0.0.193, subnet 255.255.255.0, and router 192.0.0.193 (or leave the router blank) as the current IP address of the Macintosh. n. Click Apply Now. The signal indicator in the top right corner of the computer screen will change to Adhoc Mode. 2. Configuring the printer for infrastructure mode a. Open a web browser (for example, Safari, Internet Explorer (IE), or Netscape). b. Type the IP address from the configuration page in a web browser's address line to open the embedded Web server (EWS). c. Click the Networking tab. d. Click the Wireless option on the left side. e. In the Communications Mode section, select Infrastructure as the Communications Mode. f. Select the network name in the Network Name (SSID) drop-down menu, or type the name of the SSID network. This is case sensitive. g. Under Authentication, select the appropriate Authentication type: Open System, Shared Key, or WPA_PSK. If you select Shared Key or WPA_SPK, you must enter the network password. h. Under the IP Address Configuration, select either Automatic IP (if the access point can issue an IP Address) or Manual IP (to give a static IP, fill in the IP address, Subnet Mask, and Default Gateway). i. Click Apply. j. Close the web browser. k. Print a configuration page. When the printer is in the Ready state, press and hold the GO button until the Ready light starts blinking. l. Check if the IP address is correct. If it is, go to step o. If the IP address is not correct, go to step m. If the network is encrypted, verify the password. m. Go back to System Preferences, and click the Network icon. n. Change the Location Selector back to the original setting (for example, Automatic). o. Set Show: to AirPort. p. Click the Airport tab. q. Click Join a Specific Network and choose your network name. 22 Chapter 2 Setting up the printer ENWW
-
 1
1 -
2
-
3
-
4
-
5
-
6
-
7
-
8
-
9
-
10
-
11
-
12
-
13
-
14
-
15
-
16
-
17
-
18
-
19
-
20
-
21
-
22
-
 23
23 -
 24
24 -
 25
25 -
 26
26 -
 27
27 -
 28
28 -
 29
29 -
 30
30 -
 31
31 -
 32
32 -
 33
33 -
34
-
35
-
36
-
37
-
38
-
39
-
40
-
41
-
42
-
43
-
44
-
45
-
46
-
47
-
48
-
49
-
50
-
51
-
52
-
53
-
54
-
55
-
56
-
57
-
58
-
59
-
60
-
61
-
62
-
63
-
64
-
65
-
66
-
67
-
68
-
69
-
70
-
71
-
72
-
73
-
74
-
75
-
76
-
77
-
78
-
79
-
80
-
81
-
82
-
83
-
84
-
85
-
86
-
87
-
88
-
89
-
90
-
91
-
92
-
93
-
94
-
95
-
96
-
97
-
98
-
99
-
100
-
101
-
102
-
103
-
104
-
105
-
106
-
107
-
108
-
109
-
110
-
111
-
112
-
113
-
114
-
115
-
116
-
117
-
118
-
119
-
120
-
121
-
122
-
123
-
124
 |
 |