HP 110-014 Quick Setup Guide - Windows 8
HP 110-014 Manual
 |
View all HP 110-014 manuals
Add to My Manuals
Save this manual to your list of manuals |
HP 110-014 manual content summary:
- HP 110-014 | Quick Setup Guide - Windows 8 - Page 1
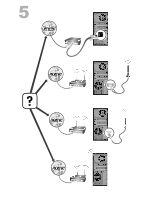
12" (30cm) HDMI DVI VGA DisplayPort DVI/HDMI DVI/VGA - HP 110-014 | Quick Setup Guide - Windows 8 - Page 2
- HP 110-014 | Quick Setup Guide - Windows 8 - Page 3
- HP 110-014 | Quick Setup Guide - Windows 8 - Page 4
http://www.hp.com/go/contactHP http://welcome.hp.com/country/us/en/wwcontact_us.html - HP 110-014 | Quick Setup Guide - Windows 8 - Page 5
provided HP Limited Warranty applicable to your product located with the user guides on service label), name, and postal address. IMPORTANT! Do NOT return your HP product to the addresses above. For U.S. products, go to http://www.hp.com/go/contactHP. For worldwide support, go to http://welcome.hp - HP 110-014 | Quick Setup Guide - Windows 8 - Page 6
- HP 110-014 | Quick Setup Guide - Windows 8 - Page 7
2. Select System and Security, and then under Action Center, select Troubleshoot common computer problems. ● Troubleshoot the most Troubleshooting and Maintenance Guide on your computer. Select the HP common computer hardware Support Assistant app on the Start screen, select My computer, and and - HP 110-014 | Quick Setup Guide - Windows 8 - Page 8
.hp.com/go/contactHP. HP Support Assistant - Maintains your computer performance and resolves problems faster by using automated updates, on-board diagnostics, and guided assistance. Select the HP Support Assistant app on the Start screen. Troubleshooting and Maintenance Guide Select the HP Support - HP 110-014 | Quick Setup Guide - Windows 8 - Page 9
ergonomically correct lifting procedures when moving the computer. To reduce the risk of serious injury read the Safety & Comfort Guide. The guide is located on the web at http://www.hp.com/ergo. 1. Place the computer so that all ventilation openings are unobstructed and cabling is not in a walkway - HP 110-014 | Quick Setup Guide - Windows 8 - Page 10
Select the HP Support Assistant app on the Start screen, select My computer, and then select User guides or visit http://www.hp.com/ergo. Internet service. Sign up with an Internet Service Provider (ISP). If you already have an account with an ISP, skip this step and follow the instructions provided - HP 110-014 | Quick Setup Guide - Windows 8 - Page 11
the Beats user interface, from the Start screen, type b, and then select HP Beats Audio. All you need to do is plug the Beats Audio headphones Activating sound 1. Press the Windows logo key on the keyboard to view the Desktop. 2. Right-click the Volume icon (white speaker) in the notification area, - HP 110-014 | Quick Setup Guide - Windows 8 - Page 12
steps to activate HDMI sound. Adjusting resolution To adjust resolution, follow the instructions for your type of graphics card. Press the Windows logo key on the keyboard to view the Desktop. Right-click an empty area of the desktop, and then: ● If NVIDIA Control Panel is present, follow the steps - HP 110-014 | Quick Setup Guide - Windows 8 - Page 13
Desktops & Displays window, right click the monitor icon at the bottom left corner of the window and select Configure. The DTV (HDMITM) 2 window opens. 4. If your HP computer is connected to an HP to connect and set up additional monitors: These instructions are for standard two-monitor setup. If you - HP 110-014 | Quick Setup Guide - Windows 8 - Page 14
Eyefinity Catalyst™ setup 1. Right-click on the Eyefinity Catalyst™ icon on the desktop to bring up ATI Catalyst Control Center™. 2. Select CCC-Advanced, select Graphics, and select Desktop & Displays, then follow the onscreen instructions to set up the layout for the two- or three-monitor display - HP 110-014 | Quick Setup Guide - Windows 8 - Page 15
once a month for visible signs of dust and debris, and clean it about once every three months. ● Visit http://www.hp.com/go/contactHP for additional cleaning instructions. Cleaning the computer vents Air vents keep the computer cool. Keep these vents clean by using a small, battery-powered vacuum - HP 110-014 | Quick Setup Guide - Windows 8 - Page 16
problems, such as issues with a monitor or a printer. The following tables present some issues you might encounter while installing, starting up, or using your computer and possible solutions. For more information or for additional troubleshooting disk drive. 4. Contact Support, whether it was - HP 110-014 | Quick Setup Guide - Windows 8 - Page 17
Symptom Possible solution Computer seems to be locked up and is not responding. Use the Task Manager to close any programs not responding, or restart the computer: 1. Press the Ctrl+Alt+Delete keys on the keyboard simultaneously. 2. Select Task Manager. 3. Select the program that is not - HP 110-014 | Quick Setup Guide - Windows 8 - Page 18
bent, reconnect the monitor connector cable to the computer. If you have a multi-monitor setup, refer to Setting up multiple displays on page 7. 12 Chapter 5 Troubleshooting - HP 110-014 | Quick Setup Guide - Windows 8 - Page 19
Keyboard and mouse (general) Symptom Possible solution Keyboard commands and typing are not recognized by the computer. Use the mouse to turn off the computer, unplug and reconnect the keyboard to the back of your computer, and then restart your computer. Mouse (with cable) does not work or is - HP 110-014 | Quick Setup Guide - Windows 8 - Page 20
the Connect button (C) on the underside of the keyboard for 5 to 10 seconds until the LED on the receiver lights or stops flashing. C 14 Chapter 5 Troubleshooting - HP 110-014 | Quick Setup Guide - Windows 8 - Page 21
the Start screen, type c, select Control Panel, and then select System and Security. 2. Under Action Center, select Troubleshoot common computer problems, and then select Troubleshoot audio playback. If you use an High-Definition Multimedia Interface (HDMI) connector on the graphics card (select - HP 110-014 | Quick Setup Guide - Windows 8 - Page 22
service provider (ISP) for assistance. Software troubleshooting To repair ● Turn the computer off completely and then turn it on again. This is the easiest (and software sometimes the best) way. problems see Troubleshooting and Maintenance Guide on your computer. Select the HP Support Assistant - HP 110-014 | Quick Setup Guide - Windows 8 - Page 23
HP DVD Writer 640b). 5. Select the Driver tab. 6. To update a driver, select Update Driver, and then follow the on-screen instructions instructions. Microsoft System Restore If you have a problem that or to add restore points manually: 1. Close all open instructions. Software troubleshooting 17 - HP 110-014 | Quick Setup Guide - Windows 8 - Page 24
screen. 3. Choose the program you want to install, select Next, and follow the on-screen instructions. 4. When you have finished reinstalling, restart the computer. Do not skip this last step. program. 4. Select the program you want to remove, and then select Uninstall. 18 Chapter 5 Troubleshooting - HP 110-014 | Quick Setup Guide - Windows 8 - Page 25
the Start screen, type h, and then select HP Support Assistant. The HP Support Assistant provides useful troubleshooting and diagnostics information and includes the following: ● E-mail support ● HP Real Time Chat with qualified support specialists ● Support phone numbers 3. For help online, go to - HP 110-014 | Quick Setup Guide - Windows 8 - Page 26
and Technical Support guide. Before upgrading your hardware Any hardware upgrades that you intend to do should only be done after you have completely set up your new computer. Refer to the setup instructions in the beginning of this guide for help with setting up. If you have any problems setting up - HP 110-014 | Quick Setup Guide - Windows 8 - Page 27
- HP 110-014 | Quick Setup Guide - Windows 8 - Page 28
your computer is also designed for maximum recyclability. Don't use a screen saver. We design to be more energy efficient. Screen savers can prevent your HP computer from going to sleep and thereby waste power. Screen savers can also reduce the life of your monitor by increasing the number of
-
 1
1 -
 2
2 -
 3
3 -
 4
4 -
 5
5 -
 6
6 -
 7
7 -
8
-
9
-
10
-
11
-
12
-
13
-
14
-
15
-
16
-
17
-
18
-
19
-
20
-
21
-
22
-
23
-
24
-
25
-
26
-
27
-
28
 |
 |

12” (30cm)
HDMI
DVI
VGA
Display
Port
DVI/HDMI
DVI/VGA