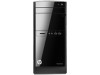
HP 110-016d Troubleshooting and Maintenance Guide
HP 110-016d Manual
 |
View all HP 110-016d manuals
Add to My Manuals
Save this manual to your list of manuals |
HP 110-016d manual content summary:
- HP 110-016d | Troubleshooting and Maintenance Guide - Page 1
Troubleshooting and Maintenance Guide - HP 110-016d | Troubleshooting and Maintenance Guide - Page 2
editions of Windows 8. This computer may require upgraded and/or separately purchased hardware, drivers and/or software to take full advantage of Windows 8 functionality. See http://www.microsoft.com for details. HP supports lawful use of technology and does not endorse or encourage the use of our - HP 110-016d | Troubleshooting and Maintenance Guide - Page 3
monitor) ...3 Keyboard and mouse (with cable) ...3 Keyboard and mouse (wireless) ...4 Speakers and sound ...5 Internet access ...5 Software troubleshooting ...6 3 System recovery ...8 Choosing a system recovery method 8 System recovery options ...8 Recovery media ...10 4 Maintenance ...12 Schedules - HP 110-016d | Troubleshooting and Maintenance Guide - Page 4
iv - HP 110-016d | Troubleshooting and Maintenance Guide - Page 5
integrity of your system and its data from unauthorized access. Review these features to ensure proper use. Computer security features Computer against new viruses beyond the trial period, purchase an extended update service. Unauthorized access to data and ongoing threats to the computer Firewall - HP 110-016d | Troubleshooting and Maintenance Guide - Page 6
or for additional troubleshooting options, see the Quick Setup Guide that accompanies your computer, or visit http://www.hp.com/go/contactHP on the back of the computer should be on; if it is not, contact Support. If the display (monitor) is blank, the monitor might not be properly connected. - HP 110-016d | Troubleshooting and Maintenance Guide - Page 7
Adjust the monitor resolution setting in Windows: too large or too small, or the images are fuzzy. 1. Right-click an empty area of the desktop, and then click Screen resolution. 2. Select the resolution from the drop-down menu. 3. Click Apply, and then click Keep changes. NOTE: In addition to - HP 110-016d | Troubleshooting and Maintenance Guide - Page 8
hold the Connect button (C) on the underside of the keyboard for 5 to 10 seconds until the LED on the receiver lights or stops flashing. 4 Chapter 2 Troubleshooting - HP 110-016d | Troubleshooting and Maintenance Guide - Page 9
select Troubleshoot common computer problems, and then select Troubleshoot audio playback do not plug a network cable into a telephone service line; doing so might damage the network adapter. open the wizard, and then follow the on-screen instructions. If your system has an external antenna, try to - HP 110-016d | Troubleshooting and Maintenance Guide - Page 10
HP DVD Writer 640b). 4. Select the Driver tab. 5. To update a driver, select Update Driver, and then follow the on-screen instructions. Or, to revert to an earlier version of a driver, select Roll Back Driver, and then follow the on-screen instructions. If you have a problem points manually: 1. - HP 110-016d | Troubleshooting and Maintenance Guide - Page 11
software programs or hardware drivers are damaged, you can reinstall it by using the HP Recovery Manager program (select models only). NOTE: Do not use the HP Recovery Manager program to program. 4. Select the program you want to remove, and then select Uninstall. Software troubleshooting 7 - HP 110-016d | Troubleshooting and Maintenance Guide - Page 12
then reinstalls the operating system, programs, and drivers. However, you must reinstall any software that - see Microsoft System Restore under Software troubleshooting on page 6. Some features might not discs purchased from HP Support. To purchase recovery discs, visit http://www.hp.com/go/contactHP - HP 110-016d | Troubleshooting and Maintenance Guide - Page 13
4. From the Start screen, type recovery, and then select HP Recovery Manager. If prompted, click Yes to allow the program to continue. 5. Select Windows Recovery Environment. 6. Follow the on-screen instructions. NOTE: If your system does not detect a recovery partition, it prompts you to insert - HP 110-016d | Troubleshooting and Maintenance Guide - Page 14
computer. If you are using a recovery DVD, the computer automatically runs HP Recovery Manager from the disc. Skip to step 7. 6. If you , and then click Next. 8. Select Factory Reset. 9. Follow the on-screen instructions. Recovery media Recovery media can be created on either blank DVD discs or a - HP 110-016d | Troubleshooting and Maintenance Guide - Page 15
on the computer. 3. From the Start screen, type recovery, and then select HP Recovery Manager. If prompted, click Yes to allow the program to continue. 4. flash drive and deletes all on files on it. 6. Follow the on-screen instructions. Be sure to label the USB flash drive and store it in a secure - HP 110-016d | Troubleshooting and Maintenance Guide - Page 16
bugs and improve performance. Also, be sure to check for driver updates for your hardware and new versions of your favorite programs. it about once every three months. Visit http://www.hp.com/ go/contactHP for additional cleaning instructions. Cleaning the computer and monitor Follow these steps to - HP 110-016d | Troubleshooting and Maintenance Guide - Page 17
1. Unplug the power to the computer and the monitor. 2. To clean the monitor screen, use a clean, dry cloth. Do not use water on the monitor screen. For more thorough cleaning, use a clean cloth and antistatic screen cleaner. 3. Use a clean, dry cloth to dust the computer case and the monitor case. - HP 110-016d | Troubleshooting and Maintenance Guide - Page 18
3. Spray a small amount of mild glass cleaner on a soft cloth to clean the touch screen. 4. Wipe the surface and left and right side of the touch screen to remove any dirt, fingerprints, or other debris that could hinder the touch recognition of the screen. 14 Chapter 4 Maintenance - HP 110-016d | Troubleshooting and Maintenance Guide - Page 19
-
 1
1 -
 2
2 -
 3
3 -
 4
4 -
 5
5 -
 6
6 -
 7
7 -
8
-
9
-
10
-
11
-
12
-
13
-
14
-
15
-
16
-
17
-
18
-
19
 |
 |

Troubleshooting and Maintenance Guide