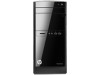
HP 110-090 Troubleshooting and Maintenance Guide
HP 110-090 Manual
 |
View all HP 110-090 manuals
Add to My Manuals
Save this manual to your list of manuals |
HP 110-090 manual content summary:
- HP 110-090 | Troubleshooting and Maintenance Guide - Page 1
Troubleshooting and Maintenance Guide - HP 110-090 | Troubleshooting and Maintenance Guide - Page 2
Not all features are available in all editions of Windows 8. This computer may require upgraded and/or separately purchased hardware, drivers and/or software to take full advantage of Windows 8 functionality. See http://www.microsoft.com for details. HP supports lawful use of technology and does not - HP 110-090 | Troubleshooting and Maintenance Guide - Page 3
Table of contents 1 Protecting your computer ...1 Computer security features ...1 2 Troubleshooting ...2 Computer does not start ...2 Power ...3 Display (monitor) ...3 Keyboard and mouse (with cable) ...3 Keyboard and mouse (wireless) ...4 Speakers and sound ...5 Internet access ...5 Software - HP 110-090 | Troubleshooting and Maintenance Guide - Page 4
iv - HP 110-090 | Troubleshooting and Maintenance Guide - Page 5
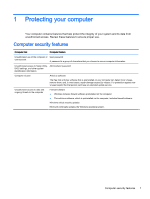
. Review these features to ensure proper use. Computer security features Computer risk Computer feature Unauthorized use of the computer or service. Unauthorized access to data and ongoing threats to the computer Firewall software ● Windows includes firewall software preinstalled on the computer - HP 110-090 | Troubleshooting and Maintenance Guide - Page 6
in properly, and the wall outlet is functioning, the green power supply light on the back of the computer should be on; if it is not, contact Support. If the display (monitor) is blank, the monitor might not be properly connected. Connect the monitor to the computer, plug it in, and turn it on. See - HP 110-090 | Troubleshooting and Maintenance Guide - Page 7
● If no pins are bent, reconnect the monitor connector cable to the computer. Images on the screen are Adjust the monitor resolution setting in Windows: too large or too small, or the images are fuzzy. 1. Right-click an empty area of the desktop, and then click Screen resolution. 2. Select the - HP 110-090 | Troubleshooting and Maintenance Guide - Page 8
in all open programs. 4. After saving changes in all open programs, press the Power button to turn off the computer. 5. After the shutdown is complete, unplug and reconnect the mouse connector to the back of your until the LED on the receiver lights or stops flashing. 4 Chapter 2 Troubleshooting - HP 110-090 | Troubleshooting and Maintenance Guide - Page 9
Troubleshoot common computer problems, and then select Troubleshoot audio playback. If you use a High-Definition Multimedia Interface (HDMI) connector on the graphics card (select models only) to connect your monitor to the computer, you should also connect analog speakers to the computer Audio - HP 110-090 | Troubleshooting and Maintenance Guide - Page 10
of device you want to update or roll back. (For example, DVD/CD-ROM drives.) 3. Double-click the specific item (for example, HP DVD Writer 640b). 4. Select the Driver tab. 5. To update a driver, select Update Driver, and then follow the on-screen instructions. Or, to revert to an earlier version of - HP 110-090 | Troubleshooting and Maintenance Guide - Page 11
software programs or hardware drivers are damaged, you can reinstall it by using the HP Recovery Manager program (select models only). NOTE: Do not use the HP Recovery Manager program to reinstall software programs that came on CDs or DVDs included in the computer box. Reinstall these programs - HP 110-090 | Troubleshooting and Maintenance Guide - Page 12
from HP Support. To purchase recovery discs, visit http://www.hp.com/go/contactHP. System recovery from the Windows Start screen CAUTION: System Recovery deletes all data and programs you created or installed. Back up any important data to a removable disc or USB flash drive. If the computer is - HP 110-090 | Troubleshooting and Maintenance Guide - Page 13
. 5. Select Windows Recovery Environment. 6. Follow the on-screen instructions. NOTE: If your system does not detect a recovery partition, it prompts you to insert recovery media. Insert the disc or USB flash drive, select Yes, and then click Next to restart the computer and run HP Recovery Manager - HP 110-090 | Troubleshooting and Maintenance Guide - Page 14
computer automatically runs HP Recovery Manager from the disc. Skip to step 7. 6. If you are running System Recovery from a USB flash drive, press Esc as the computer is powering on your computer model (typically 1-3 DVD discs). The Recovery Disc Creator program will tell you the specific number of - HP 110-090 | Troubleshooting and Maintenance Guide - Page 15
then select Next. 4. Follow the on-screen instructions. Label each disc as you make it (for example, Recovery 1, Recovery 2). To create a recovery USB flash drive: 1. Close all open programs. 2. Insert the USB flash drive into a USB port on the computer. 3. From the Start screen, type recovery, and - HP 110-090 | Troubleshooting and Maintenance Guide - Page 16
computer to ensure that it works at peak performance. Schedules and tasks Follow these instructions at the recommended intervals for proper maintenance. Weekly Software cleanup Use the Windows hard disk drive. Keeping the computer free of dust, dirt, and heat Keeping your computer system free - HP 110-090 | Troubleshooting and Maintenance Guide - Page 17
residue or a spill on the computer or monitor case, use isopropyl (rubbing) alcohol and a lint-free cloth. Cleaning the computer vents Air vents keep the computer cool. Keep these vents clean by using a small, battery-powered vacuum cleaner. (A battery-powered vacuum cleaner eliminates the risk of - HP 110-090 | Troubleshooting and Maintenance Guide - Page 18
3. Spray a small amount of mild glass cleaner on a soft cloth to clean the touch screen. 4. Wipe the surface and left and right side of the touch screen to remove any dirt, fingerprints, or other debris that could hinder the touch recognition of the screen. 14 Chapter 4 Maintenance - HP 110-090 | Troubleshooting and Maintenance Guide - Page 19
-
 1
1 -
 2
2 -
 3
3 -
 4
4 -
 5
5 -
 6
6 -
 7
7 -
8
-
9
-
10
-
11
-
12
-
13
-
14
-
15
-
16
-
17
-
18
-
19
 |
 |

Troubleshooting and Maintenance Guide