HP 1200d HP Business Inkjet 1200 - Getting Started Guide - Page 21
Problems printing an alignment Problems installing software, Problems connecting to a network - manual
 |
View all HP 1200d manuals
Add to My Manuals
Save this manual to your list of manuals |
Page 21 highlights
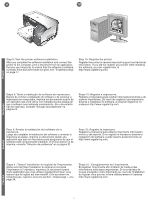
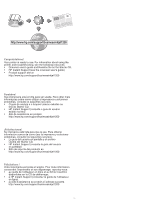
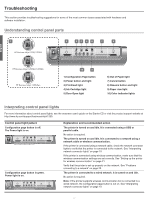
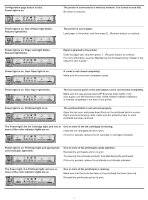
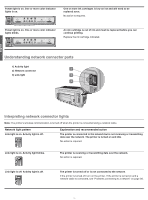
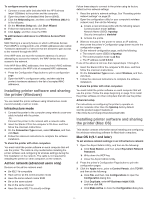
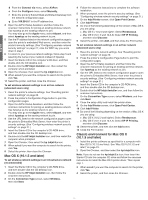
Problems printing an alignment page Check the printer to ensure the following: Power light is on and not blinking. When the printer is first turned on, it takes approximately 45 seconds to warm up. No lights on the control panel are lit or blinking and that the printer is in the Ready state. If lights are lit or blinking, see Printer lights reference. Ensure power cord and other cables are working and firmly connected to the printer. All packing tapes and materials are removed from the printer. Printheads and ink cartridges are properly installed in their correct color-coded slots. Press down firmly on each one to ensure proper contact. Ensure you have removed the tape from each printhead. Printhead latch and all covers are closed. Rear access panel or auto-duplex unit is locked into place. Media is loaded correctly in the tray and is not jammed in the printer. Problems installing software Check the computer system to ensure the following: The computer meets the system requirements (see the onscreen user's guide on the Starter CD). Verify installation preliminaries Before installing software on a Windows computer, ensure all other programs are closed. If the computer does not recognize the path to the CD drive that you type, ensure you are specifying the correct drive letter. If the computer cannot recognize the Starter CD in the CD drive, inspect the CD for damage. Also, you can download the printer driver from http://www.hp.com/support/businessinkjet1200. Reinstall the printer software If you are using Windows and the computer cannot detect the printer, run the Scrubber utility (located in the Utils\Scrubber folder on the Starter CD) to perform a clean printer driver uninstallation. Restart your computer, and re-install the printer driver. Problems connecting to a network Note: After correcting any of the following, run the setup program again. General network troubleshooting If you are unable to install the printer software, verify that: All cable connections to the computer and the printer are secure. The network is operational and the network hub is turned on. All applications, including virus protection programs and personal firewalls, are closed or disabled. Make sure the printer is installed on the same subnet as the computers that will be using the printer. If the installation program cannot discover the printer, print the configuration page and enter the IP address manually in the installation program. If you are using a computer running Windows, make sure that the network ports created in the printer driver match the printer IP address: 1) Print a configuration page. For instructions, see "Configuration page" on page 21. 2) From the Windows desktop, click Start, point to Settings, and then click Printers or Printers and Faxes. 3) Right-click the printer icon, click Properties, and then click the Ports tab. 4) Select the TCP/IP port for the printer, and then click Configure Port. 5) Compare the IP address listed in the dialog box and make sure it matches the IP address listed on the configuration page. If the IP addresses are different, change the IP address in the dialog box to match the address on the configuration page. 6) Click OK twice to save the settings and close the dialog boxes. Problems connecting to a wired network If the Link light on the network connector does not turn on, make sure that all of the "General network troubleshooting" conditions listed above are met. Though it is not recommended that you assign the printer with a static IP address, you might resolve some installation problems (such as a conflict with a personal firewall) by doing so. For more information, see the onscreen user's guide. Problems setting up wireless communication If you cannot communicate with the printer after completing the software installation and removing the network cable, then one or more of the following network settings in the printer might be wrong: Network Name (SSID) Communication Mode Channel (ad hoc networks only) Security settings and encryption key For information about correcting these settings, see "Setting up the printer for wireless communication" on page 21. Resetting printer network settings If the printer is unable to communicate with the network, reset the printer network settings: 1 While pressing the Configuration Page button, press (Resume button) three times. 2 If you have installed the printer driver, uninstall and then re-install the printer driver. Note: For late-breaking information, see the readme file and release notes or visit the product support website at http://www.hp.com/support/businessinkjet1200. 20
-
 1
1 -
2
-
3
-
4
-
5
-
6
-
7
-
8
-
9
-
10
-
11
-
12
-
13
-
14
-
15
-
 16
16 -
 17
17 -
 18
18 -
 19
19 -
 20
20 -
 21
21 -
 22
22 -
 23
23 -
 24
24 -
 25
25 -
 26
26 -
27
-
28
-
29
-
30
-
31
-
32
-
33
-
34
-
35
-
36
-
37
-
38
-
39
-
40
-
41
-
42
-
43
-
44
-
45
-
46
-
47
-
48
-
49
-
50
-
51
-
52
 |
 |