HP 1600 HP Color LaserJet 1600 - User Guide - Page 92
Clearing jams, Where to look for jams
 |
UPC - 882780316614
View all HP 1600 manuals
Add to My Manuals
Save this manual to your list of manuals |
Page 92 highlights
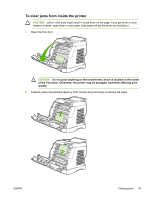
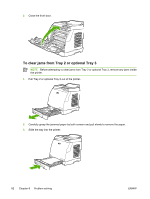
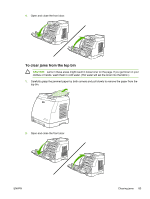
Clearing jams Occasionally, paper or other print media can become jammed during a print job. Some causes include the following events: ● The input trays are loaded improperly or overfilled. ● Tray 2 or optional Tray 3 is opened during a print job. ● Too many sheets accumulated in the output area or sheets blocked the output area. ● The print media that is being used does not meet HP specifications. See Print-media specifications. ● The environment in which the print media was stored is too humid or too dry. See Print-media specifications. Where to look for jams Jams can occur in these locations: ● Inside the printer. See To clear jams from inside the printer. ● In input areas. See To clear jams from Tray 2 or optional Tray 3. ● In the output area. See To clear jams from the top bin. Find and remove the jam by using the instructions on the following pages. If the location of the jam is not obvious, first look inside the printer. Loose toner might remain in the printer after a jam. This problem should resolve itself after a few sheets have been printed. Each section below corresponds to an area where a paper jam could occur. Use the following procedures to clear the jam. In all cases, grasp the jammed paper by both corners and pull slowly to remove the paper. 80 Chapter 8 Problem solving ENWW
-
 1
1 -
2
-
3
-
4
-
5
-
6
-
7
-
8
-
9
-
10
-
11
-
12
-
13
-
14
-
15
-
16
-
17
-
18
-
19
-
20
-
21
-
22
-
23
-
24
-
25
-
26
-
27
-
28
-
29
-
30
-
31
-
32
-
33
-
34
-
35
-
36
-
37
-
38
-
39
-
40
-
41
-
42
-
43
-
44
-
45
-
46
-
47
-
48
-
49
-
50
-
51
-
52
-
53
-
54
-
55
-
56
-
57
-
58
-
59
-
60
-
61
-
62
-
63
-
64
-
65
-
66
-
67
-
68
-
69
-
70
-
71
-
72
-
73
-
74
-
75
-
76
-
77
-
78
-
79
-
80
-
81
-
82
-
83
-
84
-
85
-
86
-
 87
87 -
 88
88 -
 89
89 -
 90
90 -
 91
91 -
 92
92 -
 93
93 -
 94
94 -
 95
95 -
 96
96 -
 97
97 -
98
-
99
-
100
-
101
-
102
-
103
-
104
-
105
-
106
-
107
-
108
-
109
-
110
-
111
-
112
-
113
-
114
-
115
-
116
-
117
-
118
-
119
-
120
-
121
-
122
-
123
-
124
-
125
-
126
-
127
-
128
-
129
-
130
-
131
-
132
-
133
-
134
-
135
-
136
-
137
-
138
-
139
-
140
-
141
-
142
 |
 |