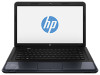
HP 2000-2b09WM User Guide - Windows 7
HP 2000-2b09WM Manual
 |
View all HP 2000-2b09WM manuals
Add to My Manuals
Save this manual to your list of manuals |
HP 2000-2b09WM manual content summary:
- HP 2000-2b09WM | User Guide - Windows 7 - Page 1
User Guide - HP 2000-2b09WM | User Guide - Windows 7 - Page 2
2013 First Edition: April 2012 Document Part Number: 681034-002 Product notice This guide describes features that are common to most models. Some features may not be available on your computer. Software terms By installing, copying, downloading, or otherwise using any software product preinstalled - HP 2000-2b09WM | User Guide - Windows 7 - Page 3
the AC adapter to come into contact with the skin or a soft surface, such as pillows or rugs or clothing, during operation. The computer and the AC adapter comply with the user-accessible surface temperature limits defined by the International Standard for Safety of Information Technology Equipment - HP 2000-2b09WM | User Guide - Windows 7 - Page 4
iv Safety warning notice - HP 2000-2b09WM | User Guide - Windows 7 - Page 5
things to do ...1 More HP resources ...2 2 Getting to know your computer ...3 Finding your hardware and 15 Using an Internet service provider 15 Setting up a WLAN 16 Configuring a wireless router 16 Protecting your WLAN 16 Connecting to a WLAN 17 Using Bluetooth wireless devices (select models - HP 2000-2b09WM | User Guide - Windows 7 - Page 6
the keyboard and pointing battery power ...35 Removing a user-replaceable battery 35 Finding battery information 36 Conserving battery power 36 Identifying low battery levels 36 Storing a user-replaceable battery 36 Disposing of a user-replaceable battery 37 Replacing a user-replaceable battery - HP 2000-2b09WM | User Guide - Windows 7 - Page 7
replacing memory modules 49 Updating programs and drivers ...51 Cleaning your computer ...51 Cleaning the display, sides, and cover 52 Cleaning the TouchPad and keyboard 52 Traveling with or shipping your computer 52 9 Securing your computer Windows security updates 57 Installing HP and - HP 2000-2b09WM | User Guide - Windows 7 - Page 8
65 Recovering using HP Recovery partition (select models only 66 Recovering using the recovery media 66 Changing the computer boot order 66 12 Specifications ...68 Input power ...68 Operating environment ...68 13 Troubleshooting and support ...69 Troubleshooting ...70 Disc drive problems ...70 - HP 2000-2b09WM | User Guide - Windows 7 - Page 9
when external power is available ....... 73 Resolving a low battery level when no power source is available .... 73 Resolving a low battery level when the computer cannot exit Hibernation 74 Troubleshooting an AC adapter 74 Contacting support ...75 14 Electrostatic Discharge ...76 Index ...77 ix - HP 2000-2b09WM | User Guide - Windows 7 - Page 10
x - HP 2000-2b09WM | User Guide - Windows 7 - Page 11
designed to enhance your work and entertainment. To get the most out of your computer, read this chapter to learn about best practices after setup, fun things to do with your computer, and where to go to get more HP resources. Best practices To protect your smart investment, after you set up and - HP 2000-2b09WM | User Guide - Windows 7 - Page 12
Setup Instructions ● Overview of computer setup and features. Help and Support ● A broad range of how-to information and troubleshooting tips. To access Help and Support, select Start > Help and Support. For more details, go to http://www.hp.com/ support. Safety & Comfort Guide ● Proper - HP 2000-2b09WM | User Guide - Windows 7 - Page 13
. A list displays all the devices installed in your computer, including optical drives, solid-state drives (SSD), or a secondary hard drive. To find out what software is included on your computer, select Start > All Programs. Front Component Speakers (2) Description Produce sound. Finding your - HP 2000-2b09WM | User Guide - Windows 7 - Page 14
Security cable slot Description Reads an optical disc. NOTE: On select models, the optical drive also writes to an optical disc. ● Green: adapter is connected and the battery is charged. ● Amber: The AC adapter is connected and the battery is charging. ● Off: The computer is using DC power. - HP 2000-2b09WM | User Guide - Windows 7 - Page 15
out (headphone) jack (8) Digital Media Slot Description Connects an external VGA monitor or projector. Enables airflow to cool internal components. NOTE: The computer fan starts up automatically to cool internal components and prevent overheating. It is normal for the internal fan to cycle on and - HP 2000-2b09WM | User Guide - Windows 7 - Page 16
(10) Hard drive light Power light Description ● Blinking white: The hard drive is being accessed. ● White: The computer is on. ● Blinking white: The computer is in the Sleep state, which is an energy-saving mode. The computer shuts off power to the display and other unneeded components. ● Off: The - HP 2000-2b09WM | User Guide - Windows 7 - Page 17
On: The webcam is in use. *The antennas are not visible from the outside of the computer. For optimal transmission, keep the areas immediately around the antennas free from obstructions. For wireless regulatory to your country or region. These notices are located in Help and Support. Display 7 - HP 2000-2b09WM | User Guide - Windows 7 - Page 18
Description Turns the TouchPad on or off. ● On: The TouchPad is off. ● Off: The TouchPad is on. Moves the on-screen pointer and selects or activates items on the screen. Functions like the left button on an external mouse. Functions like the right button on an external mouse. 8 Chapter 2 Getting to - HP 2000-2b09WM | User Guide - Windows 7 - Page 19
and other unneeded components. ● Off: The computer is off or in Hibernation. Hibernation is an energy-saving mode that uses the least amount of power. ● White: An integrated wireless device, such as a wireless local area network (WLAN) device and/or a Bluetooth® device, is on. ● Amber: All wireless - HP 2000-2b09WM | User Guide - Windows 7 - Page 20
in the Sleep state, press the button briefly to exit Sleep. ● When the computer is in Hibernation, press the button down briefly to exit Hibernation. If the computer has stopped responding and Microsoft® Windows® shutdown procedures are ineffective, press and hold the power button down for at least - HP 2000-2b09WM | User Guide - Windows 7 - Page 21
Description Displays system information when pressed in combination with the fn key. Displays system information when pressed in combination with the esc key. Displays the Windows Start menu. Execute frequently used system functions. Displays a shortcut menu for items beneath the cursor. Top 11 - HP 2000-2b09WM | User Guide - Windows 7 - Page 22
agency that regulates wireless devices in your country or region. If you replace the module and then receive a warning message, remove the module to restore computer functionality, and then contact support through Help and Support. Contains the hard drive. 12 Chapter 2 Getting to know your - HP 2000-2b09WM | User Guide - Windows 7 - Page 23
(5) Model description (select models only) Have this information available when you contact support. The service label is affixed to the bottom of the computer. ● Microsoft® Certificate of Authenticity-Contains the Windows Product Key. You may need the Product Key to update or troubleshoot the - HP 2000-2b09WM | User Guide - Windows 7 - Page 24
your computer communicates with a wireless router or a wireless access point. ● Bluetooth device- Support. Using the wireless controls You can control the wireless devices in your computer Individual wireless devices can be controlled through HP Connection Manager. Using operating system controls The - HP 2000-2b09WM | User Guide - Windows 7 - Page 25
Support. Using a WLAN With a WLAN device, you can access a wireless local area network (WLAN), which is composed of other computers large number of computers and accessories and and wired computers to share an connect your wireless computer to the modem, and test the Internet service. NOTE: Your - HP 2000-2b09WM | User Guide - Windows 7 - Page 26
DSL or cable) (1) and high-speed Internet service purchased from an Internet service provider ● A wireless router (2) (purchased separately) ● A wireless computer (3) NOTE: Some modems have a built-in over the network. For more information, see Help and Support. 16 Chapter 3 Connecting to a network - HP 2000-2b09WM | User Guide - Windows 7 - Page 27
allowing you to manually search for and connect Bluetooth wireless devices (select models only) A Bluetooth device provides short-range wireless communications that replace the physical cable connections that traditionally link electronic devices such as the following: ● Computers (desktop, notebook - HP 2000-2b09WM | User Guide - Windows 7 - Page 28
an 8-pin, RJ-45 network cable. To connect the network cable, follow these steps: 1. Plug the network cable into the network jack (1) on the computer. 2. Plug the other end of the network cable into a network wall jack (2) or router. NOTE: If the network cable contains noise suppression circuitry - HP 2000-2b09WM | User Guide - Windows 7 - Page 29
your HP computer as an entertainment hub to socialize via the webcam, enjoy and manage your music, and download and watch movies. Or, to make your computer an even more powerful entertainment center, connect external devices like speakers, headphones, monitor, projector, TV, and, on select models - HP 2000-2b09WM | User Guide - Windows 7 - Page 30
using the webcam, select Start > Help and Support. Using audio On your HP computer, you can play music CDs, download and computer or on a docking station. To connect wireless speakers to your computer, follow the device manufacturer's instructions. To connect high-definition speakers to the computer - HP 2000-2b09WM | User Guide - Windows 7 - Page 31
on your computer, follow these steps: 1. Select Start > Control Panel > Hardware and Sound > Sound. 2. When the Sound window opens, computer, using the correct cable. Check the device manufacturer's instructions if you have questions. Connecting a VGA monitor or projector To see the computer screen - HP 2000-2b09WM | User Guide - Windows 7 - Page 32
high-definition TV or monitor, connect the high-definition device according to the following instructions. To connect an HDMI device to your computer, you need an HDMI cable, sold separately. NOTE: Adjust the screen resolution of the external device, especially if you choose the "Extend" option. Go - HP 2000-2b09WM | User Guide - Windows 7 - Page 33
device only: View the screen image on the external device only. Each time you press f4, the display state changes. Configuring audio settings (with HDMI TV) HDMI is the only video interface that supports high-definition video and audio. After you connect an HDMI TV to the computer, you can then turn - HP 2000-2b09WM | User Guide - Windows 7 - Page 34
Managing your audio and video files CyberLink PowerDVD (select models only) helps you manage and edit your photo and video collections. ▲ To start CyberLink PowerDVD, select Start > All Programs > Music, Photos and Videos, and then - HP 2000-2b09WM | User Guide - Windows 7 - Page 35
the screen. Click Mouse to explore the pointing device features and to select preferred settings. Use an external USB mouse (purchased separately) by connecting it to one of the USB ports on the computer. The keyboard allows you to type and the action keys and hot keys allow you to perform specific - HP 2000-2b09WM | User Guide - Windows 7 - Page 36
, which provides tutorials, information about the Windows operating system and your computer, answers to questions, and updates to your computer. Help and Support also provides automated troubleshooting tools and access to support. f2 Decreases the screen brightness incrementally as long as you - HP 2000-2b09WM | User Guide - Windows 7 - Page 37
button TouchPad light (3) TouchPad zone Description Turns the TouchPad on or off. ● On: The TouchPad is off. ● Off: The TouchPad is on. Moves the on-screen pointer and selects or activates items on the - HP 2000-2b09WM | User Guide - Windows 7 - Page 38
off or on, quickly double-tap the TouchPad on/off button. The TouchPad light is off when the TouchPad is on. 28 Chapter 5 Using the keyboard and pointing devices - HP 2000-2b09WM | User Guide - Windows 7 - Page 39
Navigating To move the on-screen pointer, slide one finger across the TouchPad in the direction you want the pointer to go. Selecting Use the left and right TouchPad buttons as you would use the corresponding buttons on an external mouse. Using the TouchPad 29 - HP 2000-2b09WM | User Guide - Windows 7 - Page 40
TouchPad gestures, place two fingers on the TouchPad at the same time. NOTE: TouchPad gestures are not supported in all programs. To view the demonstration of a gesture: 1. Select Start > Control Panel > Hardware Click Apply, and then click OK. 30 Chapter 5 Using the keyboard and pointing devices - HP 2000-2b09WM | User Guide - Windows 7 - Page 41
Scrolling Scrolling is useful for moving up, down, or sideways on a page or image. To scroll, place two fingers slightly apart on the TouchPad, and then drag them across the TouchPad in an up, down, left, or right motion. NOTE: Scrolling speed is controlled by finger speed. Pinching/Zooming Pinching - HP 2000-2b09WM | User Guide - Windows 7 - Page 42
right forefinger from 3 o'clock to 12 o'clock. NOTE: Rotating is disabled at the factory by default. Flicking Flicking allows you to navigate through screens or quickly scroll through documents. To flick, use three fingers to touch the TouchPad zone in a light, quick flicking motion up, down, left - HP 2000-2b09WM | User Guide - Windows 7 - Page 43
at the factory to initiate Sleep after a specific period of inactivity, depending on whether the computer is running on battery power or on external power. Power settings and timeouts can be changed using Power Options in Windows Control Panel. With the computer on, you can initiate Sleep in any of - HP 2000-2b09WM | User Guide - Windows 7 - Page 44
to initiate Hibernation after a specific period of inactivity, depending on whether the computer is running on battery power or on external power, or when the battery reaches a critical battery level. Power settings and timeouts can be changed in Windows Control Panel. To initiate Hibernation - HP 2000-2b09WM | User Guide - Windows 7 - Page 45
replacement battery provided by HP, or a compatible battery purchased from HP. CAUTION: Removing a battery that is the sole power source for the computer can cause loss of information. So before removing the battery, save your work and initiate Hibernation, or shut down the computer through Windows - HP 2000-2b09WM | User Guide - Windows 7 - Page 46
tools and information about the battery: ● Battery Check tool in Help and Support to test battery performance ● Information about calibration, power management, and proper care and storage to maximize battery life ● Information about battery types, specifications, life cycles, and capacity To access - HP 2000-2b09WM | User Guide - Windows 7 - Page 47
User Guides. Replacing a user-replaceable battery Battery Check in Help and Support notifies you to replace the battery when an internal cell is not charging properly or when the battery storage capacity has reached a weak condition. If the battery is possibly covered by an HP warranty, instructions - HP 2000-2b09WM | User Guide - Windows 7 - Page 48
can shut down the computer with the power button, the recommended procedure is to use the Windows Shut down command: NOTE: If the computer is in the 5 seconds. ● Disconnect the computer from external power. ● On models with a user-replaceable battery, remove the battery. 38 Chapter 6 Managing power - HP 2000-2b09WM | User Guide - Windows 7 - Page 49
drivers, or to learn which computer port to use, see the manufacturer's instructions. Using a USB device Most computers computer, such as a USB keyboard, mouse, external drive, printer, scanner, or USB hub. Your computer may have more than one type of USB port. See Getting to know your computer - HP 2000-2b09WM | User Guide - Windows 7 - Page 50
in the notification area lets you know that the device is recognized by the computer. Removing a USB device CAUTION: To reduce the risk of damage to a at the far right of the taskbar, and then follow the on-screen instructions. 3. Remove the device. Inserting and removing a digital storage card To - HP 2000-2b09WM | User Guide - Windows 7 - Page 51
area, at the far right of the taskbar. Then follow the on-screen instructions. 3. Press in on the card (1), and then remove it from the battery is the only source of power, be sure the battery is sufficiently charged before writing to media. ● Do not type on the keyboard or move the computer - HP 2000-2b09WM | User Guide - Windows 7 - Page 52
integrated into the computer. AACS keys require occasional renewal to support playback of new BD movie releases. The CyberLink PowerDVD program will request an update to continue playback when such a BD movie release is inserted in the drive. Follow the on-screen instructions to install the update - HP 2000-2b09WM | User Guide - Windows 7 - Page 53
4. Hold the disc by the edges to avoid touching the flat surfaces and position the disc label-side up over the tray spindle. NOTE: If the tray is not fully accessible, tilt the disc carefully to position it over the spindle. 5. Gently press the disc (3) down onto the tray spindle until the disc - HP 2000-2b09WM | User Guide - Windows 7 - Page 54
a protective case. If the disc tray does not open normally, see Disc drive problems on page 70. Sharing drives on the network You can access software and data and install applications by sharing drives connected to another computer in your network. NOTE: Some discs, such as DVD movies and games, may - HP 2000-2b09WM | User Guide - Windows 7 - Page 55
and Disk Cleanup and by replacing a hard drive or adding memory. It also provides information about updating your programs and drivers, instructions for cleaning your computer, and tips for traveling with your computer. Improving performance Everyone wants a fast computer and by performing regular - HP 2000-2b09WM | User Guide - Windows 7 - Page 56
system. 1. Save your work and shut down the computer. 2. Disconnect all external devices connected to the computer. 3. Unplug the power cord from the AC outlet. 4. Turn the computer upside down on a flat surface. 5. Remove the battery from the computer. NOTE: To access the hard drive cover screw - HP 2000-2b09WM | User Guide - Windows 7 - Page 57
screw (1) (or screws depending on your model), and then lift up (2) and remove the cover (3). 2. Disconnect the hard drive cable (1) from the system board. 3. Lift the hard drive (2) out of the hard drive bay. NOTE: After removing the hard drive from the computer, you must remove the hard drive - HP 2000-2b09WM | User Guide - Windows 7 - Page 58
schedule, but you can defragment your computer manually at any time. To run Disk Defragmenter: 1. Connect the computer to AC power. 2. Select Start > All Programs > Accessories > System Tools > Disk Defragmenter. 3. Follow the on-screen instructions. For additional information, access the Disk - HP 2000-2b09WM | User Guide - Windows 7 - Page 59
Select Start > All Programs > Accessories > System Tools > Disk Cleanup. 2. Follow the on-screen instructions. Adding or replacing memory modules Adding memory can help improve your computer's performance. Your computer is like your physical work area. The hard drive is the filing cabinet where you - HP 2000-2b09WM | User Guide - Windows 7 - Page 60
clips snap into place. CAUTION: To prevent damage to the memory module, be sure that you do not bend the module. 50 Chapter 8 Maintaining your computer - HP 2000-2b09WM | User Guide - Windows 7 - Page 61
and memory module compartment cover. 10. Replace the battery. 11. Turn the computer right-side up, and then reconnect external power and external devices. 12. Turn on the computer. Updating programs and drivers HP recommends that you update your programs and drivers on a regular basis to the latest - HP 2000-2b09WM | User Guide - Windows 7 - Page 62
to internal components, do not use a vacuum cleaner attachment to clean the keyboard. A vacuum cleaner can deposit household debris on the keyboard surface. Traveling with or shipping your computer If you have to travel with or ship your computer, here are some tips to keep in mind to keep your - HP 2000-2b09WM | User Guide - Windows 7 - Page 63
and disconnected from external power for more than 2 weeks, remove the battery and store it separately. ● If you are shipping the computer or a drive, use suitable protective packaging and label the package "FRAGILE." ● If the computer has a wireless device installed, the use of these devices may be - HP 2000-2b09WM | User Guide - Windows 7 - Page 64
a Windows user account Unauthorized removal of the computer Security feature ● Power-on password ● Fingerprint reader Antivirus software Firewall software Administrator password Software updates User password Security cable lock Locating your security software HP Security Assistant (select models - HP 2000-2b09WM | User Guide - Windows 7 - Page 65
. ● Before you send your computer for service, back up your files, delete confidential files, and then remove all password settings. For additional information about Windows passwords, such as screen-saver passwords, select Start > Help and Support. Setting Windows passwords Password User password - HP 2000-2b09WM | User Guide - Windows 7 - Page 66
Your administrator password is not interchangeable with an administrator password set in Windows, nor is it displayed as it is set, entered, changed, the on-screen instructions. Your changes take effect when the computer restarts. Using Internet security software When you use your computer to access - HP 2000-2b09WM | User Guide - Windows 7 - Page 67
software updates HP, Microsoft Windows, and third-party software installed on your computer should be regularly updated to correct security problems and improve software performance. For more information, see Updating programs and drivers on page 51. Installing Windows security updates Updates - HP 2000-2b09WM | User Guide - Windows 7 - Page 68
an optional security cable lock A security cable lock, which is purchased separately, is designed to act as a deterrent, but it may not prevent the computer from being mishandled or stolen. Security cable locks are only one of several methods that should be employed as part of a complete security - HP 2000-2b09WM | User Guide - Windows 7 - Page 69
the screen. NOTE: Use extreme care when making changes in Setup Utility (BIOS). Errors can prevent the computer from operating troubleshooting the file. Determining the BIOS version To determine whether available BIOS updates contain later BIOS versions than those currently installed on the computer - HP 2000-2b09WM | User Guide - Windows 7 - Page 70
computer is connected to reliable external power using the AC adapter. Do not download or install a BIOS update while the computer is running on battery . 1. Select Start > Help and Support > Maintain. 2. Follow the on-screen instructions to identify your computer and access the BIOS update you want - HP 2000-2b09WM | User Guide - Windows 7 - Page 71
on or restart the computer. While the "Press the ESC key for Startup Menu" message is displayed in the lower-left corner of the screen, press esc. When the Startup Menu is displayed, press f2. 2. Click the diagnostic test you want to run, and then follow the on-screen instructions. NOTE: If you need - HP 2000-2b09WM | User Guide - Windows 7 - Page 72
to know ● Only one set of recovery media can be created. Handle these recovery tools carefully, and keep them in a safe place. ● HP Recovery Manager examines the computer and determines the required storage capacity for the flash drive or the number of blank DVD discs that will be required. Use DVD - HP 2000-2b09WM | User Guide - Windows 7 - Page 73
screen instructions to continue. To recover, see Recovering the original system using HP Recovery Manager on page 65. Creating system restore points A system restore point is a snapshot of certain hard drive contents saved by Windows System Restore at a specific whenever the computer is running - HP 2000-2b09WM | User Guide - Windows 7 - Page 74
Start > Control Panel > System and Security > Backup and Restore. 2. Follow the on-screen instructions to schedule and create a backup. NOTE: Windows includes the User Account Control feature to improve the security of the computer. You may be prompted for your permission or password for tasks such - HP 2000-2b09WM | User Guide - Windows 7 - Page 75
Select Start > Control Panel > System and Security > Backup and Restore. 2. Follow the on-screen instructions to restore your backup. NOTE: Windows includes the User Account Control feature to improve the security of the computer. You may be prompted for your permission or password for tasks such as - HP 2000-2b09WM | User Guide - Windows 7 - Page 76
. 2. Click System Recovery in the HP Recovery Manager window. 3. Follow the on-screen instructions. Recovering using the recovery media 1. If possible, back up all personal files. 2. Insert the first recovery disc into the optical drive on your computer or an optional external optical drive, and - HP 2000-2b09WM | User Guide - Windows 7 - Page 77
To change the boot order for a recovery flash drive: 1. Insert the flash drive into a USB port. 2. Restart the computer. 3. Press esc while the computer is restarting, and then press f9 for boot options. 4. Select the flash drive from the boot options window. Restore and recovery 67 - HP 2000-2b09WM | User Guide - Windows 7 - Page 78
source supplied and approved by HP for use with this computer. The computer can operate on DC power within the following specifications. Operating voltage and current Metric 5°C to 35°C -20°C to 60°C 10% to 90% 5% to 95% -15 m to 3,048 m -15 m to 12,192 m U.S. 41°F to 95°F -4°F to 140°F 10% to 90% - HP 2000-2b09WM | User Guide - Windows 7 - Page 79
13 Troubleshooting and support ● Troubleshooting ● Contacting support 69 - HP 2000-2b09WM | User Guide - Windows 7 - Page 80
are included with select computer models only. If wireless networking is not listed in the feature list on the side of the original computer package, you may add wireless networking capability to the computer by purchasing a wireless networking device. 70 Chapter 13 Troubleshooting and support - HP 2000-2b09WM | User Guide - Windows 7 - Page 81
the taskbar, right-click the icon, and then click Troubleshoot problems. Windows resets your network device and attempts to reconnect to one of computer to identify your computer to the network. ● For a network connected to your personal wireless router, review the router user guide for instructions - HP 2000-2b09WM | User Guide - Windows 7 - Page 82
be reinstalled. Get the latest version of the WLAN device software and drivers for your computer from the HP website at http://www.hp.com. If the WLAN device you are using was purchased separately, consult the manufacturer's website for the latest software. 72 Chapter 13 Troubleshooting and support - HP 2000-2b09WM | User Guide - Windows 7 - Page 83
your Internet browser and go to http://www.hp.com/support. 2. Select your country or region. 3. Click the option for software and driver downloads, and then type your computer model number in the search box. 4. Press enter, and then follow the on-screen instructions. NOTE: If the WLAN device you are - HP 2000-2b09WM | User Guide - Windows 7 - Page 84
sufficient power to exit Hibernation, follow these steps: 1. Replace the discharged user-replaceable battery with a charged battery, or connect the AC adapter to the computer and to external power. 2. Exit Hibernation by pressing the power button. Troubleshooting an AC adapter Test the AC adapter if - HP 2000-2b09WM | User Guide - Windows 7 - Page 85
If the information provided in this user guide or in Help and Support does not answer your questions, you can contact support. For U.S. support, go to http://www.hp.com/go/contactHP. For worldwide support, go to http://welcome.hp.com/country/us/en/wwcontact_us.html. Here you can: ● Chat online - HP 2000-2b09WM | User Guide - Windows 7 - Page 86
loss of information, observe these precautions: ● If removal or installation instructions direct you to unplug the computer, unplug it after being properly grounded and before removing a cover or assistance with component removal or installation, contact support. 76 Chapter 14 Electrostatic Discharge - HP 2000-2b09WM | User Guide - Windows 7 - Page 87
power 36 disposing 37 replacing 37 storing 36 battery bay 12, 13 battery information, finding 36 battery power 35 battery release latch 12 battery temperature 36 best practices 1 BIOS determining version 59 downloading an update 60 updating 59 Bluetooth device 14, 17 Bluetooth label 13 boot order - HP 2000-2b09WM | User Guide - Windows 7 - Page 88
5 RJ-45 (network) 5 K keys action 11 esc 11 fn 11 Windows applications 11 Windows logo 11 L labels Bluetooth 13 Microsoft Certificate of Authenticity 13 regulatory 13 serial number 13 service 13 wireless certification 13 WLAN 13 latch, battery release 12 lights AC adapter 4 caps lock 9 hard drive - HP 2000-2b09WM | User Guide - Windows 7 - Page 89
zone, identifying 8, 27 traveling with the computer 13, 36, 52 troubleshooting AC adapter 74 audio functions 73 disc drive 70 low battery level 73 power management 73 wireless connection 70 Troubleshooting and support 69 turning off the computer 38 U unresponsive system 38 USB cable, connecting
-
 1
1 -
 2
2 -
 3
3 -
 4
4 -
 5
5 -
 6
6 -
 7
7 -
8
-
9
-
10
-
11
-
12
-
13
-
14
-
15
-
16
-
17
-
18
-
19
-
20
-
21
-
22
-
23
-
24
-
25
-
26
-
27
-
28
-
29
-
30
-
31
-
32
-
33
-
34
-
35
-
36
-
37
-
38
-
39
-
40
-
41
-
42
-
43
-
44
-
45
-
46
-
47
-
48
-
49
-
50
-
51
-
52
-
53
-
54
-
55
-
56
-
57
-
58
-
59
-
60
-
61
-
62
-
63
-
64
-
65
-
66
-
67
-
68
-
69
-
70
-
71
-
72
-
73
-
74
-
75
-
76
-
77
-
78
-
79
-
80
-
81
-
82
-
83
-
84
-
85
-
86
-
87
-
88
-
89
 |
 |

User Guide