HP 2133 Security - Windows XP and Windows Vista
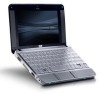
HP 2133 - Mini-Note - C7-M 1.6 GHz ULV Manual
 |
UPC - 884420156444
View all HP 2133 manuals
Add to My Manuals
Save this manual to your list of manuals |
HP 2133 manual content summary:
- HP 2133 | Security - Windows XP and Windows Vista - Page 1
Security User Guide - HP 2133 | Security - Windows XP and Windows Vista - Page 2
© Copyright 2008 Hewlett-Packard Development Company, L.P. Windows is a U.S. registered trademark of Microsoft Corporation. The information contained herein is subject to change without notice. The only warranties for HP products and services are set forth in the express warranty statements - HP 2133 | Security - Windows XP and Windows Vista - Page 3
Product notice This user guide describes features that are common to most models. Some features may not be available on your computer. iii - HP 2133 | Security - Windows XP and Windows Vista - Page 4
iv Product notice - HP 2133 | Security - Windows XP and Windows Vista - Page 5
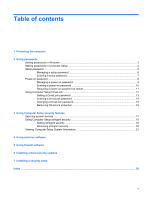
Protecting the computer 2 Using passwords Setting passwords in Windows ...3 Setting passwords in Computer Setup 4 Setup password 14 Changing a DriveLock password 15 Removing DriveLock protection 16 3 Using Computer 18 Setting stringent security 19 Removing stringent security 20 Viewing Computer - HP 2133 | Security - Windows XP and Windows Vista - Page 6
vi - HP 2133 | Security - Windows XP and Windows Vista - Page 7
reset of Computer Setup (f10) passwords Stringent security feature in Computer Setup* Unauthorized startup from an optical drive, diskette drive, or internal network adapter Unauthorized access to data Boot options feature in Computer Setup* ● Firewall software ● Windows updates Unauthorized - HP 2133 | Security - Windows XP and Windows Vista - Page 8
or exit Hibernation. Call technical support or your authorized service provider for additional information. ● If you forget both the user password and the master DriveLock password set in Computer Setup, the hard drive that is protected by the passwords is permanently locked and can no longer be - HP 2133 | Security - Windows XP and Windows Vista - Page 9
Function Administrator password* Protects access to a Windows administrator-level account. User password* Protects access to a Windows user account. *For information about setting a Windows administrator password or a Windows user password, select Start > Help and Support. Setting passwords in - HP 2133 | Security - Windows XP and Windows Vista - Page 10
computer contents when the computer turns on, restarts, or exits Hibernation. Protects access to the internal hard drive that is protected by DriveLock. It is also used to remove DriveLock protection. This password is set under DriveLock Passwords during the enable process. Protects access to the - HP 2133 | Security - Windows XP and Windows Vista - Page 11
Computer Setup and to make changes using Computer Setup. Note the following characteristics of the setup password: ● It is not interchangeable with a Windows administrator password, although both passwords can be identical. ● It is not displayed as it is set, entered, changed, or deleted. ● It - HP 2133 | Security - Windows XP and Windows Vista - Page 12
pressing f10 while the "F10 = ROM Based Setup" message is displayed in the lower-left corner of the screen. 2. Use the arrow keys to select Security > Setup password, and exit. Then follow the instructions on the screen. Your preferences go into effect when the computer restarts. 6 Chapter 2 - HP 2133 | Security - Windows XP and Windows Vista - Page 13
Entering a setup password At the Setup password prompt, type your setup password (using the same kind of keys you used to set the password), and then press enter. After 3 unsuccessful attempts to enter the setup password, you must restart the computer and try again. Setup password 7 - HP 2133 | Security - Windows XP and Windows Vista - Page 14
is turned on. Note the following characteristics of a power-on password: ● It is not displayed as it is set keyboard number keys will not be recognized if you enter it thereafter with embedded numeric keypad number keys. ● It can include any combination of up to 32 letters and numbers and is not case - HP 2133 | Security - Windows XP and Windows Vista - Page 15
then pressing f10 while the "F10 = ROM Based Setup" message is displayed in the lower-left corner of the screen. 2. Use the arrow keys to select Security > Power-On password, exit. Then follow the instructions on the screen. Your preferences go into effect when the computer restarts. Power-on password - HP 2133 | Security - Windows XP and Windows Vista - Page 16
Entering a power-on password At the Power-on Password prompt, type your password (using the same kind of keys you used to set the password), and then press enter. After 3 unsuccessful attempts to enter the password, you must turn off the computer, turn it back on, and then try again. 10 Chapter 2 - HP 2133 | Security - Windows XP and Windows Vista - Page 17
computer, and then pressing f10 while the "F10 = ROM Based Setup" message is displayed in the lower-left corner of the screen. 2. Use the arrow keys to select Security > Password options, and then press File > Save changes and exit. Then follow the instructions on the screen. Power-on password 11 - HP 2133 | Security - Windows XP and Windows Vista - Page 18
. If you forget both DriveLock passwords, the hard drive will be permanently locked and can no longer be used. DriveLock protection prevents unauthorized access to the contents of a hard drive. DriveLock can be applied only to the internal hard drive(s) of the computer. After DriveLock protection is - HP 2133 | Security - Windows XP and Windows Vista - Page 19
displayed in the lower-left corner of the screen. 2. Use the arrow keys to select Security > DriveLock passwords, and then press enter. 3. Select the location of the hard drive . Then follow the instructions on the screen. Your preferences go into effect when the computer restarts. Using Computer - HP 2133 | Security - Windows XP and Windows Vista - Page 20
Entering a DriveLock password Be sure that the hard drive is inserted into the computer (not into an optional docking device or external MultiBay). At the DriveLock Password prompt, type your user or master password ( - HP 2133 | Security - Windows XP and Windows Vista - Page 21
displayed in the lower-left corner of the screen. 2. Use the arrow keys to select Security > DriveLock passwords, and then press enter. 3. Use the arrow keys to select the location of the internal hard drive follow the instructions on the screen. Your preferences go into effect when the - HP 2133 | Security - Windows XP and Windows Vista - Page 22
displayed in the lower-left corner of the screen. 2. Use the arrow keys to select Security > DriveLock passwords, and then press enter. 3. Use the arrow keys to select the location of the internal hard drive follow the instructions on the screen. Your preferences go into effect when the computer restarts - HP 2133 | Security - Windows XP and Windows Vista - Page 23
restarting the computer, and then pressing f10 while the "F10 = ROM Based Setup" message is displayed in the lower-left corner of the screen. 2. Use the arrow keys to select System Configuration > Boot options or System Configuration > Port options. Then press enter and use the arrow keys to select - HP 2133 | Security - Windows XP and Windows Vista - Page 24
Using Computer Setup stringent security CAUTION: To prevent the computer from becoming permanently unusable, record your configured setup password, power-on password, or smart card PIN in a safe place away from your computer. Without these passwords or PIN, the computer cannot be unlocked. The - HP 2133 | Security - Windows XP and Windows Vista - Page 25
f10 while the "F10 = ROM Based Setup" message is displayed in the lower-left corner of the screen. 2. Use the arrow keys to select Security > Password options Save changes and exit. Then follow the instructions on the screen. Your preferences go into effect when the computer restarts. Using - HP 2133 | Security - Windows XP and Windows Vista - Page 26
remove stringent security in Computer Setup, follow these steps: 1. Open Computer Setup by turning on or restarting the computer, and then pressing f10 while the "F10 = ROM Based Setup" message is displayed in the lower-left corner of the screen the instructions on the screen. Your preferences go - HP 2133 | Security - Windows XP and Windows Vista - Page 27
and the batteries. ● Specification information about the processor, cache, memory, ROM, video revision, and keyboard controller revision. message is displayed in the lower-left corner of the screen. 2. Use the arrow keys to select File > System Information, and then press enter. NOTE: To prevent - HP 2133 | Security - Windows XP and Windows Vista - Page 28
. Antivirus software can detect most viruses, destroy them, and in most cases, repair any damage they have caused. To provide ongoing protection against newly discovered viruses, antivirus software must be updated. Norton Internet Security is preinstalled on the computer. For information about using - HP 2133 | Security - Windows XP and Windows Vista - Page 29
documentation or contact your firewall manufacturer for more information. NOTE: Under some circumstances a firewall can block access to Internet a network, or block authorized e-mail attachments. To temporarily solve the problem, disable the firewall, perform the task that you want to perform - HP 2133 | Security - Windows XP and Windows Vista - Page 30
sure all available updates are installed on the computer observe these guidelines: ● Run Windows Update monthly to install the latest software from Microsoft. ● Obtain updates, as they are released, from the Microsoft Web site and through the updates link in Help and Support. 24 Chapter 6 Installing - HP 2133 | Security - Windows XP and Windows Vista - Page 31
the security cable around a secured object. 2. Insert the key (1) into the cable lock (2). 3. Insert the cable lock into the security cable slot on the computer (3), and then lock the cable lock with the key. NOTE: Your computer may look different from the illustration. The location of the security - HP 2133 | Security - Windows XP and Windows Vista - Page 32
17 DriveLock password 12 power-on password 8 setup password 5 stringent security 18 critical updates, software 24 D device security 17 DriveLock password changing 15 description 12 entering 14 removing 16 setting 13 F firewall software 23 P passwords administrator 3 DriveLock 12 power-on 8 setup - HP 2133 | Security - Windows XP and Windows Vista - Page 33
-
 1
1 -
 2
2 -
 3
3 -
 4
4 -
 5
5 -
 6
6 -
 7
7 -
8
-
9
-
10
-
11
-
12
-
13
-
14
-
15
-
16
-
17
-
18
-
19
-
20
-
21
-
22
-
23
-
24
-
25
-
26
-
27
-
28
-
29
-
30
-
31
-
32
-
33
 |
 |

Security
User Guide