HP 2840 HP Color LaserJet 2820/2830/2840 All-In-One - User Guide - Page 116
To program group-dial entries, Fax setup, Phone Book, Group setup, Add/Edit group, Delete group
 |
UPC - 829160742731
View all HP 2840 manuals
Add to My Manuals
Save this manual to your list of manuals |
Page 116 highlights
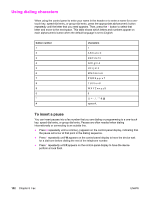
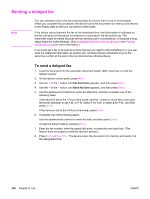
Note Speed-dial entries, one-touch keys, and group-dial entries are more easily programmed from the software. For instructions about programming speed-dial entries, one-touch keys, and group-dial entries by using the HP Toolbox, see the HP Toolbox online Help. To program group-dial entries 1. Assign a speed-dial entry to each fax number that you want in the group. (For instructions, see To program speed-dial entries and one-touch keys.) 2. On the device control panel, press MENU. 3. Use the < or the > button to select Fax setup, and then press ENTER. 4. Press ENTER to select Phone Book. 5. Use the < or the > button to select Group setup, and then press ENTER. 6. Use the < or the > button to select Add/Edit group, and then press ENTER. 7. Use the alphanumeric buttons to enter the number that you want to associate with this group, and then press ENTER. Selecting 1 through 5 also associates the group with the corresponding one-touch key. 8. Use the alphanumeric buttons to enter a name for the group, and then press ENTER. 9. Complete one of the following steps: Press a one-touch key, and then press ENTER again to confirm the addition. Repeat this step for each group member you want to add. Select Phone Book, and then select the speed-dial entry for the group member you want to add. Press ENTER to confirm the addition. Repeat this step for each group member you want to add. 10. When you are finished, press ENTER. 11. If you have more group-dial entries to assign, press ENTER, and then repeat steps 1 through 10. To delete group-dial entries 1. On the device control panel, press MENU. 2. Use the < or the > button to select Fax setup, and then press ENTER. 3. Press ENTER to select Phone Book. 4. Use the < or the > button to select Group setup, and then press ENTER. 5. Use the < or the > button to select Delete group, and then press ENTER. 6. Using the alphanumeric buttons, enter the number of the group-dial that you want to delete, and then press ENTER. 7. Press ENTER to confirm the deletion. 100 Chapter 8 Fax ENWW
-
 1
1 -
2
-
3
-
4
-
5
-
6
-
7
-
8
-
9
-
10
-
11
-
12
-
13
-
14
-
15
-
16
-
17
-
18
-
19
-
20
-
21
-
22
-
23
-
24
-
25
-
26
-
27
-
28
-
29
-
30
-
31
-
32
-
33
-
34
-
35
-
36
-
37
-
38
-
39
-
40
-
41
-
42
-
43
-
44
-
45
-
46
-
47
-
48
-
49
-
50
-
51
-
52
-
53
-
54
-
55
-
56
-
57
-
58
-
59
-
60
-
61
-
62
-
63
-
64
-
65
-
66
-
67
-
68
-
69
-
70
-
71
-
72
-
73
-
74
-
75
-
76
-
77
-
78
-
79
-
80
-
81
-
82
-
83
-
84
-
85
-
86
-
87
-
88
-
89
-
90
-
91
-
92
-
93
-
94
-
95
-
96
-
97
-
98
-
99
-
100
-
101
-
102
-
103
-
104
-
105
-
106
-
107
-
108
-
109
-
110
-
 111
111 -
 112
112 -
 113
113 -
 114
114 -
 115
115 -
 116
116 -
 117
117 -
 118
118 -
 119
119 -
 120
120 -
 121
121 -
122
-
123
-
124
-
125
-
126
-
127
-
128
-
129
-
130
-
131
-
132
-
133
-
134
-
135
-
136
-
137
-
138
-
139
-
140
-
141
-
142
-
143
-
144
-
145
-
146
-
147
-
148
-
149
-
150
-
151
-
152
-
153
-
154
-
155
-
156
-
157
-
158
-
159
-
160
-
161
-
162
-
163
-
164
-
165
-
166
-
167
-
168
-
169
-
170
-
171
-
172
-
173
-
174
-
175
-
176
-
177
-
178
-
179
-
180
-
181
-
182
-
183
-
184
-
185
-
186
-
187
-
188
-
189
-
190
-
191
-
192
-
193
-
194
-
195
-
196
-
197
-
198
-
199
-
200
-
201
-
202
-
203
-
204
-
205
-
206
-
207
-
208
-
209
-
210
-
211
-
212
-
213
-
214
-
215
-
216
-
217
-
218
-
219
-
220
-
221
-
222
-
223
-
224
-
225
-
226
-
227
-
228
-
229
-
230
-
231
-
232
-
233
-
234
-
235
-
236
-
237
-
238
-
239
-
240
-
241
-
242
-
243
-
244
-
245
-
246
-
247
-
248
-
249
-
250
-
251
-
252
-
253
-
254
-
255
-
256
-
257
-
258
-
259
-
260
-
261
-
262
-
263
-
264
-
265
-
266
-
267
-
268
-
269
-
270
-
271
-
272
-
273
-
274
-
275
-
276
-
277
-
278
-
279
-
280
-
281
-
282
-
283
-
284
-
285
-
286
-
287
-
288
-
289
-
290
-
291
-
292
-
293
-
294
-
295
-
296
-
297
-
298
-
299
-
300
-
301
-
302
-
303
-
304
-
305
-
306
-
307
-
308
-
309
-
310
-
311
-
312
-
313
-
314
-
315
-
316
-
317
-
318
-
319
-
320
-
321
-
322
-
323
-
324
-
325
-
326
-
327
-
328
-
329
-
330
-
331
-
332
-
333
-
334
 |
 |