HP 2840 HP Color LaserJet 2820/2830/2840 All-In-One - User Guide - Page 120
Sending a delayed fax
 |
UPC - 829160742731
View all HP 2840 manuals
Add to My Manuals
Save this manual to your list of manuals |
Page 120 highlights
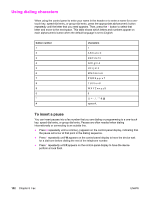
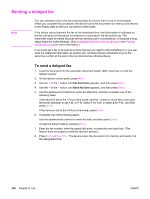
Sending a delayed fax Note You can schedule a fax to be sent automatically at a future time to one or more people. When you complete this procedure, the device scans the document into memory and returns to the Ready state so that you can perform other tasks. If the device cannot transmit the fax at the scheduled time, that information is indicated on the fax call report (if that option is turned on) or recorded in the fax activity log. The transmittal might be halted because the fax-sending call is not answered, or because a busy signal stops the redial attempts. (See Setting print times for the fax call report and Printing the fax activity log for more information.) If you have set a fax to be sent at a future time but you need to add something to it, you can send the additional information as another job. All faxes that are scheduled to go to the same fax number at the same time are delivered as individual faxes. To send a delayed fax 1. Load the document into the automatic document feeder (ADF) input tray or onto the flatbed scanner. 2. On the device control panel, press MENU. 3. Use the < or the > button until Fax functions appears, and then press ENTER. 4. Use the < or the > button until Send fax later appears, and then press ENTER. 5. Use the alphanumeric buttons to enter the start time, and then complete one of the following tasks: If the device is set to the 12-hour time mode, use the > button to move the cursor past the fourth character to set A.M. or P.M. Select 1 for A.M. or select 2 for P.M., and then press ENTER. If the device is set to the 24-hour time mode, press ENTER. 6. Complete one of the following tasks: Use the alphanumeric buttons to enter the date, and then press ENTER. Accept the default date by pressing ENTER. 7. Enter the fax number, enter the speed-dial entry, or press the one-touch key. (This feature does not support undefined (ad hoc) groups.) 8. Press ENTER or START FAX. The device scans the document into memory and sends it at the designated time. 104 Chapter 8 Fax ENWW
-
 1
1 -
2
-
3
-
4
-
5
-
6
-
7
-
8
-
9
-
10
-
11
-
12
-
13
-
14
-
15
-
16
-
17
-
18
-
19
-
20
-
21
-
22
-
23
-
24
-
25
-
26
-
27
-
28
-
29
-
30
-
31
-
32
-
33
-
34
-
35
-
36
-
37
-
38
-
39
-
40
-
41
-
42
-
43
-
44
-
45
-
46
-
47
-
48
-
49
-
50
-
51
-
52
-
53
-
54
-
55
-
56
-
57
-
58
-
59
-
60
-
61
-
62
-
63
-
64
-
65
-
66
-
67
-
68
-
69
-
70
-
71
-
72
-
73
-
74
-
75
-
76
-
77
-
78
-
79
-
80
-
81
-
82
-
83
-
84
-
85
-
86
-
87
-
88
-
89
-
90
-
91
-
92
-
93
-
94
-
95
-
96
-
97
-
98
-
99
-
100
-
101
-
102
-
103
-
104
-
105
-
106
-
107
-
108
-
109
-
110
-
111
-
112
-
113
-
114
-
 115
115 -
 116
116 -
 117
117 -
 118
118 -
 119
119 -
 120
120 -
 121
121 -
 122
122 -
 123
123 -
 124
124 -
 125
125 -
126
-
127
-
128
-
129
-
130
-
131
-
132
-
133
-
134
-
135
-
136
-
137
-
138
-
139
-
140
-
141
-
142
-
143
-
144
-
145
-
146
-
147
-
148
-
149
-
150
-
151
-
152
-
153
-
154
-
155
-
156
-
157
-
158
-
159
-
160
-
161
-
162
-
163
-
164
-
165
-
166
-
167
-
168
-
169
-
170
-
171
-
172
-
173
-
174
-
175
-
176
-
177
-
178
-
179
-
180
-
181
-
182
-
183
-
184
-
185
-
186
-
187
-
188
-
189
-
190
-
191
-
192
-
193
-
194
-
195
-
196
-
197
-
198
-
199
-
200
-
201
-
202
-
203
-
204
-
205
-
206
-
207
-
208
-
209
-
210
-
211
-
212
-
213
-
214
-
215
-
216
-
217
-
218
-
219
-
220
-
221
-
222
-
223
-
224
-
225
-
226
-
227
-
228
-
229
-
230
-
231
-
232
-
233
-
234
-
235
-
236
-
237
-
238
-
239
-
240
-
241
-
242
-
243
-
244
-
245
-
246
-
247
-
248
-
249
-
250
-
251
-
252
-
253
-
254
-
255
-
256
-
257
-
258
-
259
-
260
-
261
-
262
-
263
-
264
-
265
-
266
-
267
-
268
-
269
-
270
-
271
-
272
-
273
-
274
-
275
-
276
-
277
-
278
-
279
-
280
-
281
-
282
-
283
-
284
-
285
-
286
-
287
-
288
-
289
-
290
-
291
-
292
-
293
-
294
-
295
-
296
-
297
-
298
-
299
-
300
-
301
-
302
-
303
-
304
-
305
-
306
-
307
-
308
-
309
-
310
-
311
-
312
-
313
-
314
-
315
-
316
-
317
-
318
-
319
-
320
-
321
-
322
-
323
-
324
-
325
-
326
-
327
-
328
-
329
-
330
-
331
-
332
-
333
-
334
 |
 |