HP 2840 HP Color LaserJet 2820/2830/2840 All-In-One - User Guide - Page 287
Cleaning the paper path, T.30 protocol trace, To restore the factory-set defaults, Service
 |
UPC - 829160742731
View all HP 2840 manuals
Add to My Manuals
Save this manual to your list of manuals |
Page 287 highlights
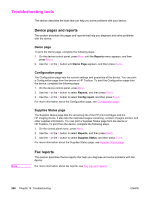
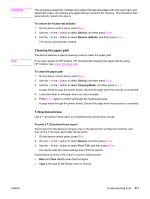
CAUTION Note This procedure clears fax numbers and names that are associated with one-touch keys and speed-dial codes, and deletes any pages that are stored in the memory. The procedure then automatically restarts the device. To restore the factory-set defaults 1. On the device control panel, press MENU. 2. Use the < or the > button to select Service, and then press ENTER. 3. Use the < or the > button to select Restore defaults, and then press ENTER. The device automatically restarts. Cleaning the paper path The device features a special cleaning mode to clean the paper path. If you have access to HP Toolbox, HP recommends cleaning the paper path by using HP Toolbox. See Clean the paper path. To clean the paper path 1. On the device control panel, press MENU. 2. Use the < or the > button to select Service, and then press ENTER. 3. Use the < or the > button to select Cleaning Mode, and then press ENTER. A page feeds through the printer slowly. Discard the page when the process is completed. 4. Load plain letter or A4 paper when you are prompted. 5. Press ENTER again to confirm and begin the cleaning process. A page feeds through the printer slowly. Discard the page when the process is completed. T.30 protocol trace Use a T.30 protocol trace report to troubleshoot fax transmission issues. To print a T.30 protocol trace report Send a fax from the device or receive a fax to the device from another fax machine, and then print a T.30 trace report after the fax prints. 1. On the device control panel, press MENU. 2. Use the < or the > button to select Service, and then press ENTER. 3. Use the < or the > button to select Print T.30, and then press ENTER. The device exits the menu settings and prints the reports. Explanations of some of the report's column heading follow: ● Date and Time identify when the fax begins. ● Type is the type of fax activity: send or receive. ENWW Troubleshooting tools 271
-
 1
1 -
2
-
3
-
4
-
5
-
6
-
7
-
8
-
9
-
10
-
11
-
12
-
13
-
14
-
15
-
16
-
17
-
18
-
19
-
20
-
21
-
22
-
23
-
24
-
25
-
26
-
27
-
28
-
29
-
30
-
31
-
32
-
33
-
34
-
35
-
36
-
37
-
38
-
39
-
40
-
41
-
42
-
43
-
44
-
45
-
46
-
47
-
48
-
49
-
50
-
51
-
52
-
53
-
54
-
55
-
56
-
57
-
58
-
59
-
60
-
61
-
62
-
63
-
64
-
65
-
66
-
67
-
68
-
69
-
70
-
71
-
72
-
73
-
74
-
75
-
76
-
77
-
78
-
79
-
80
-
81
-
82
-
83
-
84
-
85
-
86
-
87
-
88
-
89
-
90
-
91
-
92
-
93
-
94
-
95
-
96
-
97
-
98
-
99
-
100
-
101
-
102
-
103
-
104
-
105
-
106
-
107
-
108
-
109
-
110
-
111
-
112
-
113
-
114
-
115
-
116
-
117
-
118
-
119
-
120
-
121
-
122
-
123
-
124
-
125
-
126
-
127
-
128
-
129
-
130
-
131
-
132
-
133
-
134
-
135
-
136
-
137
-
138
-
139
-
140
-
141
-
142
-
143
-
144
-
145
-
146
-
147
-
148
-
149
-
150
-
151
-
152
-
153
-
154
-
155
-
156
-
157
-
158
-
159
-
160
-
161
-
162
-
163
-
164
-
165
-
166
-
167
-
168
-
169
-
170
-
171
-
172
-
173
-
174
-
175
-
176
-
177
-
178
-
179
-
180
-
181
-
182
-
183
-
184
-
185
-
186
-
187
-
188
-
189
-
190
-
191
-
192
-
193
-
194
-
195
-
196
-
197
-
198
-
199
-
200
-
201
-
202
-
203
-
204
-
205
-
206
-
207
-
208
-
209
-
210
-
211
-
212
-
213
-
214
-
215
-
216
-
217
-
218
-
219
-
220
-
221
-
222
-
223
-
224
-
225
-
226
-
227
-
228
-
229
-
230
-
231
-
232
-
233
-
234
-
235
-
236
-
237
-
238
-
239
-
240
-
241
-
242
-
243
-
244
-
245
-
246
-
247
-
248
-
249
-
250
-
251
-
252
-
253
-
254
-
255
-
256
-
257
-
258
-
259
-
260
-
261
-
262
-
263
-
264
-
265
-
266
-
267
-
268
-
269
-
270
-
271
-
272
-
273
-
274
-
275
-
276
-
277
-
278
-
279
-
280
-
281
-
 282
282 -
 283
283 -
 284
284 -
 285
285 -
 286
286 -
 287
287 -
 288
288 -
 289
289 -
 290
290 -
 291
291 -
 292
292 -
293
-
294
-
295
-
296
-
297
-
298
-
299
-
300
-
301
-
302
-
303
-
304
-
305
-
306
-
307
-
308
-
309
-
310
-
311
-
312
-
313
-
314
-
315
-
316
-
317
-
318
-
319
-
320
-
321
-
322
-
323
-
324
-
325
-
326
-
327
-
328
-
329
-
330
-
331
-
332
-
333
-
334
 |
 |