HP 4100n HP LaserJet 4100 Series - User Guide - Page 110
Continued on the next pulling on the fuser. Do not pull
 |
View all HP 4100n manuals
Add to My Manuals
Save this manual to your list of manuals |
Page 110 highlights
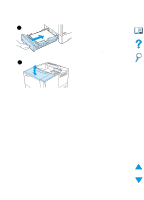
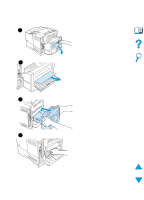
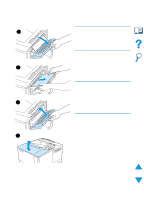
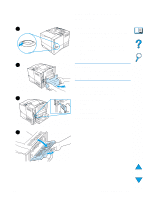
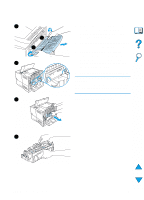
5 1 2 6 7 5 Remove the rear output bin and extension. To do this, bend the middle down slightly, release tab 1 and then release tab 2. 6 Unlock the fuser by rotating the blue fuser levers so that they point up. 7 Pull the fuser out of the printer. To release the fuser from the printer, hold the back of the printer while pulling on the fuser. Do not pull on the black plastic flapper. 8 Remove the paper that has jammed. CAUTION Do not use a sharp object to clear paper from the fuser area. You might damage the fuser. Continued on the next page. 8 108 Chapter 4 - Problem solving EN
-
 1
1 -
2
-
3
-
4
-
5
-
6
-
7
-
8
-
9
-
10
-
11
-
12
-
13
-
14
-
15
-
16
-
17
-
18
-
19
-
20
-
21
-
22
-
23
-
24
-
25
-
26
-
27
-
28
-
29
-
30
-
31
-
32
-
33
-
34
-
35
-
36
-
37
-
38
-
39
-
40
-
41
-
42
-
43
-
44
-
45
-
46
-
47
-
48
-
49
-
50
-
51
-
52
-
53
-
54
-
55
-
56
-
57
-
58
-
59
-
60
-
61
-
62
-
63
-
64
-
65
-
66
-
67
-
68
-
69
-
70
-
71
-
72
-
73
-
74
-
75
-
76
-
77
-
78
-
79
-
80
-
81
-
82
-
83
-
84
-
85
-
86
-
87
-
88
-
89
-
90
-
91
-
92
-
93
-
94
-
95
-
96
-
97
-
98
-
99
-
100
-
101
-
102
-
103
-
104
-
 105
105 -
 106
106 -
 107
107 -
 108
108 -
 109
109 -
 110
110 -
 111
111 -
 112
112 -
 113
113 -
 114
114 -
 115
115 -
116
-
117
-
118
-
119
-
120
-
121
-
122
-
123
-
124
-
125
-
126
-
127
-
128
-
129
-
130
-
131
-
132
-
133
-
134
-
135
-
136
-
137
-
138
-
139
-
140
-
141
-
142
-
143
-
144
-
145
-
146
-
147
-
148
-
149
-
150
-
151
-
152
-
153
-
154
-
155
-
156
-
157
-
158
-
159
-
160
-
161
-
162
-
163
-
164
-
165
-
166
-
167
-
168
-
169
-
170
-
171
-
172
-
173
-
174
-
175
-
176
-
177
-
178
-
179
-
180
-
181
-
182
-
183
-
184
-
185
-
186
-
187
-
188
-
189
-
190
-
191
-
192
-
193
-
194
-
195
-
196
-
197
-
198
-
199
-
200
-
201
-
202
-
203
-
204
-
205
-
206
-
207
-
208
-
209
-
210
-
211
-
212
-
213
-
214
-
215
-
216
-
217
-
218
-
219
-
220
-
221
-
222
-
223
-
224
-
225
-
226
-
227
-
228
-
229
-
230
-
231
-
232
-
233
-
234
-
235
-
236
-
237
-
238
-
239
-
240
-
241
-
242
-
243
-
244
-
245
-
246
-
247
-
248
-
249
-
250
-
251
-
252
-
253
-
254
-
255
-
256
-
257
-
258
-
259
-
260
-
261
-
262
-
263
-
264
-
265
-
266
-
267
-
268
-
269
-
270
-
271
-
272
-
273
-
274
-
275
-
276
-
277
-
278
 |
 |

108
Chapter
4 - Problem solving
EN
5
Remove the rear output bin and
extension. To do this, bend the
middle down slightly, release tab 1
and then release tab 2.
6
Unlock the fuser by rotating the blue
fuser levers so that they point up.
7
Pull the fuser out of the printer. To
release the fuser from the printer,
hold the back of the printer while
pulling on the fuser. Do not pull on
the black plastic flapper.
8
Remove the paper that has jammed.
CAUTION
Do not use a sharp object to clear paper
from the fuser area. You might damage
the fuser.
Continued on the next page.
5
6
7
8
1
2