HP 4100n HP LaserJet 4100 Series - User Guide - Page 111
Turn the printer back on., optional duplexer.
 |
View all HP 4100n manuals
Add to My Manuals
Save this manual to your list of manuals |
Page 111 highlights
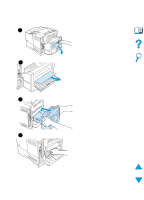
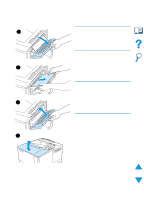
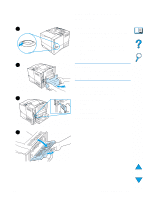
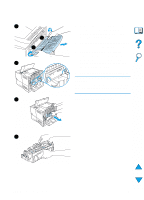
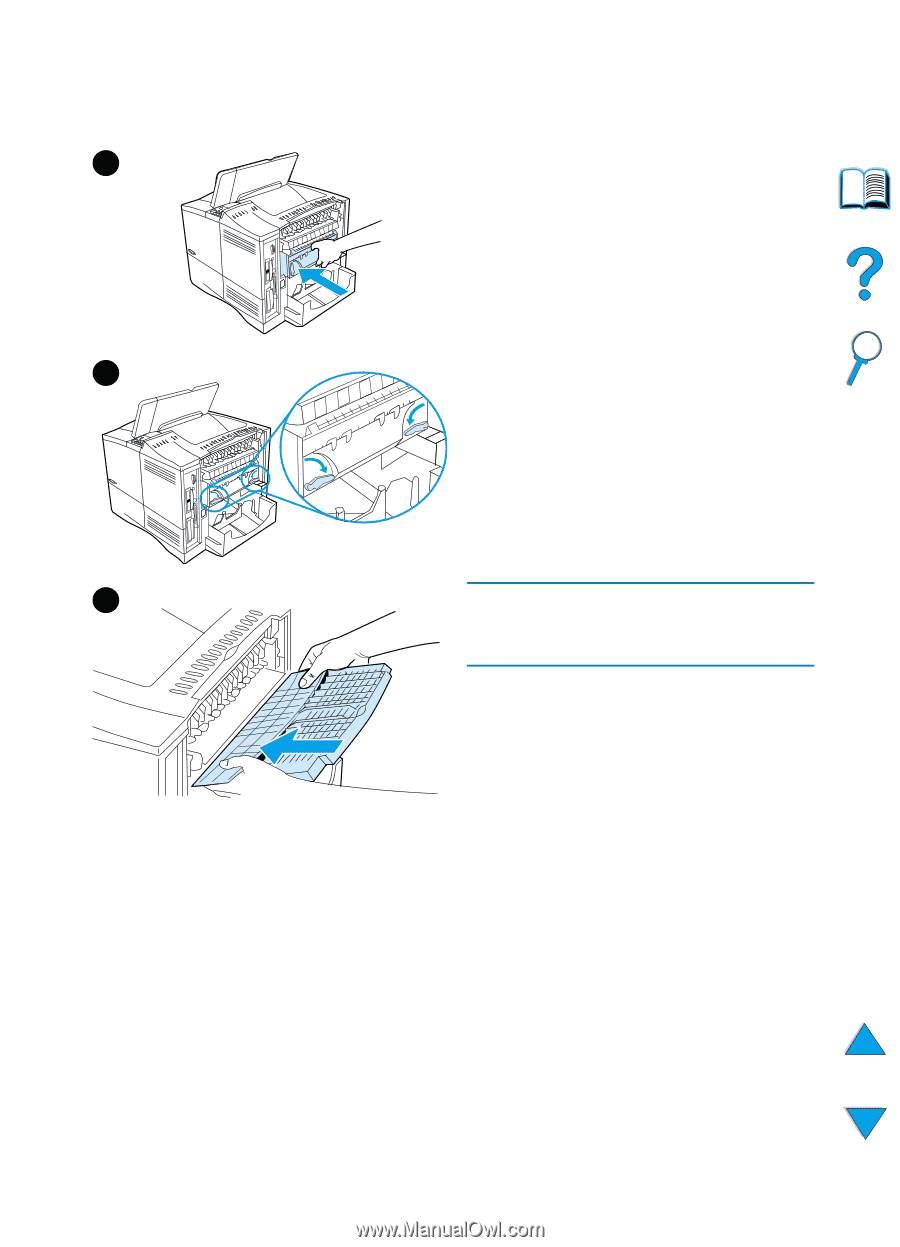
9 9 Replace the fuser, left side first. Be sure to push the fuser firmly into the printer. 10 Lock the fuser in place by rotating the levers to the horizontal position. 11 Replace the rear output bin, left side first. 12 Plug the power cord into the printer. 10 13 Replace the tray 2 dust cover or the optional duplexer. 14 Turn the printer back on. 15 If a paper jam message persists, there is still paper in the printer. Look for paper in another location (see "Paper jam locations" on page 97). 11 Note Since the printer has been turned off, you will need to send the print job again. EN Clearing paper jams 109
-
 1
1 -
2
-
3
-
4
-
5
-
6
-
7
-
8
-
9
-
10
-
11
-
12
-
13
-
14
-
15
-
16
-
17
-
18
-
19
-
20
-
21
-
22
-
23
-
24
-
25
-
26
-
27
-
28
-
29
-
30
-
31
-
32
-
33
-
34
-
35
-
36
-
37
-
38
-
39
-
40
-
41
-
42
-
43
-
44
-
45
-
46
-
47
-
48
-
49
-
50
-
51
-
52
-
53
-
54
-
55
-
56
-
57
-
58
-
59
-
60
-
61
-
62
-
63
-
64
-
65
-
66
-
67
-
68
-
69
-
70
-
71
-
72
-
73
-
74
-
75
-
76
-
77
-
78
-
79
-
80
-
81
-
82
-
83
-
84
-
85
-
86
-
87
-
88
-
89
-
90
-
91
-
92
-
93
-
94
-
95
-
96
-
97
-
98
-
99
-
100
-
101
-
102
-
103
-
104
-
105
-
 106
106 -
 107
107 -
 108
108 -
 109
109 -
 110
110 -
 111
111 -
 112
112 -
 113
113 -
 114
114 -
 115
115 -
 116
116 -
117
-
118
-
119
-
120
-
121
-
122
-
123
-
124
-
125
-
126
-
127
-
128
-
129
-
130
-
131
-
132
-
133
-
134
-
135
-
136
-
137
-
138
-
139
-
140
-
141
-
142
-
143
-
144
-
145
-
146
-
147
-
148
-
149
-
150
-
151
-
152
-
153
-
154
-
155
-
156
-
157
-
158
-
159
-
160
-
161
-
162
-
163
-
164
-
165
-
166
-
167
-
168
-
169
-
170
-
171
-
172
-
173
-
174
-
175
-
176
-
177
-
178
-
179
-
180
-
181
-
182
-
183
-
184
-
185
-
186
-
187
-
188
-
189
-
190
-
191
-
192
-
193
-
194
-
195
-
196
-
197
-
198
-
199
-
200
-
201
-
202
-
203
-
204
-
205
-
206
-
207
-
208
-
209
-
210
-
211
-
212
-
213
-
214
-
215
-
216
-
217
-
218
-
219
-
220
-
221
-
222
-
223
-
224
-
225
-
226
-
227
-
228
-
229
-
230
-
231
-
232
-
233
-
234
-
235
-
236
-
237
-
238
-
239
-
240
-
241
-
242
-
243
-
244
-
245
-
246
-
247
-
248
-
249
-
250
-
251
-
252
-
253
-
254
-
255
-
256
-
257
-
258
-
259
-
260
-
261
-
262
-
263
-
264
-
265
-
266
-
267
-
268
-
269
-
270
-
271
-
272
-
273
-
274
-
275
-
276
-
277
-
278
 |
 |
EN
Clearing paper jams
109
9
Replace the fuser, left side first. Be
sure to push the fuser firmly into the
printer.
10
Lock the fuser in place by rotating
the levers to the horizontal position.
11
Replace the rear output bin, left side
first.
12
Plug the power cord into the printer.
13
Replace the tray 2 dust cover or the
optional duplexer.
14
Turn the printer back on.
15
If a paper jam message persists,
there is still paper in the printer. Look
for paper in another location (see
“Paper jam locations” on page 97).
Note
Since the printer has been turned off,
you will need to send the print job again.
9
10
11