HP 4200n HP Jetdirect Print Servers - Administrator Guide - Page 166
Install, Protocol, Internet, Protocol TCP/IP, TCP/IP Protocol, Microsoft TCP/IP Printing, General
 |
UPC - 808736313971
View all HP 4200n manuals
Add to My Manuals
Save this manual to your list of manuals |
Page 166 highlights
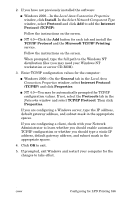
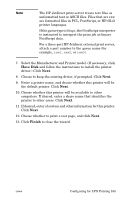
2. If you have not previously installed the software: I Windows 2000-In the Local Area Connection Properties window, click Install. In the Select Network Component Type window, select Protocol and click Add to add the Internet Protocol (TCP/IP). Follow the instructions on the screen. I NT 4.0-Click the Add button for each tab and install the TCP/IP Protocol and the Microsoft TCP/IP Printing service. Follow the instructions on the screen. When prompted, type the full path to the Windows NT distribution files (you may need your Windows NT workstation or server CD-ROM). 3. Enter TCP/IP configuration values for the computer: I Windows 2000-On the General tab in the Local Area Connection Properties window, select Internet Protocol (TCP/IP) and click Properties. I NT 4.0-You may be automatically prompted for TCP/IP configuration values. If not, select the Protocols tab in the Networks window and select TCP/IP Protocol. Then click Properties. If you are configuring a Windows server, type the IP address, default gateway address, and subnet mask in the appropriate spaces. If you are configuring a client, check with your Network Administrator to learn whether you should enable automatic TCP/IP configuration or whether you should type a static IP address, default gateway address, and subnet mask in the appropriate spaces. 4. Click OK to exit. 5. If prompted, exit Windows and restart your computer for the changes to take effect. ENWW Configuring for LPD Printing 166
-
 1
1 -
2
-
3
-
4
-
5
-
6
-
7
-
8
-
9
-
10
-
11
-
12
-
13
-
14
-
15
-
16
-
17
-
18
-
19
-
20
-
21
-
22
-
23
-
24
-
25
-
26
-
27
-
28
-
29
-
30
-
31
-
32
-
33
-
34
-
35
-
36
-
37
-
38
-
39
-
40
-
41
-
42
-
43
-
44
-
45
-
46
-
47
-
48
-
49
-
50
-
51
-
52
-
53
-
54
-
55
-
56
-
57
-
58
-
59
-
60
-
61
-
62
-
63
-
64
-
65
-
66
-
67
-
68
-
69
-
70
-
71
-
72
-
73
-
74
-
75
-
76
-
77
-
78
-
79
-
80
-
81
-
82
-
83
-
84
-
85
-
86
-
87
-
88
-
89
-
90
-
91
-
92
-
93
-
94
-
95
-
96
-
97
-
98
-
99
-
100
-
101
-
102
-
103
-
104
-
105
-
106
-
107
-
108
-
109
-
110
-
111
-
112
-
113
-
114
-
115
-
116
-
117
-
118
-
119
-
120
-
121
-
122
-
123
-
124
-
125
-
126
-
127
-
128
-
129
-
130
-
131
-
132
-
133
-
134
-
135
-
136
-
137
-
138
-
139
-
140
-
141
-
142
-
143
-
144
-
145
-
146
-
147
-
148
-
149
-
150
-
151
-
152
-
153
-
154
-
155
-
156
-
157
-
158
-
159
-
160
-
 161
161 -
 162
162 -
 163
163 -
 164
164 -
 165
165 -
 166
166 -
 167
167 -
 168
168 -
 169
169 -
 170
170 -
 171
171 -
172
-
173
-
174
-
175
-
176
-
177
-
178
-
179
-
180
-
181
-
182
-
183
-
184
-
185
-
186
-
187
-
188
-
189
-
190
-
191
-
192
-
193
-
194
-
195
-
196
-
197
-
198
-
199
-
200
-
201
-
202
-
203
-
204
-
205
-
206
-
207
-
208
-
209
-
210
-
211
-
212
-
213
-
214
-
215
-
216
-
217
-
218
-
219
-
220
-
221
-
222
-
223
-
224
-
225
-
226
-
227
-
228
-
229
-
230
-
231
-
232
-
233
-
234
-
235
-
236
-
237
-
238
-
239
-
240
-
241
-
242
-
243
-
244
-
245
-
246
-
247
-
248
-
249
-
250
-
251
-
252
-
253
-
254
-
255
-
256
-
257
-
258
-
259
-
260
-
261
-
262
-
263
-
264
-
265
-
266
-
267
-
268
-
269
-
270
-
271
-
272
-
273
-
274
-
275
-
276
-
277
-
278
-
279
-
280
-
281
-
282
-
283
-
284
-
285
-
286
-
287
-
288
-
289
-
290
-
291
-
292
-
293
-
294
-
295
-
296
-
297
-
298
-
299
-
300
-
301
-
302
 |
 |