HP 520 HP Business Notebook PC - Getting Started - Windows Vista - Enhanced fo
HP 520 - Notebook PC Manual
 |
View all HP 520 manuals
Add to My Manuals
Save this manual to your list of manuals |
HP 520 manual content summary:
- HP 520 | HP Business Notebook PC - Getting Started - Windows Vista - Enhanced fo - Page 1
Basic Setup 1 Unpack the box ✎ Computer color, features, and options may vary. Component Component 1 AC adapter 3 Primary battery 2 Computer 4 Power cord ✎ Batteries and power cords vary in appearance by region and country. Getting Started 1 - HP 520 | HP Business Notebook PC - Getting Started - Windows Vista - Enhanced fo - Page 2
To reduce potential safety issues, use only the AC adapter or battery provided with the computer, a replacement AC adapter or battery provided by HP, or a compatible AC adapter or battery purchased separately as an accessory from HP. 3 Connect the computer to external power Å WARNING: To reduce the - HP 520 | HP Business Notebook PC - Getting Started - Windows Vista - Enhanced fo - Page 3
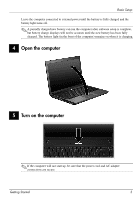
not be accurate until the new battery has been fully charged. The battery light (in the front of the computer) remains on when it is charging. 4 Open the computer 5 Turn on the computer ✎ If the computer will not start up, be sure that the power cord and AC adapter connections are secure. Getting - HP 520 | HP Business Notebook PC - Getting Started - Windows Vista - Enhanced fo - Page 4
. 2. Click Next. 3. In Windows Vista-Click Create a set of recovery discs (Recommended), and then click Next. In Windows XP-Click Create factory software recovery CDs or DVDs to recover the system (Highly Recommended), and then click Next. 4. Follow the on-screen instructions. 4 Getting Started - HP 520 | HP Business Notebook PC - Getting Started - Windows Vista - Enhanced fo - Page 5
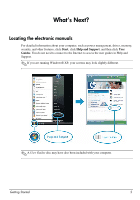
Help and Support, and then click User Guides. You do not need to connect to the Internet to access the user guides in Help and Support. ✎ If you are running Windows® XP, your screens may look slightly different. ✎ A User Guides disc may have also been included with your computer. Getting Started - HP 520 | HP Business Notebook PC - Getting Started - Windows Vista - Enhanced fo - Page 6
operating system, drivers, troubleshooting tools, and technical support. To access Help and Support, click Start, and then click Help and Support. For country- or region-specific support, see http://www.hp.com/support, select your country or region, and follow the on-screen instructions. Å WARNING - HP 520 | HP Business Notebook PC - Getting Started - Windows Vista - Enhanced fo - Page 7
. For more information about the display panel on your notebook PC, see the HP Web site: http://www.hp.com/support Input power The power information in this section may be helpful if you plan to travel internationally with the computer. The computer operates on DC power, which can be supplied by - HP 520 | HP Business Notebook PC - Getting Started - Windows Vista - Enhanced fo - Page 8
Troubleshooting Operating environment The operating environment information in the following table may be helpful if you plan to use or transport the computer all external media cards, such as digital cards and ExpressCards. Ä To reduce the risk of damage to the computer, damage to a drive, or loss - HP 520 | HP Business Notebook PC - Getting Started - Windows Vista - Enhanced fo - Page 9
❏ Check the power cord and adapter requirements for each location in which you plan to use the computer. Voltage, frequency, and plug configurations cloth. If the screen requires additional cleaning, use premoistened antistatic wipes or an antistatic screen cleaner. Cleaning the keyboard Å WARNING: - HP 520 | HP Business Notebook PC - Getting Started - Windows Vista - Enhanced fo - Page 10
or one approved by HP for this computer. ■ If the computer is running on battery power or is plugged into an external power source other than an AC outlet, plug the computer into an AC outlet using the AC adapter. Be sure that the power cord and AC adapter connections are secure. The computer screen - HP 520 | HP Business Notebook PC - Getting Started - Windows Vista - Enhanced fo - Page 11
-right corner of the screen. - or - In Windows XP: Press ctrl+alt+delete. Then click Shut Down, and then click Turn Off. 2. Press and hold the power button on the computer for at least 5 seconds. 3. Disconnect the computer from external power and remove the battery. The computer is unusually warm It - HP 520 | HP Business Notebook PC - Getting Started - Windows Vista - Enhanced fo - Page 12
wireless service, refer to the mobile network operator information included with your computer. Contacting technical support If the preceding questions and solutions did not address your problem, contact technical support. Click Start, click Help and Support, and then click Contact support to - HP 520 | HP Business Notebook PC - Getting Started - Windows Vista - Enhanced fo - Page 13
the screen. To copy only the active window, press alt+fn+prt sc. To copy the entire screen, press fn+prt sc. c. Open a word-processing document, click Edit, and then click Paste. ✎ Drivers, utilities, and programs installed by HP can be copied to a CD or to a DVD using HP Backup & Recovery Manager - HP 520 | HP Business Notebook PC - Getting Started - Windows Vista - Enhanced fo - Page 14
computer. To back up specific files or folders: 1. Click Start, click All Programs, click HP Backup & Recovery, and then click Backup & Recovery Manager. 2. Click Next. 3. In Windows In Windows XP-Click Back up individual files and folders, and then click Next. 5. Follow the on-screen instructions. - HP 520 | HP Business Notebook PC - Getting Started - Windows Vista - Enhanced fo - Page 15
backups, and then click Next. In Windows XP-Click Backup to protect system settings and important data files, and then click Next. 4. Click Create or manage Recovery Points, and then click Next. 5. Follow the on-screen instructions. Scheduling backups Use HP Backup Scheduler to schedule backups for - HP 520 | HP Business Notebook PC - Getting Started - Windows Vista - Enhanced fo - Page 16
HP Backup & Recovery, and then click Backup & Recovery Manager. 3. Click Next. 4. In Windows Vista-Click Perform a recovery, and then click Next. In Windows XP-Click Recover important files or the entire system, and then click Next. 5. Follow the on-screen instructions. Initiating a recovery from
-
 1
1 -
 2
2 -
 3
3 -
 4
4 -
 5
5 -
 6
6 -
 7
7 -
8
-
9
-
10
-
11
-
12
-
13
-
14
-
15
-
16
 |
 |

Getting Started
1
Basic Setup
1
Unpack the box
✎
Computer color, features, and options may vary.
Component
Component
1
AC adapter
3
Primary battery
2
Computer
4
Power cord
✎
Batteries and power cords vary in appearance by region and country.