HP 6500 User Guide - Page 156
Align the printer, Device Settings - review
 |
UPC - 884420425137
View all HP 6500 manuals
Add to My Manuals
Save this manual to your list of manuals |
Page 156 highlights
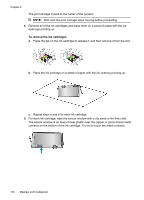
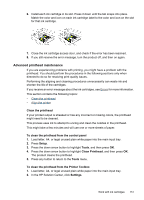
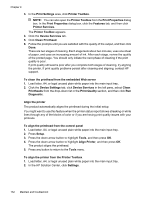
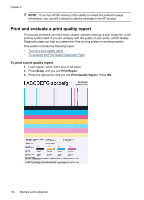
Chapter 9 3. In the Print Settings area, click Printer Toolbox. NOTE: You can also open the Printer Toolbox from the Print Properties dialog box. In the Print Properties dialog box, click the Features tab, and then click Printer Services. The Printer Toolbox appears. 4. Click the Device Services tab. 5. Click Clean Printhead. 6. Follow the prompts until you are satisfied with the quality of the output, and then click Done. There are two stages of cleaning. Each stage lasts about two minutes, uses one sheet of paper, and uses an increasing amount of ink. After each stage, review the quality of the printed page. You should only initiate the next phase of cleaning if the print quality is poor. If print quality still seems poor after you complete both stages of cleaning, try aligning the printer. If print quality problems persist after cleaning and aligning, contact HP support. To clean the printhead from the embedded Web server 1. Load letter, A4, or legal unused plain white paper into the main input tray. 2. Click the Device Settings tab, click Device Services in the left pane, select Clean Printheads from the drop-down list in the Print Quality section, and then click Run Diagnostic. Align the printer The product automatically aligns the printhead during the initial setup. You might want to use this feature when the printer status report shows streaking or white lines through any of the blocks of color or if you are having print quality issues with your printouts. To align the printhead from the control panel 1. Load letter, A4, or legal unused plain white paper into the main input tray. 2. Press Setup. 3. Press the down arrow button to highlight Tools, and then press OK. 4. Press the down arrow button to highlight Align Printer, and then press OK. The product aligns the printhead. 5. Press any button to return to the Tools menu. To align the printer from the Printer Toolbox 1. Load letter, A4, or legal unused plain white paper into the main input tray. 2. In the HP Solution Center, click Settings. 152 Maintain and troubleshoot
-
 1
1 -
2
-
3
-
4
-
5
-
6
-
7
-
8
-
9
-
10
-
11
-
12
-
13
-
14
-
15
-
16
-
17
-
18
-
19
-
20
-
21
-
22
-
23
-
24
-
25
-
26
-
27
-
28
-
29
-
30
-
31
-
32
-
33
-
34
-
35
-
36
-
37
-
38
-
39
-
40
-
41
-
42
-
43
-
44
-
45
-
46
-
47
-
48
-
49
-
50
-
51
-
52
-
53
-
54
-
55
-
56
-
57
-
58
-
59
-
60
-
61
-
62
-
63
-
64
-
65
-
66
-
67
-
68
-
69
-
70
-
71
-
72
-
73
-
74
-
75
-
76
-
77
-
78
-
79
-
80
-
81
-
82
-
83
-
84
-
85
-
86
-
87
-
88
-
89
-
90
-
91
-
92
-
93
-
94
-
95
-
96
-
97
-
98
-
99
-
100
-
101
-
102
-
103
-
104
-
105
-
106
-
107
-
108
-
109
-
110
-
111
-
112
-
113
-
114
-
115
-
116
-
117
-
118
-
119
-
120
-
121
-
122
-
123
-
124
-
125
-
126
-
127
-
128
-
129
-
130
-
131
-
132
-
133
-
134
-
135
-
136
-
137
-
138
-
139
-
140
-
141
-
142
-
143
-
144
-
145
-
146
-
147
-
148
-
149
-
150
-
 151
151 -
 152
152 -
 153
153 -
 154
154 -
 155
155 -
 156
156 -
 157
157 -
 158
158 -
 159
159 -
 160
160 -
 161
161 -
162
-
163
-
164
-
165
-
166
-
167
-
168
-
169
-
170
-
171
-
172
-
173
-
174
-
175
-
176
-
177
-
178
-
179
-
180
-
181
-
182
-
183
-
184
-
185
-
186
-
187
-
188
-
189
-
190
-
191
-
192
-
193
-
194
-
195
-
196
-
197
-
198
-
199
-
200
-
201
-
202
-
203
-
204
-
205
-
206
-
207
-
208
-
209
-
210
-
211
-
212
-
213
-
214
-
215
-
216
-
217
-
218
-
219
-
220
-
221
-
222
-
223
-
224
-
225
-
226
-
227
-
228
-
229
-
230
-
231
-
232
-
233
-
234
-
235
-
236
-
237
-
238
-
239
-
240
-
241
-
242
-
243
-
244
-
245
-
246
-
247
-
248
-
249
-
250
-
251
-
252
-
253
-
254
-
255
-
256
-
257
-
258
-
259
-
260
-
261
-
262
-
263
-
264
-
265
-
266
-
267
-
268
-
269
-
270
-
271
-
272
-
273
-
274
-
275
-
276
-
277
-
278
-
279
-
280
-
281
-
282
-
283
-
284
-
285
-
286
-
287
-
288
-
289
-
290
-
291
-
292
-
293
-
294
 |
 |