HP 7260 HP Photosmart 7200 series - (English) Setup Guide
HP 7260 - PhotoSmart Color Inkjet Printer Manual
 |
UPC - 844844844303
View all HP 7260 manuals
Add to My Manuals
Save this manual to your list of manuals |
HP 7260 manual content summary:
- HP 7260 | HP Photosmart 7200 series - (English) Setup Guide - Page 1
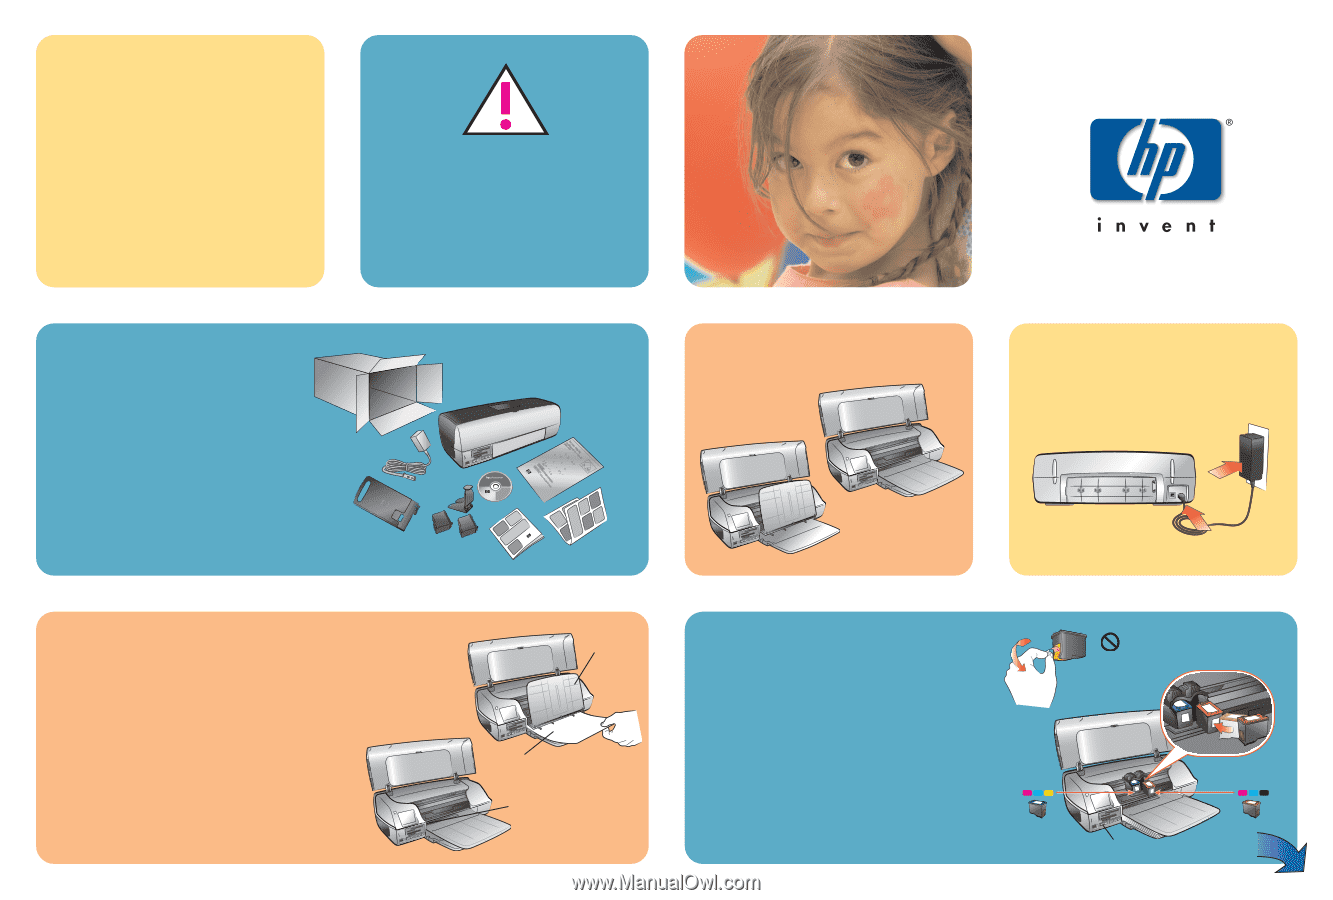
with the USB cable until the software installation has finished. 1 unpack your printer Note: Purchase a USB cable separately. See the HP Photosmart Basics Guide for a description of the items included with your printer. 2 open your printer 3 plug in the power cord HP #57 HP #58 4 load plain - HP 7260 | HP Photosmart 7200 series - (English) Setup Guide - Page 2
. Macintosh: Do not connect the printer to your computer with the USB cable until the software installation has finished. Note: For more detailed installation instructions or troubleshooting information, see the HP Photosmart Setup & Support Reference Guide. Windows PC 1. Be sure you have completed
-
 1
1 -
 2
2
 |
 |
1
3
5
4
Do not touch or remove
the ink nozzles or the
copper contacts!
HP #57
HP #58
Q3005-90154
hp
photosmart
7200 series
setup
guide
2
Out tray
Paper width guide
1
2
unpack your printer
Note:
Purchase a USB cable separately.
See the
HP Photosmart Basics Guide
for a
description of the items included with your
printer.
open your printer
plug in the power cord
load plain paper in the in tray
1.
Lift the main cover of the printer, and slide the paper
width guide as far to the left as it will go.
2.
Lift the Out tray and place a stack of plain paper in
the In tray.
3.
Push the paper into the printer as far as it will go
without bending.
4.
Adjust the paper width guide to fit close to the edge
of the paper without bending the paper.
5.
Lower the Out tray and main cover.
Note:
You can load 4 x 6 inch (100 x 150 mm) photo
paper in the photo cassette (that came with the printer) for
printing beautiful photos. Store photo paper in the
resealable storage bag provided. For more information
see the
HP Photosmart Basics Guide
or
HP Photosmart
Printer Help
.
install the print cartridges
1.
Press the
ON
button to turn on the printer.
2.
Lift the main cover. The print cartridge cradle moves
to the middle of the printer.
3.
Pull the
pink pull-tab
to remove the clear tape from
each print cartridge. Do not touch or remove the
copper contacts.
4.
Insert the print cartridges with the copper contacts
facing the printer, and with one label facing up and
the other label facing out from the printer.
Be sure to insert the
HP #57 tri-color
print cartridge
in the left stall and the
HP #58 photo
print cartridge
in the right stall.
5.
Close the main cover.
*Q3005-90154*
HP #57
HP #58
In tray
Windows PC: Do not connect the printer to
your computer with the USB cable until
prompted by the installation software.
Macintosh: Do not connect the printer to
your computer with the USB cable until the
software installation has finished.
On button