HP 8000f Maintenance and Service Guide: HP Compaq 8000f Elite Business PC Ultr - Page 57
Preparing the New Optical Drive, Aligning the Release Latch
 |
UPC - 885631750551
View all HP 8000f manuals
Add to My Manuals
Save this manual to your list of manuals |
Page 57 highlights
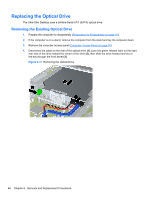
Preparing the New Optical Drive Before the new optical drive can be used, the release latch must be attached. 1. Peel the backing off the adhesive on the release latch. 2. Without allowing the release latch to touch the optical drive, carefully align the holes on the release latch with the pins on the side of the optical drive. Make sure the release latch is oriented properly. 3. Insert the pin at the front of the optical drive into the hole at the end of the release latch, and press firmly. 4. Insert the second pin, and press the entire release latch firmly to fasten the latch securely to the optical drive. Figure 6-18 Aligning the Release Latch Replacing the Optical Drive 47
-
 1
1 -
2
-
3
-
4
-
5
-
6
-
7
-
8
-
9
-
10
-
11
-
12
-
13
-
14
-
15
-
16
-
17
-
18
-
19
-
20
-
21
-
22
-
23
-
24
-
25
-
26
-
27
-
28
-
29
-
30
-
31
-
32
-
33
-
34
-
35
-
36
-
37
-
38
-
39
-
40
-
41
-
42
-
43
-
44
-
45
-
46
-
47
-
48
-
49
-
50
-
51
-
 52
52 -
 53
53 -
 54
54 -
 55
55 -
 56
56 -
 57
57 -
 58
58 -
 59
59 -
 60
60 -
 61
61 -
 62
62 -
63
-
64
-
65
-
66
-
67
-
68
-
69
-
70
-
71
-
72
-
73
-
74
-
75
-
76
-
77
-
78
-
79
-
80
-
81
-
82
-
83
-
84
-
85
-
86
-
87
-
88
-
89
-
90
-
91
-
92
-
93
-
94
-
95
-
96
-
97
-
98
-
99
-
100
-
101
-
102
-
103
-
104
-
105
-
106
-
107
-
108
-
109
-
110
-
111
-
112
-
113
-
114
-
115
-
116
-
117
-
118
-
119
-
120
-
121
-
122
-
123
-
124
-
125
-
126
-
127
-
128
-
129
-
130
-
131
-
132
-
133
-
134
-
135
-
136
-
137
-
138
-
139
-
140
-
141
-
142
-
143
-
144
-
145
-
146
-
147
-
148
-
149
-
150
-
151
-
152
-
153
-
154
-
155
-
156
-
157
-
158
-
159
-
160
-
161
-
162
-
163
-
164
-
165
-
166
 |
 |
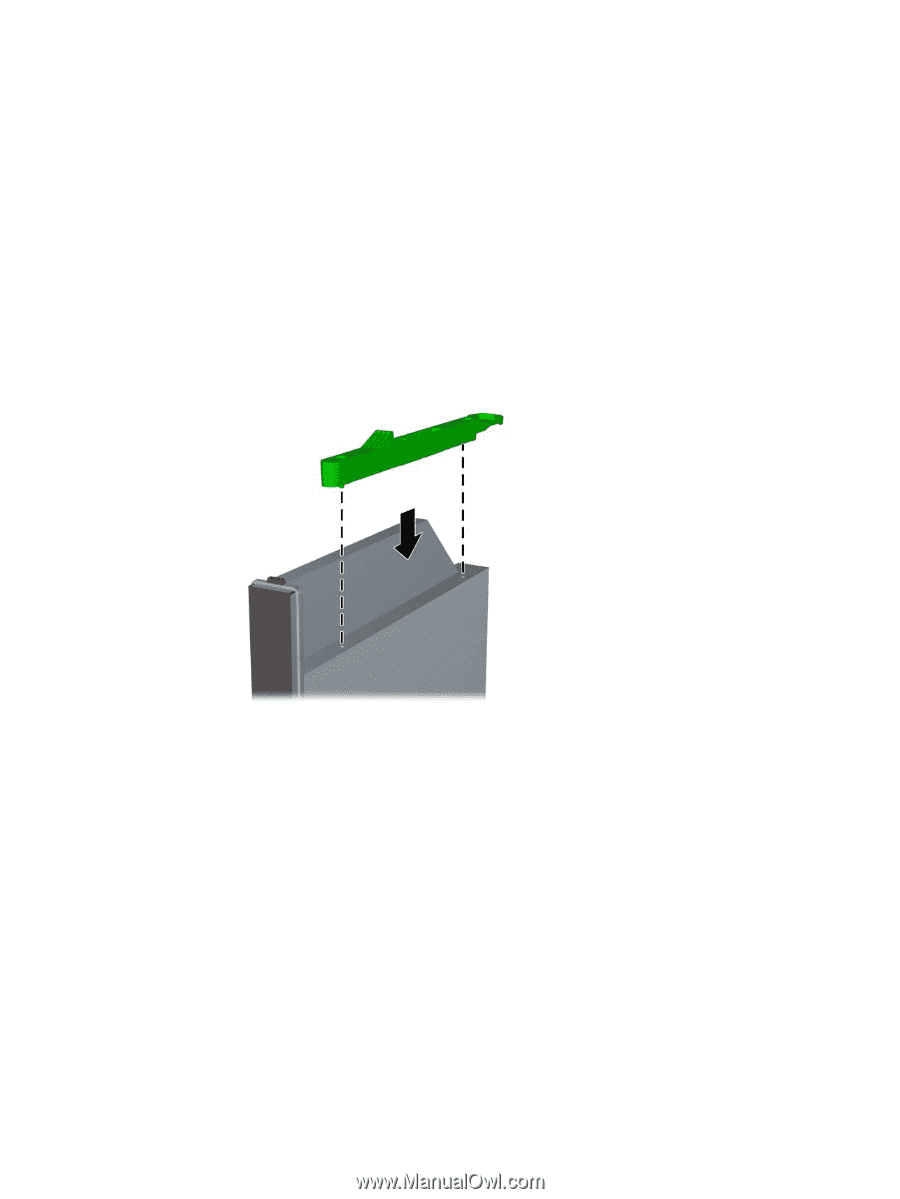
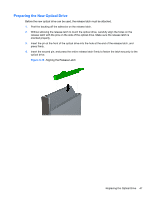
Preparing the New Optical Drive
Before the new optical drive can be used, the release latch must be attached.
1.
Peel the backing off the adhesive on the release latch.
2.
Without allowing the release latch to touch the optical drive, carefully align the holes on the
release latch with the pins on the side of the optical drive. Make sure the release latch is
oriented properly.
3.
Insert the pin at the front of the optical drive into the hole at the end of the release latch, and
press firmly.
4.
Insert the second pin, and press the entire release latch firmly to fasten the latch securely to the
optical drive.
Figure 6-18
Aligning the Release Latch
Replacing the Optical Drive
47