HP 9040n HP LaserJet 9040/9050 - Getting Started Guide - Page 16
Step 6. Install print cartridge, To install the print cartridge - toner
 |
UPC - 829160954967
View all HP 9040n manuals
Add to My Manuals
Save this manual to your list of manuals |
Page 16 highlights
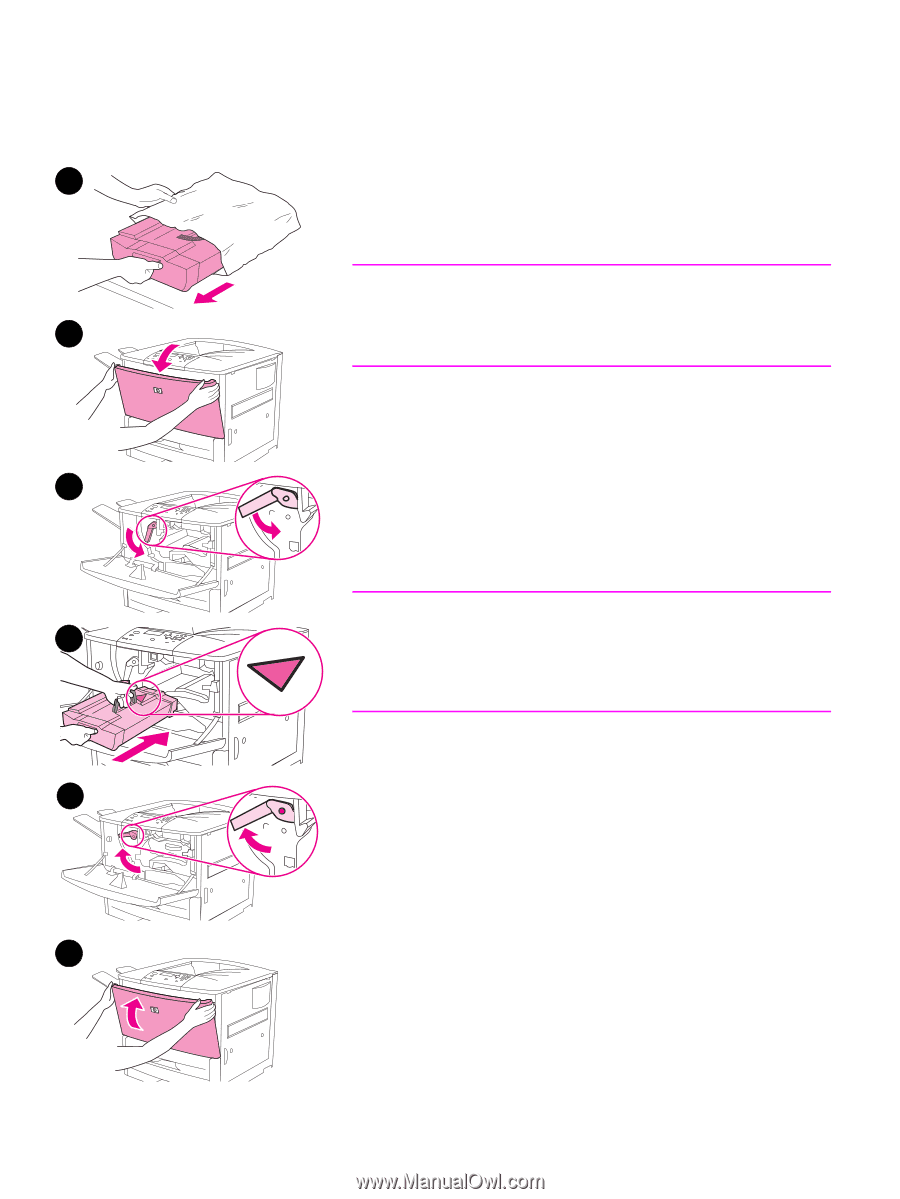
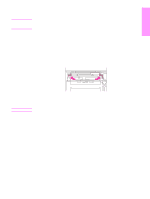
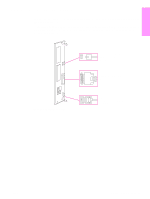
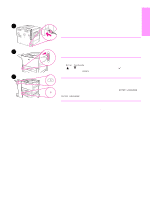
Step 6. Install print cartridge Use this procedure to install the print cartridge. If toner gets on your clothing, wipe it off with a dry cloth and wash the clothing in cold water. Hot water sets toner into fabric. 1 To install the print cartridge 1 Before removing the print cartridge from its packaging, set the print cartridge on a sturdy surface. Gently slide the print cartridge out of the packaging. CAUTION To prevent damage to the print cartridge, use two hands when handling the cartridge. 3 Do not expose the print cartridge to light for more than a few minutes. Cover the print cartridge when it is outside of the printer. 2 Gently rock the print cartridge from front to back to distribute the toner evenly inside the cartridge. This is the only time that you need to rock the cartridge. 3 Open the front door on the printer. 4 4 Rotate the green lever downward to the unlock position. 5 Hold the cartridge so that the arrow is on the left side of the cartridge. Position the cartridge as shown, with the arrow on the left side pointing toward the printer, and align the cartridge with the printing guides. Slide the cartridge into the printer as far as it will go. Note The print cartridge has an internal pull tab. The printer automatically 5 removes the pull tab after the print cartridge is installed and the product is turned on. The print cartridge makes a loud noise for several seconds when the product removes the pull tab. This noise occurs with new print cartridges only. 6 Press the button on the green lever, and turn the lever clockwise to the lock position. 7 Close the front door. 6 7 14 Printer Setup ENWW
-
 1
1 -
2
-
3
-
4
-
5
-
6
-
7
-
8
-
9
-
10
-
 11
11 -
 12
12 -
 13
13 -
 14
14 -
 15
15 -
 16
16 -
 17
17 -
 18
18 -
 19
19 -
 20
20 -
 21
21 -
22
-
23
-
24
-
25
-
26
-
27
-
28
-
29
-
30
-
31
-
32
-
33
-
34
-
35
-
36
-
37
-
38
-
39
-
40
-
41
-
42
-
43
-
44
-
45
-
46
-
47
-
48
-
49
-
50
-
51
-
52
-
53
-
54
-
55
-
56
-
57
-
58
-
59
-
60
-
61
-
62
-
63
-
64
-
65
-
66
-
67
-
68
-
69
-
70
-
71
-
72
-
73
-
74
-
75
-
76
-
77
-
78
-
79
-
80
-
81
-
82
-
83
-
84
-
85
-
86
-
87
-
88
-
89
-
90
-
91
-
92
-
93
-
94
-
95
-
96
-
97
-
98
-
99
-
100
-
101
-
102
-
103
-
104
-
105
-
106
-
107
-
108
-
109
-
110
-
111
-
112
-
113
-
114
-
115
-
116
-
117
-
118
-
119
-
120
-
121
-
122
-
123
-
124
-
125
-
126
-
127
-
128
-
129
-
130
-
131
-
132
-
133
-
134
-
135
-
136
-
137
-
138
-
139
-
140
-
141
-
142
-
143
-
144
-
145
-
146
-
147
-
148
-
149
-
150
-
151
-
152
-
153
-
154
-
155
-
156
-
157
-
158
-
159
-
160
-
161
-
162
-
163
-
164
-
165
-
166
-
167
-
168
-
169
-
170
-
171
-
172
-
173
-
174
-
175
-
176
-
177
-
178
-
179
-
180
-
181
-
182
-
183
-
184
-
185
-
186
-
187
-
188
-
189
-
190
-
191
-
192
-
193
-
194
-
195
-
196
-
197
-
198
-
199
-
200
-
201
-
202
-
203
-
204
-
205
-
206
-
207
-
208
-
209
-
210
-
211
-
212
-
213
-
214
-
215
-
216
-
217
-
218
-
219
-
220
-
221
-
222
-
223
-
224
-
225
-
226
-
227
-
228
-
229
-
230
-
231
-
232
-
233
-
234
-
235
-
236
-
237
-
238
-
239
-
240
-
241
-
242
-
243
-
244
-
245
-
246
-
247
-
248
-
249
-
250
-
251
-
252
-
253
-
254
-
255
-
256
 |
 |