HP 9040n HP LaserJet 9040/9050 - Getting Started Guide - Page 20
Step 8. Change the control panel overlay, To change the overlay
 |
UPC - 829160954967
View all HP 9040n manuals
Add to My Manuals
Save this manual to your list of manuals |
Page 20 highlights
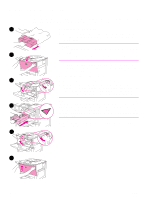
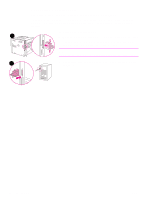
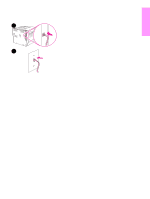
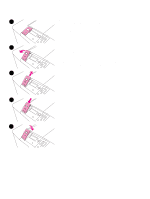
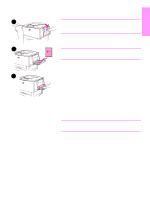
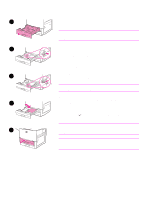
Step 8. Change the control panel overlay The control panel comes with an English overlay installed. If necessary, 1 use the procedure below to change the control panel overlay to one included in the box. To change the overlay 1 Insert your fingernail or a thin, rigid object in back of the overlay and lift up. 2 Gently lift the overlay up and backward to move it away from the 2 printer. 3 Position the new overlay over the control panel. Align the ends of the overlay with the holes on the control panel and slide the overlay in. 4 Snap the overlay firmly onto the control panel. Ensure that the overlay is flat against the control panel. 3 4 5 18 Printer Setup ENWW
-
 1
1 -
2
-
3
-
4
-
5
-
6
-
7
-
8
-
9
-
10
-
11
-
12
-
13
-
14
-
 15
15 -
 16
16 -
 17
17 -
 18
18 -
 19
19 -
 20
20 -
 21
21 -
 22
22 -
 23
23 -
 24
24 -
 25
25 -
26
-
27
-
28
-
29
-
30
-
31
-
32
-
33
-
34
-
35
-
36
-
37
-
38
-
39
-
40
-
41
-
42
-
43
-
44
-
45
-
46
-
47
-
48
-
49
-
50
-
51
-
52
-
53
-
54
-
55
-
56
-
57
-
58
-
59
-
60
-
61
-
62
-
63
-
64
-
65
-
66
-
67
-
68
-
69
-
70
-
71
-
72
-
73
-
74
-
75
-
76
-
77
-
78
-
79
-
80
-
81
-
82
-
83
-
84
-
85
-
86
-
87
-
88
-
89
-
90
-
91
-
92
-
93
-
94
-
95
-
96
-
97
-
98
-
99
-
100
-
101
-
102
-
103
-
104
-
105
-
106
-
107
-
108
-
109
-
110
-
111
-
112
-
113
-
114
-
115
-
116
-
117
-
118
-
119
-
120
-
121
-
122
-
123
-
124
-
125
-
126
-
127
-
128
-
129
-
130
-
131
-
132
-
133
-
134
-
135
-
136
-
137
-
138
-
139
-
140
-
141
-
142
-
143
-
144
-
145
-
146
-
147
-
148
-
149
-
150
-
151
-
152
-
153
-
154
-
155
-
156
-
157
-
158
-
159
-
160
-
161
-
162
-
163
-
164
-
165
-
166
-
167
-
168
-
169
-
170
-
171
-
172
-
173
-
174
-
175
-
176
-
177
-
178
-
179
-
180
-
181
-
182
-
183
-
184
-
185
-
186
-
187
-
188
-
189
-
190
-
191
-
192
-
193
-
194
-
195
-
196
-
197
-
198
-
199
-
200
-
201
-
202
-
203
-
204
-
205
-
206
-
207
-
208
-
209
-
210
-
211
-
212
-
213
-
214
-
215
-
216
-
217
-
218
-
219
-
220
-
221
-
222
-
223
-
224
-
225
-
226
-
227
-
228
-
229
-
230
-
231
-
232
-
233
-
234
-
235
-
236
-
237
-
238
-
239
-
240
-
241
-
242
-
243
-
244
-
245
-
246
-
247
-
248
-
249
-
250
-
251
-
252
-
253
-
254
-
255
-
256
 |
 |

18
Printer Setup
ENWW
Step 8.
Change the control panel overlay
The control panel comes with an English overlay installed. If necessary,
use the procedure below to change the control panel overlay to one
included in the box.
To change the overlay
1
Insert your fingernail or a thin, rigid object in back of the overlay and
lift up.
2
Gently lift the overlay up and backward to move it away from the
printer.
3
Position the new overlay over the control panel. Align the ends of
the overlay with the holes on the control panel and slide the overlay
in.
4
Snap the overlay firmly onto the control panel. Ensure that the
overlay is flat against the control panel.
1
2
3
4
5