HP 9040n HP LaserJet 9040/9050 - Getting Started Guide - Page 24
Step 12. Load Trays 2 and 3, To load Tray 2 and Tray 3
 |
UPC - 829160954967
View all HP 9040n manuals
Add to My Manuals
Save this manual to your list of manuals |
Page 24 highlights
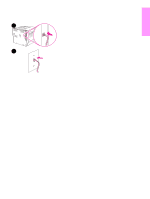
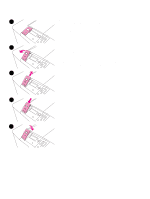
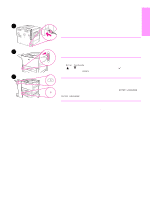
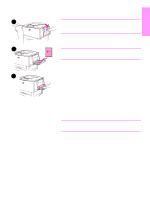
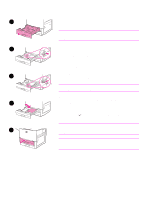
Step 12. Load Trays 2 and 3 This section describes how to load A4- or letter-size paper. For 1 instructions on loading and configuring other sizes and types of media, see the use guide. CAUTION To avoid a paper jam, never open a tray while the printer is printing from that tray. To load Tray 2 and Tray 3 2 1 Open the tray until it stops. 2 Adjust the left (Y) paper guide by pressing the tab on the guide and set the guide to the correct paper size. 3 Adjust the front (X) paper guide by pressing the tab on the guide and set the guide to the correct paper size. 4 Load a stack of media with the top of the stack toward the rear of the tray. For single-sided printing, the side to be printed should be 3 down. For double-sided printing, the first side to be printed should be up. Note For information about printing on special media, see the use guide. 5 Set the paper lever to Standard if both guides are set to the same Standard marking, such as Letter or A4. Otherwise, set the lever to 4 Custom. 6 Close the tray. 7 The paper size and type for this tray appears on the printer control panel. Press to verify or see the use guide to make changes. 8 Repeat steps 1 through 7 to load the other tray. Note 6 For information about loading Tray 4, see the install guide that came with Tray 4. CAUTION Never store paper or other items in the area to the left of the paper guides. Doing so can permanently damage the tray. 22 Printer Setup ENWW
-
 1
1 -
2
-
3
-
4
-
5
-
6
-
7
-
8
-
9
-
10
-
11
-
12
-
13
-
14
-
15
-
16
-
17
-
18
-
 19
19 -
 20
20 -
 21
21 -
 22
22 -
 23
23 -
 24
24 -
 25
25 -
 26
26 -
 27
27 -
 28
28 -
 29
29 -
30
-
31
-
32
-
33
-
34
-
35
-
36
-
37
-
38
-
39
-
40
-
41
-
42
-
43
-
44
-
45
-
46
-
47
-
48
-
49
-
50
-
51
-
52
-
53
-
54
-
55
-
56
-
57
-
58
-
59
-
60
-
61
-
62
-
63
-
64
-
65
-
66
-
67
-
68
-
69
-
70
-
71
-
72
-
73
-
74
-
75
-
76
-
77
-
78
-
79
-
80
-
81
-
82
-
83
-
84
-
85
-
86
-
87
-
88
-
89
-
90
-
91
-
92
-
93
-
94
-
95
-
96
-
97
-
98
-
99
-
100
-
101
-
102
-
103
-
104
-
105
-
106
-
107
-
108
-
109
-
110
-
111
-
112
-
113
-
114
-
115
-
116
-
117
-
118
-
119
-
120
-
121
-
122
-
123
-
124
-
125
-
126
-
127
-
128
-
129
-
130
-
131
-
132
-
133
-
134
-
135
-
136
-
137
-
138
-
139
-
140
-
141
-
142
-
143
-
144
-
145
-
146
-
147
-
148
-
149
-
150
-
151
-
152
-
153
-
154
-
155
-
156
-
157
-
158
-
159
-
160
-
161
-
162
-
163
-
164
-
165
-
166
-
167
-
168
-
169
-
170
-
171
-
172
-
173
-
174
-
175
-
176
-
177
-
178
-
179
-
180
-
181
-
182
-
183
-
184
-
185
-
186
-
187
-
188
-
189
-
190
-
191
-
192
-
193
-
194
-
195
-
196
-
197
-
198
-
199
-
200
-
201
-
202
-
203
-
204
-
205
-
206
-
207
-
208
-
209
-
210
-
211
-
212
-
213
-
214
-
215
-
216
-
217
-
218
-
219
-
220
-
221
-
222
-
223
-
224
-
225
-
226
-
227
-
228
-
229
-
230
-
231
-
232
-
233
-
234
-
235
-
236
-
237
-
238
-
239
-
240
-
241
-
242
-
243
-
244
-
245
-
246
-
247
-
248
-
249
-
250
-
251
-
252
-
253
-
254
-
255
-
256
 |
 |
