HP 9124 Cisco MDS 9124e Fabric Switch for HP c-Class BladeSystem installation
HP 9124 - Cisco MDS Fabric Switch Manual
 |
UPC - 808736835008
View all HP 9124 manuals
Add to My Manuals
Save this manual to your list of manuals |
HP 9124 manual content summary:
- HP 9124 | Cisco MDS 9124e Fabric Switch for HP c-Class BladeSystem installation - Page 1
Switch kit contains: • Cisco MDS 9124e Fabric Switch for HP c-Class BladeSystem installation instructions • One of the following switches: • Cisco MDS 9124e 24-Port Fabric Switch with sixteen internal and eight external active ports and four 4Gb SFPs installed. See Figure 1. • Cisco MDS 9124e 12 - HP 9124 | Cisco MDS 9124e Fabric Switch for HP c-Class BladeSystem installation - Page 2
web site: www.hp.com/go/cisco9124e Follow these instructions (links subject to change): 1. Go to the Support section, located on the far right side of the web page. 2. Click Support & drivers. 3. Locate the Tasks for Cisco MDS 9124e Fabric Switch for HP c-Class BladeSystem section. 4. Click Download
-
 1
1 -
 2
2
 |
 |
*78-18011-01*
Overview
Read these instructions to install the Cisco MDS 9124e Fabric
Switch for HP c-Class BladeSystem.
Kit contents
The Cisco MDS 9124e Fabric Switch kit contains:
•
Cisco MDS 9124e Fabric Switch for HP c-Class BladeSystem
installation instructions
•
One of the following switches:
•
Cisco MDS 9124e 24-Port Fabric Switch with sixteen
internal and eight external active ports and four 4Gb
SFPs installed. See Figure 1.
•
Cisco MDS 9124e 12-Port Fabric Switch with eight internal
and four external active ports and two 4Gb SFPs
installed.
•
Small bag containing black, plastic SFP dust covers that
must be inserted in ports where Small Form-factor Pluggable
(SFP) optical transceivers are not installed.
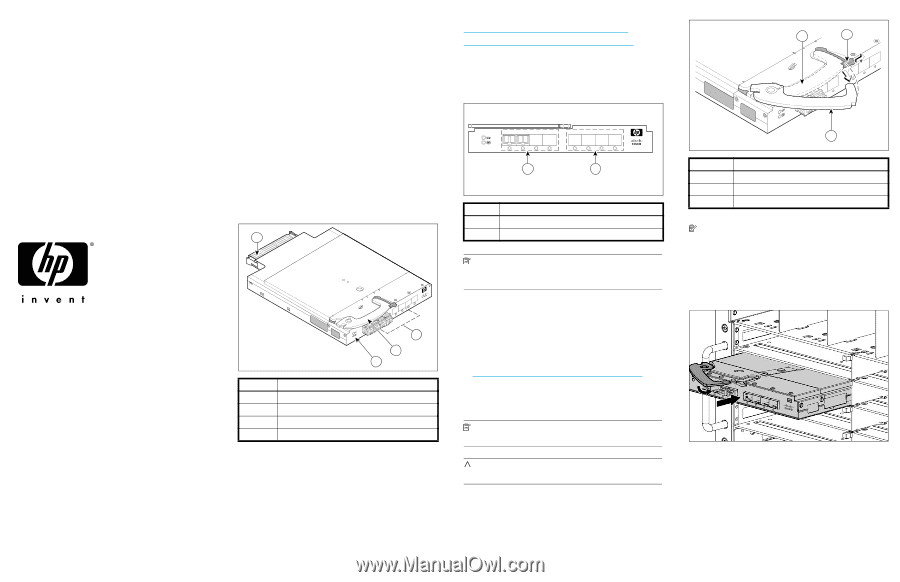
Figure 1
Cisco MDS 9124e 24-Port Fabric Switch with four SFPs
installed
Additional information
See the
HP BladeSystem enclosure setup and installation guide
provided with your enclosure for more information on the
association between the server mezzanine bays and the
enclosure interconnect bays.
For example, where you install the mezzanine card will
determine where you need to install interconnect modules such
as the Cisco MDS 9124e Fabric Switch.
Additional component information is available at:
Switch connection identification
Figure2 shows the external ports for the Cisco MDS 9124e
Fabric Switch.
Figure 2
External ports
NOTE:
Refer to the
HP BladeSystem enclosure setup and
installation guide
provided with your enclosure for
specific
information on BladeSystem enclosure internal port mapping.
Install the switch
Install the Cisco MDS 9124e Fabric Switch into the enclosure.
1.
For help identifying your specific enclosure setup and
available connections, obtain the
HP BladeSystem enclosure
setup and installation guide
provided with your enclosure, or
access it from:
2. Locate the appropriate interconnect bay in the rear of the
enclosure per the
HP BladeSystem enclosure setup and
installation guide
.
NOTE:
Populate all enclosure interconnect bays with
either a switch, Pass-Thru or one of the blank panels provided.
CAUTION:
Properly ground yourself before handling the
switch.
3. Press the handle latch to release the installation handle. See
Figure 3.
Figure 3
Releasing the installation handle
NOTE:
The Cisco MDS 9124e Fabric Switch is a
hot-pluggable device. The enclosure power may be on or off
during install.
4. Align the Cisco MDS 9124e Fabric Switch for HP c-Class
BladeSystem with the appropriate interconnect bay
according to your enclosure’s specific configuration. Push
firmly into the interconnect bay. See Figure 4.
Figure 4
Installing the switch into an interconnect bay
5. Press the installation handle into the latch to lock the switch
in place.
Verify configuration
The Onboard Administrator (OA) is the enclosure management
module used to support and manage the c-Class HP
BladeSystem and all the managed devices used in the
enclosure.
Once the switch is installed in the interconnect bay, the OA
verifies that the switch type matches the mezzanine cards
present on the servers. If there is no mismatch, the OA powers
up the switch.
Item
Description
1
Midplane connector
2
Eight external FC ports
3
Installation handle
4
Unit ID (UID) LED and Health LED
scale: 3/8" = 1"
17
18
19
20
!
Cisco MDS 9124e
EXT 8
EXT 7
EXT 6
EXT5
3
4
2
3
181734
1
Item
Description
1
Left bank – EXT 1, EXT 2, EXT 3, EXT 4
2
Right bank – EXT 5, EXT 6, EXT 7, EXT 8
scale: .667" = 1"
!
Cisco MDS 9124e
1
2
EXT 1
EXT 2
EXT 3
EXT 4
EXT 5
EXT 6
EXT 7
EXT 8
LiNK
181735
Item
Description
1
Installation handle in latched position
2
Handle latch
3
Installation handle (released)
scale: 2/3" = 1"
17
18
19
20
!
EXT 7
EXT 6
EXT5
1
2
3
181736
EXT 5
EXT 8
EXT 7
EXT 8
Cisco MDS 9124e
4
EXT 5
Cisco MDS 9124e
Fabric Switch
for HP c-Class BladeSystem
installation instructions
© Copyright 2007 Hewlett-Packard Development Company, L.P.
The information contained herein is subject to change without notice.
The only warranties for HP products and services are set forth in the
express warranty statements accompanying such products and services.
Nothing herein should be construed as constituting an additional
warranty. HP shall not be liable for technical or editorial errors or
omissions contained herein.
First edition March 2007
Printed in the USA on recycled paper containing 10% postconsumer
waste.
www.hp.com