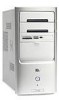
HP A1224n PC Troubleshooting and Maintenance Guide
HP A1224n - Pavilion - 1 GB RAM Manual
 |
View all HP A1224n manuals
Add to My Manuals
Save this manual to your list of manuals |
HP A1224n manual content summary:
- HP A1224n | PC Troubleshooting and Maintenance Guide - Page 1
PC Troubleshooting and Maintenance Guide - HP A1224n | PC Troubleshooting and Maintenance Guide - Page 2
577,216, 4,819,098, and 4,907,093 licensed for limited viewing uses only. Microsoft and Windows are U.S. registered trademarks of Microsoft Corporation. HP supports lawful use of technology and does not endorse or encourage the use of its products for purposes other than those permitted by copyright - HP A1224n | PC Troubleshooting and Maintenance Guide - Page 3
Discs 1 Creating System Recovery Discs 1 Removing Unused Programs 1 Running the Disk Cleanup Program 1 Running the Disk Defragmenter Program 2 Checking for Hard Disk Drive Errors 2 Understanding Hard Disk Drive Space 2 Recommended Maintenance Schedule 3 Troubleshooting PC Problems 4 Audio - HP A1224n | PC Troubleshooting and Maintenance Guide - Page 4
System Restore 16 Application and Driver Recovery 16 System Recovery Overview 17 Creating System Recovery Discs 18 Creating a Recovery Tools CD 18 Running System Recovery from Recovery Discs 19 Running System Recovery from the Hard Disk Drive 19 iv PC Troubleshooting and Maintenance Guide - HP A1224n | PC Troubleshooting and Maintenance Guide - Page 5
data on your hard disk drive with the data copied to the disc to ensure it is an exact copy. Depending on your disc burning software, you may need to manually enable this feature. Creating System Recovery Discs This is a one-time step that you should perform while your PC is working properly. If you - HP A1224n | PC Troubleshooting and Maintenance Guide - Page 6
and attempt recovery of bad sectors. 6 Click Start. If prompted to restart, click Yes to restart the PC. Understanding Hard Disk Drive Space HP PCs with the Windows XP operating system preinstalled may appear to have a hard disk drive smaller than what is stated in the product specifications, in the - HP A1224n | PC Troubleshooting and Maintenance Guide - Page 7
for Hard Disk Drive Errors" on page 2.) • Run Disk Defragmenter. (See "Running the Disk Defragmenter Program" page 2.) Review the Start menu • Set to launch only needed applications. Clean the PC, monitor, keyboard, and mouse • For detailed cleaning instructions, go to http://www.hp.com/ support - HP A1224n | PC Troubleshooting and Maintenance Guide - Page 8
do to try to solve the problem. The troubleshooting tables appear in the following order: • Audio • Video • CD and DVD Drives Audio • Display (Monitor) • Hard Disk Drive • Hardware Installation • Internet Access • Keyboard and Mouse • Power • Performance • Miscellaneous For additional information - HP A1224n | PC Troubleshooting and Maintenance Guide - Page 9
cannot remove a CD or DVD. Turn on your PC, and press the Eject button nearest the drive to open the tray. If you suspect a problem with the actual Eject button: 1 Click Start and then My Computer. 2 Right-click the CD or DVD drive you want to open. 3 Select Eject from the menu. PC Troubleshooting - HP A1224n | PC Troubleshooting and Maintenance Guide - Page 10
's Web site. Use a CD instead of a DVD. Audio files on a DVD can be played on your PC, but you cannot create a music DVD to be played in a home CD player. Convert .mp3 or .wma audio files to .wav or .cda music files before burning them to a disc. 6 PC Troubleshooting and Maintenance Guide - HP A1224n | PC Troubleshooting and Maintenance Guide - Page 11
too large or too small, or the images are fuzzy. Adjust the monitor resolution setting in Windows: 1 Right-click the desktop, and then select Properties. 2 Select the Settings tab. 3 Drag the Screen Resolution slider to adjust the resolution as needed. PC Troubleshooting and Maintenance Guide 7 - HP A1224n | PC Troubleshooting and Maintenance Guide - Page 12
the keyboard to open the Help and Support Center, or refer to the Warranty and Support Guide to contact Support for replacement details. Hardware Installation Symptom Possible solution A new device is not recognized as part of the system. Install the device driver from the CD provided with the - HP A1224n | PC Troubleshooting and Maintenance Guide - Page 13
settings, or contact your Internet Service Provider (ISP) for assistance. Reconnect the modem, verifying connections. Note that your PC may also have an Ethernet network interface (also called a network interface card, or NIC) that connects to a local area network (LAN). Although it looks similar - HP A1224n | PC Troubleshooting and Maintenance Guide - Page 14
is working properly. 6 In the Device usage area, verify the modem is enabled. 7 If there are further problems, click the Troubleshoot button, and follow the onscreen instructions. Note that Web pages do not always load as quickly as files stored on your PC. Web pages may also load slowly if there - HP A1224n | PC Troubleshooting and Maintenance Guide - Page 15
the keyboard to the back of your PC, and then turn on your PC. Press the Help ? button on the keyboard to open the Help and Support Center, or refer to the Warranty and Support Guide to contact Support for replacement details. Keyboard Print button does not work. Use the Print menu item in the - HP A1224n | PC Troubleshooting and Maintenance Guide - Page 16
Support for replacement details. Reseat drive power, data, and power supply cables. See the Upgrading and Servicing Guide for instructions. Invalid system disk or Non-System disk or disk error message displays. When drive activity stops, remove the disk and press the spacebar. The PC should - HP A1224n | PC Troubleshooting and Maintenance Guide - Page 17
by using the Control Panel. If the problem persists, replace the battery. See the Upgrading and Servicing Guide for replacement instructions. In the Volume column, select the hard disk drive you want to defragment (typically C:), and then click Defragment. Remove unused programs: 1 Click Start, and - HP A1224n | PC Troubleshooting and Maintenance Guide - Page 18
click My Computer. 3 Right-click the hard disk drive that memory cards for dirt or material closing a hole or spoiling a metal contact. Clean the contacts with a lint-free cloth and small amounts of isopropyl alcohol. Replace the memory card if necessary. 14 PC Troubleshooting and Maintenance Guide - HP A1224n | PC Troubleshooting and Maintenance Guide - Page 19
described in "Creating System Recovery Discs" on page 18. • Contact HP Support to purchase a set of System Recovery discs. You should also make the HP PC Recovery Tools CD. This CD contains utilities that allow you to make changes to your hard disk drive. See "Creating a Recovery Tools CD" on page - HP A1224n | PC Troubleshooting and Maintenance Guide - Page 20
, (for example, DVD/CD-ROM drives). 4 Double-click the specific item (for example, HP DVD Writer 640b), and then click the Driver tab. 5 Click Update Driver or Rollback Driver, and follow the onscreen instructions. Microsoft System Restore Microsoft® Windows® XP includes a feature that allows you to - HP A1224n | PC Troubleshooting and Maintenance Guide - Page 21
disk drive that cannot be used for data storage. • Recovery Discs - Run the recovery from a set of recovery discs (CDs or DVDs) that you create from files stored on your hard disk drive. To create recovery discs, perform the procedure in the next section. PC Troubleshooting and Maintenance Guide 17 - HP A1224n | PC Troubleshooting and Maintenance Guide - Page 22
System Recovery discs, you can create a Recovery Tools CD. The Recovery Tools CD can be used to: • Read instructions to use each utility on the Recovery Tools CD. • Start the System Recovery program from the recovery partition. • Remove the System Recovery partition from your PC hard disk drive to - HP A1224n | PC Troubleshooting and Maintenance Guide - Page 23
keyboard, and the mouse. 5 Disconnect or remove all external drives and remove the HP Personal Media Drive if your PC includes one. 6 Press the On button to turn on the PC. 7 The PC starts the recovery from the recovery disc. Follow the onscreen instructions when they are displayed. • For standard - HP A1224n | PC Troubleshooting and Maintenance Guide - Page 24
purchase. Be sure to back up any data that you want to keep onto a removable disc. 6 Complete the PC startup, finish the registration process, and wait until you see the desktop. Then, turn off the PC, reconnect all peripheral devices, and turn on the PC. 20 PC Troubleshooting and Maintenance Guide - HP A1224n | PC Troubleshooting and Maintenance Guide - Page 25
PC Troubleshooting and Maintenance Guide 21 - HP A1224n | PC Troubleshooting and Maintenance Guide - Page 26
Printed in
-
 1
1 -
 2
2 -
 3
3 -
 4
4 -
 5
5 -
 6
6 -
 7
7 -
8
-
9
-
10
-
11
-
12
-
13
-
14
-
15
-
16
-
17
-
18
-
19
-
20
-
21
-
22
-
23
-
24
-
25
-
26
 |
 |

PC Troubleshooting and Maintenance Guide