HP A6219h PC Troubleshooting
HP A6219h - Pavilion - 2 GB RAM Manual
 |
UPC - 883585366514
View all HP A6219h manuals
Add to My Manuals
Save this manual to your list of manuals |
HP A6219h manual content summary:
- HP A6219h | PC Troubleshooting - Page 1
Troubleshooting and Maintenance Guide - HP A6219h | PC Troubleshooting - Page 2
or disassembly is prohibited. Microsoft and Windows are U.S. registered trademarks of Microsoft Corporation. The Windows logo is a trademark or registered trademark of Microsoft Corporation in the United States and/or other countries/regions. HP supports lawful use of technology and does not - HP A6219h | PC Troubleshooting - Page 3
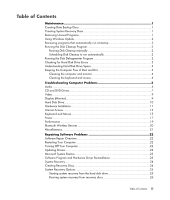
Access ...13 Keyboard and Mouse 15 Power ...17 Performance ...19 Bluetooth Wireless Devices 20 Miscellaneous ...21 Repairing Software Problems 22 Software Repair Overview 22 Restarting Your Computer 22 Turning Off Your Computer 22 Updating Drivers 22 Microsoft System Restore 23 Software - HP A6219h | PC Troubleshooting - Page 4
iv Troubleshooting and Maintenance Guide - HP A6219h | PC Troubleshooting - Page 5
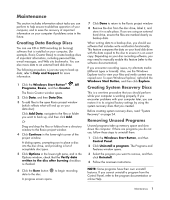
ensure trouble-free operation of your computer, and to ease the recovery of important information on your computer if problems arise refer to Help and Support for more information. 1 Click the Windows Start Button® , All Programs, Roxio, and then Creator. The Roxio Creator window opens. 2 Click - HP A6219h | PC Troubleshooting - Page 6
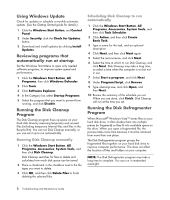
Using Windows Update Check for updates or schedule a monthly automatic update. (See the Getting Started guide for details.) 1 Click the Windows Start Button, and Control Panel. 2 Under Security, click the Check for Updates button. 3 Download and install updates by clicking Install Updates. Reviewing - HP A6219h | PC Troubleshooting - Page 7
Hard Disk Drive Space The hard disk drive on the Hewlett-Packard and Compaq computers with the Windows Vista operating system preinstalled may appear to be smaller than what is stated in the product specifications, in the documentation, or on the box. Hard disk drives are described and advertised - HP A6219h | PC Troubleshooting - Page 8
computer from its power source. 2 Unplug the monitor from its power source. 3 Use a clean, dry cloth to dust the computer case and the monitor. 4 Use a clean cloth dampened with warm water to wipe the computer dry, replace the ball and ball-cover ring. 4 Troubleshooting and Maintenance Guide - HP A6219h | PC Troubleshooting - Page 9
Troubleshooting Computer Problems The troubleshooting tables appear in the following order: Audio CD and DVD Drives Video Display (Monitor) Hard Disk Drive Hardware Installation Internet Access Keyboard and Mouse Power Performance Bluetooth Wireless Devices Miscellaneous For more information about - HP A6219h | PC Troubleshooting - Page 10
without a separate power cord) will not produce satisfactory sound. Replace the non-powered speakers with powered speakers. Powered speakers have a power cord and On button, and they connect to the Audio Out (green) connector on the back of the computer. 6 Troubleshooting and Maintenance Guide - HP A6219h | PC Troubleshooting - Page 11
information about restoring and updating drivers, see "Updating Drivers" on page 22. I cannot remove a CD or DVD. Turn on your computer, and press the Eject button nearest the drive to open the tray. If you suspect a problem with the Eject button itself: 1 Click the Windows Start Button and then - HP A6219h | PC Troubleshooting - Page 12
disk drive to store a temporary copy of the content. Click the Windows Start Button, then Computer. Right-click the hard disk drive and click Properties to view the available Some video files may be viewed on a computer, but not on a home DVD video player. 8 Troubleshooting and Maintenance Guide - HP A6219h | PC Troubleshooting - Page 13
and game controllers. 4 Right-click TV tuner (select models only), and then click Update Driver Software. 5 Select Search automatically for updated driver software. 6 Follow the instructions to update the driver. 7 If you are prompted, restart the computer. Display (Monitor) In addition to the - HP A6219h | PC Troubleshooting - Page 14
and hold the On button for 5 or more seconds to turn off the computer. 2 Press the On button to start the computer. Press the Help ? button on the keyboard to open the Help and Support Center, or refer to the Limited Warranty and Support Guide to contact Support. 10 Troubleshooting and Maintenance - HP A6219h | PC Troubleshooting - Page 15
from the device manufacturer's Web site. You may need an updated driver for Windows Vista. Contact the device vendor directly for an update. For HP peripherals, visit the HP Web site. For details, refer to the Limited Warranty and Support Guide for details. Ensure that all cables are properly and - HP A6219h | PC Troubleshooting - Page 16
see whether your device is enabled and working properly. If it is available, click the Troubleshoot button, and follow the onscreen instructions in the device troubleshooter wizard. 8 Restart the computer. Click the Windows Start Button, click the Arrow button next to the Lock button, and then click - HP A6219h | PC Troubleshooting - Page 17
Start Button, and select Network. 2 In the Network window, click Network and Sharing Center. 3 In the Network and Sharing Center window, click Set up a connection or network to open the wizard. 4 Follow the onscreen instructions. If your system has external antennas, try to move the antenna to - HP A6219h | PC Troubleshooting - Page 18
/adware program included on your computer (select models only), or use any number of available software programs that remove adware programs. Note that many of the popular antivirus programs have tools that scan for and remove adware from your computer. 14 Troubleshooting and Maintenance Guide - HP A6219h | PC Troubleshooting - Page 19
after 60 seconds. To ensure the connection was established, and that the receiver did not time out instead, move the mouse and check for response. Troubleshooting Computer Problems 15 - HP A6219h | PC Troubleshooting - Page 20
. If you have a rollerball mouse, clean the roller ball. For detailed cleaning instructions, go to: http://www.hp.com/support Select your country/region and language, search on your computer model number, and then search on the keyword cleaning. For a mouse with a roller ball, use a mouse pad - HP A6219h | PC Troubleshooting - Page 21
been installed. Reinstall the old memory to return your computer to its original state. For instructions, refer to the Upgrading and Servicing Guide. Reseat the hard disk drive data and power cables. For instructions, refer to the Upgrading and Servicing Guide. Troubleshooting Computer Problems 17 - HP A6219h | PC Troubleshooting - Page 22
is approximately seven years. Before replacing the battery, try resetting the date and time in your operating system by using the Control Panel. If the problem persists, replace the battery. For instructions, refer to the Upgrading and Servicing Guide. 18 Troubleshooting and Maintenance - HP A6219h | PC Troubleshooting - Page 23
and folders on your computer. NOTE: The Disk Windows Start Button, and then Control Panel. 2 Click Uninstall a program. The Programs and Features window opens. 3 Select the program you want to remove and click Uninstall. 4 Follow the onscreen instructions. Troubleshooting Computer Problems - HP A6219h | PC Troubleshooting - Page 24
working. Possible solution Ensure the device and your computer are the correct distance apart-not too far and not too near. For the correct distance, refer to the device instructions. Remove and then reinstall the device: 1 Click the Windows Start Button, and then Control Panel. 2 Click Hardware - HP A6219h | PC Troubleshooting - Page 25
inserted into the correct slot. Inspect the ends of the memory cards for dirt or material that closes a hole or spoils a metal contact. Clean the contacts with a lint-free cloth and a small amount of isopropyl alcohol. Replace the memory card if necessary. Troubleshooting Computer Problems 21 - HP A6219h | PC Troubleshooting - Page 26
-click the specific item (for example, HP DVD Writer 640b). 5 Click the Driver tab. 6 To update a driver, click Update Driver, and follow the onscreen instructions. Or To revert to an earlier version of a driver, click Rollback Driver, and follow the onscreen instructions. 22 Troubleshooting and - HP A6219h | PC Troubleshooting - Page 27
manually. If you experience a problem that you think may be due to software on your computer, use System Restore to return the computer instructions. For more information about software restore points: 1 Click the Windows Start Button, and Help and Support the Windows Start Button, All Programs, PC - HP A6219h | PC Troubleshooting - Page 28
onscreen instructions. 5 When you have finished reinstalling, restart the computer. NOTE: Do not skip this last step. You must restart the computer after recovering software programs or hardware drivers. System normal that some of your discs may be rejected. 24 Troubleshooting and Maintenance Guide - HP A6219h | PC Troubleshooting - Page 29
://www.hp.com/support and visit the Software & Driver downloads page for your computer model. Starting system recovery from the hard disk drive Choose one of the following procedures to reinstall the software from the recovery image on your hard disk drive: System recovery from the Windows Vista - HP A6219h | PC Troubleshooting - Page 30
4 Disconnect all peripheral devices from the computer, except the monitor, keyboard, and mouse. 5 Press the On button to turn on the computer. A window may open, prompting you to choose between running system recovery from the discs or from your hard drive. 26 Troubleshooting and Maintenance Guide - HP A6219h | PC Troubleshooting - Page 31
Restart your computer. (Some updates will not finish installing until you restart.) 7 Use HP Update to get critical updates from HP: a Click the Windows Start Button, All Programs, the HP folder, and then HP Update. b Follow the onscreen instruction to download driver and software updates. 8 If you - HP A6219h | PC Troubleshooting - Page 32
www.hp.com Printed in
-
 1
1 -
 2
2 -
 3
3 -
 4
4 -
 5
5 -
 6
6 -
 7
7 -
8
-
9
-
10
-
11
-
12
-
13
-
14
-
15
-
16
-
17
-
18
-
19
-
20
-
21
-
22
-
23
-
24
-
25
-
26
-
27
-
28
-
29
-
30
-
31
-
32
 |
 |

Troubleshooting and Maintenance Guide