HP A626 Basics Guide
HP A626 - PhotoSmart Color Inkjet Printer Manual
 |
UPC - 883585085330
View all HP A626 manuals
Add to My Manuals
Save this manual to your list of manuals |
HP A626 manual content summary:
- HP A626 | Basics Guide - Page 1
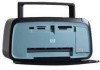
HP Photosmart A620 series Basics Guide Guía básica - HP A626 | Basics Guide - Page 2
to change without notice. All rights reserved. Reproduction, adaptation, or translation of this material is prohibited without prior written permission of Hewlett-Packard, except as allowed under copyright laws. The only warranties for HP products and services are set forth in the express warranty - HP A626 | Basics Guide - Page 3
HP Photosmart A620 series Basics Guide HP Photosmart A620 series Basics Guide English - HP A626 | Basics Guide - Page 4
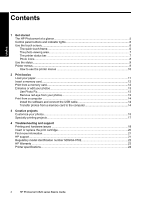
...17 4 Troubleshooting and support Printing and hardware issues 18 Insert or replace the print cartridge 20 Find more information...21 HP support...21 Regulatory model identification number SDGOA-0702 22 HP Warranty ...23 Printer specifications...24 4 HP Photosmart A620 series Basics Guide - HP A626 | Basics Guide - Page 5
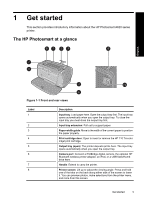
Input tray extension: Pull out to support paper. Paper-width guide: Move to the width of the current paper to position the paper properly. Print cartridge door: Open to insert or remove the HP 110 Tri-color Inkjet print cartridge. Output tray (open): The printer deposits prints here. The input tray - HP A626 | Basics Guide - Page 6
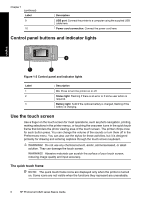
of your touch screen, reducing image quality and input accuracy. The quick touch frame NOTE: The quick touch frame icons are displayed only when the printer is turned on. Some icons are not visible when the functions they represent are unavailable. 6 HP Photosmart A620 series Basics Guide - HP A626 | Basics Guide - Page 7
• How many photos are being printed and how much time remains for the print job. • How much charge remains in the optional battery. Table 1-1 Printer status bar icons Printer status icon Description Ink level: Indicates the amount of ink estimated to be remaining in the print cartridge. Use the - HP A626 | Basics Guide - Page 8
view to rotate the photo 90 degrees clockwise for each press of the icon. Red-eye: Indicates a photo in 1-up view that has red-eye removed. The icon flashes on a photo undergoing red-eye removal. Video: Indicates a video clip. Touch to play the video clip. 8 HP Photosmart A620 series Basics Guide - HP A626 | Basics Guide - Page 9
here to keep it handy while you work with your photos. Stylus storage slot: Securely store the stylus here when moving the printer or between sessions. Printer menus The printer menus contain many features for printing photos, changing print settings, and more. The menus, when opened, overlay - HP A626 | Basics Guide - Page 10
perform the operation it indicates. 4. To exit a menu, touch the icon on the quick touch frame. For detailed information on all the options in the printer menus, see the electronic Help. 10 HP Photosmart A620 series Basics Guide - HP A626 | Basics Guide - Page 11
, see the setup instructions that came in the box with the printer or "Insert or replace the print cartridge" on page 20. Load your paper Use HP Advanced Photo Paper. It is especially designed to work with the inks in your printer to create beautiful photos. Other photo papers will produce inferior - HP A626 | Basics Guide - Page 12
to print to view it in 1-up view, and then touch the Selection box icon on the photo to select the photo. 3. If you want several copies of the same photo, touch the Copies icon on the photo, set the number of copies to be printed, and then touch OK. 12 HP Photosmart A620 series Basics Guide - HP A626 | Basics Guide - Page 13
enhances your photos using HP Real Life Technologies that: • Sharpen blurred photos. • Improve the dark areas of a photo without affecting the light areas of a photo. • Improve the overall brightness, color, and contrast of photos. Photo Fix is on by default when you turn on the printer. If you - HP A626 | Basics Guide - Page 14
to the computer. 2. Insert a memory card that contains photos into the correct memory card slot in the printer. 3. HP Photosmart Essential opens on the computer. Follow the prompts on the computer. For more information, see the HP Photosmart Software Help. 14 HP Photosmart A620 series Basics Guide - HP A626 | Basics Guide - Page 15
you print it. NOTE: Get Creative actions are not saved with the photo, so the original photo remains untouched. Always print a photo after you finish applying creative actions. NOTE: The Get Creative features available on the printer may vary by country/region and/or model. • The Scribble creative - HP A626 | Basics Guide - Page 16
categories, including: Seasonal, Kids, General, and Special. Figure 3-5 Add clip art to photos • The Albums creative option lets you add photos to photo album books. You can select from several categories, including: Seasonal, Kids, General, and Special. 16 HP Photosmart A620 series Basics Guide - HP A626 | Basics Guide - Page 17
See the electronic Help or online user guide for detailed information on how to add these creative effects to your photos. Specialty printing projects You can also use the printer for the following kinds of specialty projects: • Panoramic photos: Use special panoramic photo paper for your wide-angle - HP A626 | Basics Guide - Page 18
This section contains troubleshooting information for the HP Photosmart A620 series printer. • Printing and hardware issues • Insert or replace the print cartridge • Find more information • HP support • Regulatory model identification number SDGOA-0702 • HP Warranty • Printer specifications Printing - HP A626 | Basics Guide - Page 19
for information on checking the level of ink in the print cartridge. Replace the cartridge if necessary. • See the electronic Help or online user guide for information on updating the printer software. To check the version of the software, select About from the HP Digital Imaging Monitor icon in the - HP A626 | Basics Guide - Page 20
you install all retail print cartridges before the date stamped on the box. To insert or replace a print cartridge 1. Make sure the power is on and you have removed the cardboard from inside the printer. 2. Open the print cartridge door of the printer. 20 HP Photosmart A620 series Basics Guide - HP A626 | Basics Guide - Page 21
printer, install the HP Photosmart software, and print a photo. Read this document first. • Basics Guide: This is the document you are reading. It describes the features of the printer, explains how to use the printer without connecting it to a computer, and contains troubleshooting tips and support - HP A626 | Basics Guide - Page 22
printer to where you purchased it. Service is free during the printer limited warranty period. After the warranty period, you will be quoted a service charge. 4. Call HP support. Support name (HP Photosmart A620 series) or product number (Q8536A). English 22 HP Photosmart A620 series Basics Guide - HP A626 | Basics Guide - Page 23
HP Warranty English HP Warranty 23 - HP A626 | Basics Guide - Page 24
127 x 178 mm (5 x 7 inches) Paper Tray One 10 x 15 cm (4 x 6 inches) photo paper tray Paper Tray Capacity 20 sheets of photo paper, maximum thickness 292 µm (11.5 mil) per sheet 10 sheets of 10 x 30 cm (4 x 12 inches) photo paper for panoramic printing 24 HP Photosmart A620 series Basics Guide - HP A626 | Basics Guide - Page 25
Guía básica de HP Photosmart A620 series Guía básica de HP Photosmart A620 series Español - HP A626 | Basics Guide - Page 26
sus fotografías 36 Imprimir desde un equipo ...36 Instale el software y conecte el cable USB 36 Transferir fotografías desde una HP...45 Número normativo de identificación de modelo SDGOA-0702 45 Garantía de HP ...46 Especificaciones de la impresora 47 Español 26 Guía básica de HP Photosmart - HP A626 | Basics Guide - Page 27
1 Introducción Esta sección ofrece información básica acerca de la impresora HP Photosmart A620 series. El HP Photosmart de un vistazo Español Figura 1-1 Vistas frontal y posterior Etiqueta 1 2 3 4 5 6 7 8 Descripción del producto Bandeja de entrada: cargue el papel aquí. Primero abra la bandeja - HP A626 | Basics Guide - Page 28
pueden rayar la superficie de su pantalla táctil, lo que hará que disminuya la calidad de imagen y la precisión de entrada. 28 Guía básica de HP Photosmart A620 series - HP A626 | Basics Guide - Page 29
Marco de retoque rápido Nota Los iconos del marco de retoque rápido sólo aparecen cuando la impresora está activada. Algunos iconos no se encuentran visibles cuando sus funciones no están disponibles. Español Figura 1-3 Marco de retoque rápido Etiqueta 1 2 3 4 5 Descripción del producto Menú de - HP A626 | Basics Guide - Page 30
este icono para rotar la fotografía 90 grados en el sentido de las agujas del reloj con cada operación. Español 30 Guía básica de HP Photosmart A620 series - HP A626 | Basics Guide - Page 31
Iconos de fotografía (continúa) Icono de fotografía Descripción del producto Ojos rojos: indica una fotografía en la vista 1 en 1 en la que se ha eliminado el efecto de ojos rojos. El icono parpadea en la fotografía en la que se van a quitar los ojos rojos. Vídeo: indica un videoclip Toque este - HP A626 | Basics Guide - Page 32
retoque rápido. Para obtener información detallada sobre todas las opciones de los menús de la impresora, consulte la Ayuda electrónica. 32 Guía básica de HP Photosmart A620 series - HP A626 | Basics Guide - Page 33
an en la caja de la impresora o "Insertar o sustituir el cartucho de tinta" en la página 44. Cargue el papel Utilice papel fotográfico avanzado HP. Está diseñado especialmente para utilizarse con las tintas de su impresora para crear fotografías bonitas. Si utiliza otros papeles fotográficos obtendr - HP A626 | Basics Guide - Page 34
impresora para imprimir las fotos. Español Etiqueta 1 2 3 4 Descripción del producto xD-Picture Card Compact Flash I y II (excepto Microdrive) Memory Stick Memory Stick Duo o Memory Stick PRO Duo (con imprimir para mostrarla en la vista 1 en 1. de la 34 Guía básica de HP Photosmart A620 series - HP A626 | Basics Guide - Page 35
siguientes. Usar Corrección de fotografías Corrección de fotografías mejora automáticamente las fotografías mediante las tecnologías Real Life de HP que permiten: • Aumentar la nitidez de las fotografías borrosas. • Mejorar las zonas oscuras de las fotografías sin afectar a las zonas claras - HP A626 | Basics Guide - Page 36
separado. Instale el software y conecte el cable USB Usuarios de Windows Usuarios de Mac Importante: no conecte el cable USB hasta 1. Conecte un extremo del cable USB al que lo indique la impresora. puerto USB situado en la parte posterior de 1. Inserte el CD de HP Photosmart en la unidad de - HP A626 | Basics Guide - Page 37
que contenga fotografías en la ranura de tarjeta de memoria correcta de la impresora. 3. HP Photosmart Essential abre el equipo. Siga las instrucciones que aparecen en pantalla. Para obtener más información, consulte la Ayuda del software de HP Photosmart. Español Imprimir desde un equipo 37 - HP A626 | Basics Guide - Page 38
ón creativa Galería de diseño le permite aplicar efectos especiales. Puede modificar el efecto si cambia la configuración disponible para ese efecto. 38 Guía básica de HP Photosmart A620 series - HP A626 | Basics Guide - Page 39
Español Figura 3-3 Aplicar efectos especiales a las fotos • La opción creativa Título le permite agregar texto (con 24 caracteres como máximo) a la fotografía actual utilizando un teclado de pantalla táctil. Puede seleccionar cinco tipos de fuente y seis colores para el texto. El teclado adoptará - HP A626 | Basics Guide - Page 40
o la guía del usuario en línea para obtener información detallada sobre cada uno de estos proyectos de impresión especializados. Español 40 Guía básica de HP Photosmart A620 series - HP A626 | Basics Guide - Page 41
Web www.hp.com/support. Antes software de la impresora. Sugerencia HP recomienda utilizar un cable USB con una longitud máxima de 3 metros (10 pies). El uso de un cable USB más largo puede causar errores. Esta sección contiene información sobre la solución de problemas de la impresora HP Photosmart - HP A626 | Basics Guide - Page 42
o la guía del usuario en línea para obtener información sobre la actualización del software de la impresora. Para comprobar la versión del software, seleccione Acerca de en el icono del Monitor de imágenes digitales de HP de la barra de tareas. Español 42 Guía básica de HP Photosmart A620 series - HP A626 | Basics Guide - Page 43
encendido se ilumina, el cable de alimentación estará funcionando correctamente. Si no se ilumina, visite el sitio web www.hp.com/support o póngase en contacto con el servicio de asistencia técnica de HP. He perdido el lápiz Solución: Si la impresora está aún bajo garantía, llame a la asistencia de - HP A626 | Basics Guide - Page 44
más información. Recicle el cartucho viejo. El programa de reciclaje de suministros de HP para inyección de tinta está disponible en muchos países/regiones y permite www.hp.com/hpinfo/globalcitizenship/environment/recycle/inkjet.html Cómo buscar más información Su nueva impresora HP Photosmart A620 - HP A626 | Basics Guide - Page 45
la solución de problemas de software. Una vez que haya instalado el software HP Photosmart en el equipo, podrá HP Photosmart. 2. Visite el sitio Web de asistencia en línea de HP que se encuentra en www.hp.com/ support. La asistencia en línea de HP se encuentra disponible para todos los clientes de HP - HP A626 | Basics Guide - Page 46
Capítulo 4 confundirse este número normativo con el nombre comercial (HP Photosmart A620 series) o el número de producto (Q8536A). Garantía de HP Español 46 Guía básica de HP Photosmart A620 series - HP A626 | Basics Guide - Page 47
59-95° F), 20-80% HR Requisitos de alimentación y de consumo energético América del Norte Requisitos de energía: Adaptador, número de pieza HP 0957-2121; voltaje de entrada: 120 VAC; frecuencia de entrada: 60 Hz. Consumo eléctrico: normalmente 13 W al imprimir (22 W máximo); normalmente 4,1 W cuando - HP A626 | Basics Guide - Page 48
Capítulo 4 Español 48 Guía básica de HP Photosmart A620 series - HP A626 | Basics Guide - Page 49
-
 1
1 -
 2
2 -
 3
3 -
 4
4 -
 5
5 -
 6
6 -
 7
7 -
8
-
9
-
10
-
11
-
12
-
13
-
14
-
15
-
16
-
17
-
18
-
19
-
20
-
21
-
22
-
23
-
24
-
25
-
26
-
27
-
28
-
29
-
30
-
31
-
32
-
33
-
34
-
35
-
36
-
37
-
38
-
39
-
40
-
41
-
42
-
43
-
44
-
45
-
46
-
47
-
48
-
49
 |
 |

HP Photosmart A620 series
Guía básica
Basics Guide