HP B8550 Creative Guide
HP B8550 - PhotoSmart Color Inkjet Printer Manual
 |
UPC - 884420048510
View all HP B8550 manuals
Add to My Manuals
Save this manual to your list of manuals |
HP B8550 manual content summary:
- HP B8550 | Creative Guide - Page 1
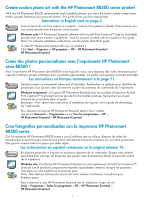
HP Photosmart B8500 series HP Photosmart série B8500 HP Photosmart B8500 series Creative Projects Guide Guide de projets créatifs Guía de proyectos creativos - HP B8550 | Creative Guide - Page 2
guide. Note: For software installation instructions, see the printer Start Here guide. To start HP Photosmart Essential after you've installed it: Click Start > Programs or All programs > HP > HP Photosmart Essential > HP Photosmart Essential. Créez des photos Windows sólo: El software HP Photosmart - HP B8550 | Creative Guide - Page 3
de álbum Page 8 Page 16 Página 24 Printable School Papers Papiers scolaires Papel rayado Page 9 Page 17 Página 25 Color Effects Effets de couleur Efectos de colors Page 9 Page 17 Página 25 Easy Photo Editing Edition facile de photos Edición sencilla de fotografías Page 10 Page 18 Página 26 2 - HP B8550 | Creative Guide - Page 4
from the left pane on the window. 10. Load photo paper of the correct size into the printer. 11. Select the desired print settings, and then click Print. * HP Photo Books provide an attractive way to display your photo pages. Available online at www.hp.com in several colors. Tip: For best results - HP B8550 | Creative Guide - Page 5
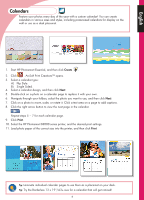
in the calendar. Repeat steps 5 − 7 for each calendar page. 9. Click Print. 10. Select the HP Photosmart B8500 series printer, and the desired print settings. 11. Load photo paper of the correct size into the printer, and then click Print. Tip: Laminate individual calendar pages to use them as - HP B8550 | Creative Guide - Page 6
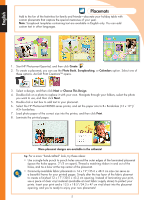
-click a text box to add text to your placemat. 6. Select the HP Photosmart B8500 series printer, and set the paper size to B+ Borderless (13 x 19")/ A3+ borderless. 7. Load photo paper of the correct size into the printer, and then click Print. 8. Laminate the printed pages. More placemat designs - HP B8550 | Creative Guide - Page 7
to use, and then click Next. 7. Click a text placeholder to add custom text and click Print. 8. Select the HP Photosmart B8500 series printer, and set the paper size. 9. Load photo paper of the correct size into the printer, and then click Print. More card designs are available in the software! 6 - HP B8550 | Creative Guide - Page 8
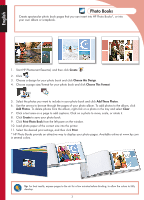
and a portrait version. 1. Insert a memory card containing your photos into the printer. 2. Select View , then navigate to the photo you want to modify, and press OK. 3. Press OK again to display the Photo Options menu. 4. Select Edit Photo, and then press OK. 5. Select Add Frame, and then - HP B8550 | Creative Guide - Page 9
want to include in your album. If you select more photos than will fit on one page, the printer will automatically create additional album pages. 8. Press OK when done selecting photos. Press OK again to continue. 9. The recommended number of pages that will create the best looking album is displayed - HP B8550 | Creative Guide - Page 10
notebook papers in narrow, wide, or child rule from the HP Photosmart B8500 series printer and save a trip to Color Effects Alter the mood and impact of a photo by applying a color effect. 1. Insert a memory card containing your photos into the printer. 2. Select View , then navigate to the photo - HP B8550 | Creative Guide - Page 11
the Red Eye Removal button on the printer control panel. The Red Eye Removal light turns on. When the feature is on, the HP Photosmart automatically corrects red eye coloring in all photos. Photo Fix Photo Fix automatically enhances your photos using HP Real Life Technologies that sharpen blurred - HP B8550 | Creative Guide - Page 12
pouvez intégrer à HP Photo Books* ou à votre propre album. 1. Démarrez HP Photosmart Essential, puis cliquez sur Créer . 2. Cliquez sur . 3. Choisissez un design pour votre album, puis cliquez sur Choisir ce design. 4. Choisissez un format de page pour votre album photo et cliquez sur Choisir - HP B8550 | Creative Guide - Page 13
étapes 5 à 7 pour chaque page de calendrier. 9. Cliquez sur Imprimer. 10. Sélectionnez l'imprimante HP Photosmart série B8500 ainsi que les paramètres d'impression voulus. 11. Chargez du papier photo d'un format correct dans l'imprimante, puis cliquez sur Imprimer. Conseil : Laminez les pages de - HP B8550 | Creative Guide - Page 14
pour ajouter du texte à votre sous-main. 6. Sélectionnez l'imprimante HP Photosmart série B8500 et définissez le format de papier à B+ sans bordure (13 x 19 pouces/A3+ sans bordure.) 7. Chargez du papier photo d'un format correct dans l'imprimante, puis cliquez sur Imprimer. 8. Laminez les pages - HP B8550 | Creative Guide - Page 15
d'un texte pour ajouter du texte personnalisé, puis cliquez sur Imprimer. 8. Sélectionnez l'imprimante HP Photosmart série B8500 et définissez le format de papier. 9. Chargez du papier photo d'un format correct dans l'imprimante, puis cliquez sur Imprimer. D'autres modèles de cartes sont disponibles - HP B8550 | Creative Guide - Page 16
que vous souhaitez modifier et cliquez sur OK. 3. Appuyez de nouveau sur OK pour afficher le menu Options photos. 4. Sélectionnez Modifier photo, puis appuyez sur OK. 5. Sélectionnez Ajouter un cadre, puis appuyez sur OK. 6. Sélectionnez un cadre et appuyez sur OK. 7. Appuyez sur sur le panneau - HP B8550 | Creative Guide - Page 17
éer un album photo. 1. Insérez une carte mémoire contenant vos photos dans l'imprimante. 2. Sélectionnez Créer , puis Pages d'album. 3. Sélectionnez un format de papier et nécessaire, puis appuyez sur OK pour continuer. 10. Utilisez ou pour prévisualiser les pages de l'album. 11. Appuyez sur OK - HP B8550 | Creative Guide - Page 18
du papier scolaire avec diverses interlignes à l'aide de l'imprimante HP Photosmart série B8500 et économiser ainsi un trajet à votre papeterie Appuyez de nouveau sur OK pour afficher le menu Options photos. 4. Sélectionnez Modifier photo, puis appuyez sur OK. 5. Sélectionnez Effet de couleur, puis - HP B8550 | Creative Guide - Page 19
s'allume. Lorsque cette fonction est active, l'imprimante HP Photosmart corrige automatiquement la coloration rouge des yeux pour toutes les photos. Avant Après Réparation de photos Photo Fix améliore automatiquement vos photos à l'aide de la technologie HP Real Life qui traite la précision des - HP B8550 | Creative Guide - Page 20
ías que podrá insertar en HP Photo Books*, o en su propio álbum o álbum de recortes. 1. Inicie HP Photosmart Essential y, a continuación, haga clic HP Photo Books proporciona una manera atractiva de mostrar las páginas de fotos. Disponible en línea en la página www.hp.com, en diferentes colores - HP B8550 | Creative Guide - Page 21
página del calendario. Repita los pasos del 5 al 7 para cada página del calendario. 9. Haga clic en Imprimir. 10. Seleccione la impresora HP Photosmart B8500 series y los ajustes de impresión deseados. 11. Cargue papel fotográfico del tamaño correcto en la impresora y, a continuación, haga clic en - HP B8550 | Creative Guide - Page 22
desea utilizar y, a continuación, haga clic en Siguiente. 5. Haga doble clic en un cuadro de texto para añadir texto al salvamanteles. 6. Seleccione la impresora HP Photosmart B8500 series y ajuste el tamaño de papel a B+ sin bordes (13 x 19 in)/A3+ sin bordes. 7. Cargue papel fotográfico del tama - HP B8550 | Creative Guide - Page 23
Siguiente. 7. Haga clic en el recuadro de texto para agregar texto personalizado y, a continuación, haga clic en Imprimir. 8. Seleccione la impresora HP Photosmart B8500 series y ajuste el tamaño del papel. 9. Cargue papel fotográfico del tamaño correcto en la impresora y, a continuación, haga clic - HP B8550 | Creative Guide - Page 24
Español Marcos Enmarque sus fotos con unos bordes decorativos que marcarán la diferencia. Todos los marcos están disponibles en horizontal y en vertical. 1. Introduzca en la impresora una tarjeta de memoria que contenga sus fotos. 2. Seleccione Ver y, a continuación, vaya a la foto que desea - HP B8550 | Creative Guide - Page 25
Español Páginas de álbum Imprima páginas de álbum llamativas directamente desde el panel de control de la impresora. Esta opción le permite seleccionar múltiples fotos que la impresora organizará automáticamente en un diseño atractivo. A continuación, puede encuadernar múltiples páginas de álbum - HP B8550 | Creative Guide - Page 26
bloc con separación estrecha, ancha o de caligrafía desde la impresora HP Photosmart B8500 series y, así, ahorrarse un viaje a la tienda. También OK para imprimir. Efectos de color Modifique la disposición y el impacto de una foto mediante la aplicación de un efecto de color. 1. Introduzca en la - HP B8550 | Creative Guide - Page 27
ón de ojos rojos se encenderá. Cuando esta opción esté activada, HP Photosmart corregirá automáticamente los ojos rojos en todas las fotos. Antes Despu el uso de la tecnología HP Real Life, que hace más nítidas las imágenes borrosas y mejoran el brillo, el color y el contraste generales de las - HP B8550 | Creative Guide - Page 28
www.hp.com Printed in [country]. Imprimé en [pays]. © 2008 Hewlett-Packard Development Company, L.P. *CB981-90037* *CB981-90037* CB981-90037
-
 1
1 -
 2
2 -
 3
3 -
 4
4 -
 5
5 -
 6
6 -
 7
7 -
8
-
9
-
10
-
11
-
12
-
13
-
14
-
15
-
16
-
17
-
18
-
19
-
20
-
21
-
22
-
23
-
24
-
25
-
26
-
27
-
28
 |
 |
HP Photosmart série B8500
HP Photosmart B8500 series
HP Photosmart B8500 series
Creative Projects Guide
Guide de projets créatifs
Guía de proyectos creativos