HP C5280 Basics Guide
HP C5280 - Photosmart All-in-One Color Inkjet Manual
 |
UPC - 883585060276
View all HP C5280 manuals
Add to My Manuals
Save this manual to your list of manuals |
HP C5280 manual content summary:
- HP C5280 | Basics Guide - Page 1
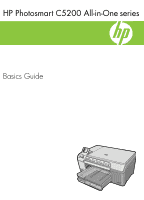
HP Photosmart C5200 All-in-One series Basics Guide - HP C5280 | Basics Guide - Page 2
are set forth in the express warranty statements accompanying such products and services. Nothing herein should be construed as constituting an additional warranty. HP shall not be liable for technical or editorial errors or omissions contained herein. © 2007 Hewlett-Packard Development Company - HP C5280 | Basics Guide - Page 3
...11 Replace the print cartridges...12 Clean the HP All-in-One...15 2 Troubleshooting and support Uninstall and reinstall the software 17 Hardware setup troubleshooting 17 Clear paper jams...20 CD/DVD print troubleshooting 20 Print cartridge troubleshooting 23 Support process...24 3 Technical - HP C5280 | Basics Guide - Page 4
guide introduces basic operations and troubleshooting, as well as provides information for contacting HP support and ordering supplies. The onscreen Help details the full range of features and functions, including use of the HP Photosmart software that came with the HP All-in-One. The HP All-in-One - HP C5280 | Basics Guide - Page 5
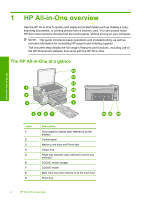
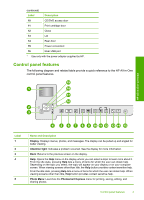
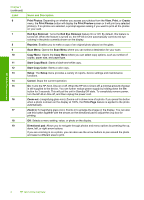
10 CD/DVD access door 11 Print cartridge door 12 Glass 13 Lid 14 Rear door 15 Power connection* 16 Rear USB port * Use only with the power adapter supplied by HP. Control panel features The following diagram and related table provide a quick reference to the HP All-in-One control - HP C5280 | Basics Guide - Page 6
the unit in Standby/Off state. To completely remove power, turn the HP All-in-One off, and then unplug the power cord. Zoom out - (magnifying glass icon): Zooms out with the arrows on the directional pad to adjust the crop box for printing. OK: Selects a menu setting, value, or photo on the display - HP C5280 | Basics Guide - Page 7
The Setup Guide provides instructions for setting up the HP All-in-One and installing software. Make sure you follow the steps in the Setup Guide in order. If you have problems during setup, see Troubleshooting in the last section of the Setup Guide, or see "Troubleshooting and support" on page - HP C5280 | Basics Guide - Page 8
down. Slide the stack of paper forward until it stops. CAUTION: Make sure that the HP All-in-One is idle and silent when you load paper into the main input tray. If the HP All-in-One is servicing the print cartridges or otherwise engaged in a task, the paper stop inside the device might not be - HP C5280 | Basics Guide - Page 9
input tray and is no higher than the top of the paper-width guide. HP All-in-One overview 6. Lower the output tray. 7. Pull the output tray extender the paper-width guide. 4. Lower the photo tray lid. Avoid paper jams To help avoid paper jams, follow these guidelines. • Remove printed papers from - HP C5280 | Basics Guide - Page 10
the paper-width guide does not bend the paper in the input tray. • Do not force paper too far forward in the input tray. • Use paper types that are recommended for the HP All-in-One. Print directly onto a CD/DVD 1. Use the software that came with the HP All-in-One to create and print a CD/DVD label - HP C5280 | Basics Guide - Page 11
the output tray. 5. Push the CD/DVD holder into the HP All-in-One until the lines on the CD/DVD holder line up to the white lines on the CD/DVD tray. HP All-in-One overview NOTE: The HP All-in-One pulls the CD/DVD holder while printing on the media. The CD/DVD holder might protrude about 7.5 cm - HP C5280 | Basics Guide - Page 12
memory card into the appropriate slot on the HP All-in-One. The Photosmart Express menu appears, with the most recent Print Preview highlighted, press OK. The Print Preview screen appears, showing how your photo will look when printed. 8. If you want to select additional photos to view and print - HP C5280 | Basics Guide - Page 13
HP All-in-One overview 9. (Optional) If you want to check and/or modify any of your print settings, press to highlight Settings and press OK. 10. To print the photo(s), use or to highlight Print Now (or press the Print Photos button on the control panel). A print status screen displays the number - HP C5280 | Basics Guide - Page 14
Replace the print cartridges Follow these instructions when you need to replace print cartridges. NOTE: When the ink level for the print cartridge is low, a message appears on the display. You can also check the ink levels by using the Printer Toolbox available through the HP Photosmart Software on - HP C5280 | Basics Guide - Page 15
using the pink pull tab. HP All-in-One overview 1 Copper-colored contacts 2 Plastic tape with pink pull tab (must be removed before installing) 3 Ink nozzles under tape CAUTION: Do not touch the copper-colored contacts or ink nozzles. Also, do not re-tape the print cartridges. Doing so can result - HP C5280 | Basics Guide - Page 16
If you are installing a black, photo, or gray photo print cartridge, slide it into the right slot. 8. Close the print cartridge door. HP All-in-One overview If you installed a new print cartridge, the HP All-in-One prints a print cartridge alignment page. 9. When prompted, ensure plain white paper - HP C5280 | Basics Guide - Page 17
to: www.shopping.hp.com/accessories-store/printer. Clean the glass Fingerprints, smudges, hair, and dust on the main glass surface slow down performance and affect the accuracy of the copy and scan features. To clean the glass 1. Turn off the HP All-in-One, unplug the power cord, and raise the lid - HP C5280 | Basics Guide - Page 18
thoroughly with a damp cloth to remove any residual alcohol. CAUTION: Be careful not to spill alcohol on the glass or exterior of the HP Allin-One, as this might damage the device. 5. Plug in the power cord, and then turn on the HP All-in-One. HP All-in-One overview 16 HP All-in-One overview - HP C5280 | Basics Guide - Page 19
have reinstalled the software. 6. Insert the HP All-in-One CD-ROM into your computer's CD-ROM drive and then start the Setup program. 7. Follow the onscreen instructions and the instructions provided in the Setup Guide that came with the HP All-in-One. Hardware setup troubleshooting Use this section - HP C5280 | Basics Guide - Page 20
Chapter 2 Solution • Make sure the power cord is firmly connected to both the HP All-in-One and the power adapter. Plug the power cord into a power outlet, surge protector, or power strip. Troubleshooting and support 1 Power connection 2 Power cord and adapter 3 Power outlet • If you are using a - HP C5280 | Basics Guide - Page 21
the power cord is firmly connected to the HP All-in-One and plugged into a power outlet. Press the On button to turn on the HP All-in-One. • Make sure the print cartridges are installed. • Make sure you have paper loaded in the input tray. • Check that the HP All-in-One does not have a paper jam - HP C5280 | Basics Guide - Page 22
to solve any problems you might encounter while printing on CD/DVD surfaces with the HP All-in-One. The HP All-in-One does not detect the CD/DVD holder Cause: You might not have pushed the CD/DVD holder far enough into the CD/DVD tray. Troubleshooting and support 20 Troubleshooting and support - HP C5280 | Basics Guide - Page 23
the holder. Load the next disc onto the CD/DVD holder with the printable side up and reinsert the holder into the CD/DVD tray until the lines on the holder line up to the white lines on the tray. When the HP All-in-One detects the holder, the prompt disappears. CD/DVD print troubleshooting 21 - HP C5280 | Basics Guide - Page 24
CD/DVD tray until the lines on the holder line up to the white lines on the tray and try your print again. Troubleshooting and support The HP All-in-One is printing the online help of the software you are using for additional information. Cause: You might have loaded the CD/DVD upside down on the - HP C5280 | Basics Guide - Page 25
device by turning off a power strip or unplugging the power cord from the HP All-in-One. If you improperly turn off the HP All-in-One, the print carriage does not return to the correct position and the print cartridges can dry out. Troubleshooting and support Print cartridge troubleshooting 23 - HP C5280 | Basics Guide - Page 26
online support specialists • Software and driver updates for the HP All-in-One • Valuable HP All-in-One and troubleshooting information for common problems • Proactive device updates, support alerts, and HP newsgrams that are available when you register the HP All-in-One 3. Call HP support. Support - HP C5280 | Basics Guide - Page 27
media sizes, see the printer software. Physical specifications • Height: 21.6 cm (8.5 inches) • Width: 45.2 cm (17.8 inches) • Depth: 38.5 cm (15.2 inches) • Weight: 6.8 kg (15 pounds) Power specifications • Power consumption: 25 watts maximum (average printing) • Input voltage: AC 100 to 240 - HP C5280 | Basics Guide - Page 28
cartridges for printing, and in printhead servicing, which keeps print nozzles clear and ink flowing smoothly. In addition, some residual ink is left in the cartridge after it is used. For more information, see www.hp.com/go/inkusage. Visit www.hp (HP Photosmart C5200 All-in-One series, - HP C5280 | Basics Guide - Page 29
Warranty Warranty 27 Technical information - HP C5280 | Basics Guide - Page 30
Chapter 3 Technical information 28 Technical information - HP C5280 | Basics Guide - Page 31
-
 1
1 -
 2
2 -
 3
3 -
 4
4 -
 5
5 -
 6
6 -
 7
7 -
8
-
9
-
10
-
11
-
12
-
13
-
14
-
15
-
16
-
17
-
18
-
19
-
20
-
21
-
22
-
23
-
24
-
25
-
26
-
27
-
28
-
29
-
30
-
31
 |
 |
Basics Guide
series
HP Photosmart C5200 All-in-One