HP C7280 User Guide - Page 14
Control panel features, Display, Attention light, Directional pad, Zoom out, Fit to Zoom - photosmart problem
 |
UPC - 883585105137
View all HP C7280 manuals
Add to My Manuals
Save this manual to your list of manuals |
Page 14 highlights
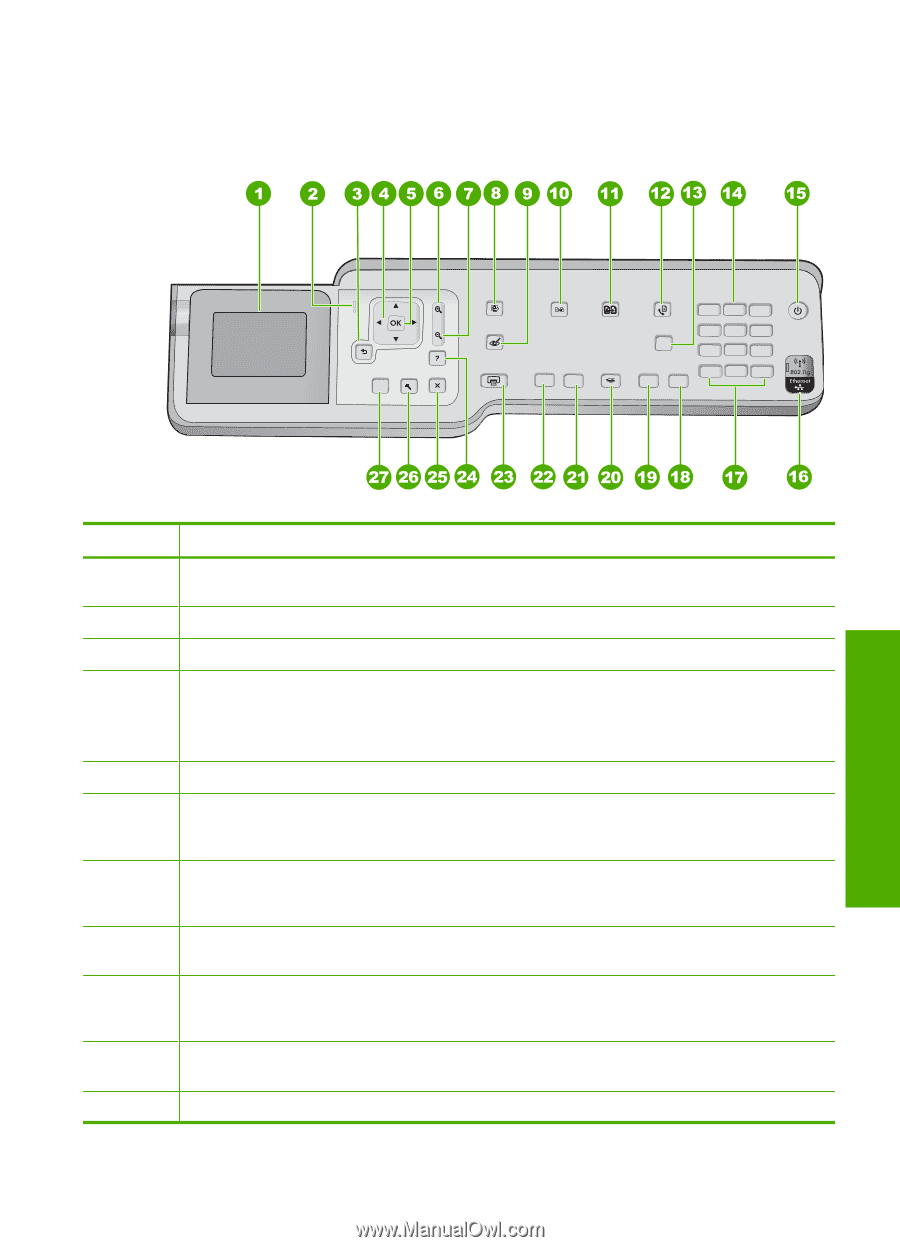
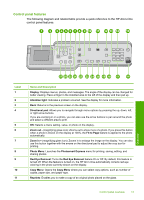
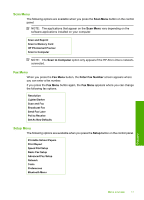
Control panel features The following diagram and related table provide a quick reference to the HP All-in-One control panel features. Overview Label 1 2 3 4 5 6 7 8 9 10 11 Name and Description Display: Displays menus, photos, and messages. The angle of the display can be changed for better viewing. Place a finger in the indented area to the left of the display and then pull up. Attention light: Indicates a problem occurred. See the display for more information. Back: Returns to the previous screen on the display. Directional pad: Allows you to navigate through menu options by pressing the up, down, left, or right arrow buttons. If you are zooming in on a photo, you can also use the arrow buttons to pan around the photo and select a different area to print. OK: Selects a menu setting, value, or photo on the display. Zoom out - (magnifying glass icon): Zooms out to show more of a photo. If you press this button when a photo is shown on the display at 100%, the Fit to Page feature is applied to the photo automatically. Zoom in + (magnifying glass icon): Zooms in to enlarge the image on the display. You can also use this button together with the arrows on the directional pad to adjust the crop box for printing. Photo Menu: Launches the Photosmart Express menu for printing, saving, editing, and sharing photos. Red Eye Removal: Turns the Red Eye Removal feature On or Off. By default, this feature is turned off. When the feature is turned on, the HP All-in-One automatically corrects red eye coloring in the photo currently shown on the display. Copy Menu: Opens the Copy Menu where you can select copy options, such as number of copies, paper size, and paper type. Reprints: Enables you to make a copy of an original photo placed on the glass. Control panel overview 13
-
 1
1 -
2
-
3
-
4
-
5
-
6
-
7
-
8
-
 9
9 -
 10
10 -
 11
11 -
 12
12 -
 13
13 -
 14
14 -
 15
15 -
 16
16 -
 17
17 -
 18
18 -
 19
19 -
20
-
21
-
22
-
23
-
24
-
25
-
26
-
27
-
28
-
29
-
30
-
31
-
32
-
33
-
34
-
35
-
36
-
37
-
38
-
39
-
40
-
41
-
42
-
43
-
44
-
45
-
46
-
47
-
48
-
49
-
50
-
51
-
52
-
53
-
54
-
55
-
56
-
57
-
58
-
59
-
60
-
61
-
62
-
63
-
64
-
65
-
66
-
67
-
68
-
69
-
70
-
71
-
72
-
73
-
74
-
75
-
76
-
77
-
78
-
79
-
80
-
81
-
82
-
83
-
84
-
85
-
86
-
87
-
88
-
89
-
90
-
91
-
92
-
93
-
94
-
95
-
96
-
97
-
98
-
99
-
100
-
101
-
102
-
103
-
104
-
105
-
106
-
107
-
108
-
109
-
110
-
111
-
112
-
113
-
114
-
115
-
116
-
117
-
118
-
119
-
120
-
121
-
122
-
123
-
124
-
125
-
126
-
127
-
128
-
129
-
130
-
131
-
132
-
133
-
134
-
135
-
136
-
137
-
138
-
139
-
140
-
141
-
142
-
143
-
144
-
145
-
146
-
147
-
148
-
149
-
150
-
151
-
152
-
153
-
154
-
155
-
156
-
157
-
158
-
159
-
160
-
161
-
162
-
163
-
164
-
165
-
166
-
167
-
168
-
169
-
170
-
171
-
172
-
173
-
174
-
175
-
176
-
177
-
178
-
179
-
180
-
181
-
182
-
183
-
184
-
185
-
186
-
187
-
188
-
189
-
190
-
191
-
192
-
193
-
194
-
195
-
196
-
197
-
198
-
199
-
200
-
201
-
202
-
203
-
204
-
205
-
206
-
207
-
208
-
209
-
210
-
211
-
212
-
213
-
214
-
215
-
216
-
217
-
218
-
219
-
220
-
221
-
222
-
223
-
224
-
225
-
226
-
227
-
228
-
229
-
230
-
231
-
232
-
233
-
234
-
235
-
236
-
237
-
238
-
239
-
240
-
241
-
242
-
243
-
244
-
245
-
246
-
247
-
248
-
249
-
250
-
251
-
252
-
253
-
254
-
255
-
256
-
257
-
258
-
259
-
260
-
261
-
262
-
263
-
264
-
265
-
266
-
267
-
268
-
269
-
270
-
271
-
272
-
273
-
274
-
275
-
276
-
277
-
278
-
279
-
280
-
281
-
282
-
283
-
284
-
285
-
286
-
287
-
288
-
289
-
290
-
291
-
292
-
293
-
294
-
295
-
296
-
297
-
298
-
299
-
300
-
301
-
302
-
303
-
304
-
305
-
306
-
307
-
308
-
309
 |
 |