HP C7280 User Guide - Page 164
Clean the ink cartridge contacts, Clean the Print Head - photosmart support
 |
UPC - 883585105137
View all HP C7280 manuals
Add to My Manuals
Save this manual to your list of manuals |
Page 164 highlights
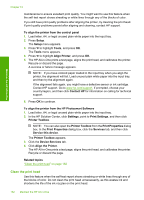
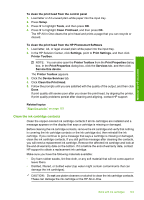
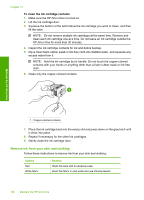
Maintain the HP All-in-One To clean the print head from the control panel 1. Load letter or A4 unused plain white paper into the input tray. 2. Press Setup. 3. Press to highlight Tools, and then press OK. 4. Press to highlight Clean Printhead, and then press OK. The HP All-in-One cleans the print head and prints a page that you can recycle or discard. To clean the print head from the HP Photosmart Software 1. Load letter, A4, or legal unused plain white paper into the input tray. 2. In the HP Solution Center, click Settings, point to Print Settings, and then click Printer Toolbox. NOTE: You can also open the Printer Toolbox from the Print Properties dialog box. In the Print Properties dialog box, click the Services tab, and then click Service this device. The Printer Toolbox appears. 3. Click the Device Services tab. 4. Click Clean the Print Head. 5. Follow the prompts until you are satisfied with the quality of the output, and then click Done. If print quality still seems poor after you clean the print head, try aligning the printer. If print quality problems persist after cleaning and aligning, contact HP support. Related topics "Align the printer" on page 161 Clean the ink cartridge contacts Clean the copper-colored ink cartridge contacts if all ink cartridges are installed and a message appears on the display that says a cartridge is missing or damaged. Before cleaning the ink cartridge contacts, remove the ink cartridge and verify that nothing is covering the ink cartridge contacts or the ink cartridge slot, then reinstall the ink cartridge. If you continue to get a message that says a cartridge is missing or damaged, clean the ink cartridge contacts. If you still get this message after cleaning the contacts, you will need a replacement ink cartridge. Remove the affected ink cartridge and look at the end-of-warranty date on the bottom. If it is before the end-of-warranty date, contact HP support to obtain a replacement ink cartridge. Make sure you have the following materials available: • Dry foam rubber swabs, lint-free cloth, or any soft material that will not come apart or leave fibers. • Distilled, filtered, or bottled water (tap water might contain contaminants that can damage the ink cartridges). CAUTION: Do not use platen cleaners or alcohol to clean the ink cartridge contacts. These can damage the ink cartridge or the HP All-in-One. Work with ink cartridges 163
-
 1
1 -
2
-
3
-
4
-
5
-
6
-
7
-
8
-
9
-
10
-
11
-
12
-
13
-
14
-
15
-
16
-
17
-
18
-
19
-
20
-
21
-
22
-
23
-
24
-
25
-
26
-
27
-
28
-
29
-
30
-
31
-
32
-
33
-
34
-
35
-
36
-
37
-
38
-
39
-
40
-
41
-
42
-
43
-
44
-
45
-
46
-
47
-
48
-
49
-
50
-
51
-
52
-
53
-
54
-
55
-
56
-
57
-
58
-
59
-
60
-
61
-
62
-
63
-
64
-
65
-
66
-
67
-
68
-
69
-
70
-
71
-
72
-
73
-
74
-
75
-
76
-
77
-
78
-
79
-
80
-
81
-
82
-
83
-
84
-
85
-
86
-
87
-
88
-
89
-
90
-
91
-
92
-
93
-
94
-
95
-
96
-
97
-
98
-
99
-
100
-
101
-
102
-
103
-
104
-
105
-
106
-
107
-
108
-
109
-
110
-
111
-
112
-
113
-
114
-
115
-
116
-
117
-
118
-
119
-
120
-
121
-
122
-
123
-
124
-
125
-
126
-
127
-
128
-
129
-
130
-
131
-
132
-
133
-
134
-
135
-
136
-
137
-
138
-
139
-
140
-
141
-
142
-
143
-
144
-
145
-
146
-
147
-
148
-
149
-
150
-
151
-
152
-
153
-
154
-
155
-
156
-
157
-
158
-
 159
159 -
 160
160 -
 161
161 -
 162
162 -
 163
163 -
 164
164 -
 165
165 -
 166
166 -
 167
167 -
 168
168 -
 169
169 -
170
-
171
-
172
-
173
-
174
-
175
-
176
-
177
-
178
-
179
-
180
-
181
-
182
-
183
-
184
-
185
-
186
-
187
-
188
-
189
-
190
-
191
-
192
-
193
-
194
-
195
-
196
-
197
-
198
-
199
-
200
-
201
-
202
-
203
-
204
-
205
-
206
-
207
-
208
-
209
-
210
-
211
-
212
-
213
-
214
-
215
-
216
-
217
-
218
-
219
-
220
-
221
-
222
-
223
-
224
-
225
-
226
-
227
-
228
-
229
-
230
-
231
-
232
-
233
-
234
-
235
-
236
-
237
-
238
-
239
-
240
-
241
-
242
-
243
-
244
-
245
-
246
-
247
-
248
-
249
-
250
-
251
-
252
-
253
-
254
-
255
-
256
-
257
-
258
-
259
-
260
-
261
-
262
-
263
-
264
-
265
-
266
-
267
-
268
-
269
-
270
-
271
-
272
-
273
-
274
-
275
-
276
-
277
-
278
-
279
-
280
-
281
-
282
-
283
-
284
-
285
-
286
-
287
-
288
-
289
-
290
-
291
-
292
-
293
-
294
-
295
-
296
-
297
-
298
-
299
-
300
-
301
-
302
-
303
-
304
-
305
-
306
-
307
-
308
-
309
 |
 |