HP C7280 User Guide - Page 66
Set up speed dialing, Set up individual speed dial entries, Speed Dial Setup - model
 |
UPC - 883585105137
View all HP C7280 manuals
Add to My Manuals
Save this manual to your list of manuals |
Page 66 highlights
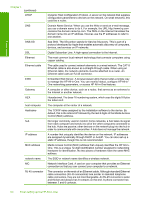
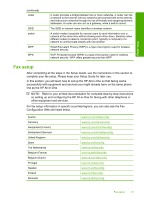
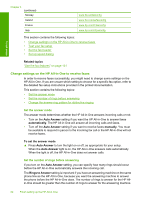
Finish setup Set up speed dialing You can assign speed dial entries to fax numbers you use often. This lets you dial those numbers quickly by using the control panel. This section contains the following topics: • Set up individual speed dial entries • Set up group speed dial entries • Delete speed dial entries • Print the speed dial list Set up individual speed dial entries You can create speed dial entries for fax numbers that you use frequently. If necessary, you can also edit the name or fax number of a speed dial entry you have already created. TIP: You can include individual speed dial entries in a group speed dial entry. This enables you to send a fax to a group of people at one time. (The maximum number of individual speed dial entries allowed in a group speed dial entry varies by model.) This section contains the following topics: • Create individual speed dial entries • Update individual speed dial entries Create individual speed dial entries You can create speed dial entries from the control panel or from your computer by using the software that you installed with the HP All-in-One. To create speed dial entries from the control panel 1. Press Setup. 2. Press to highlight Speed Dial Setup, and then press OK. 3. Press to highlight Individual Speed Dial, and then press OK. The first unassigned speed dial entry appears on the display. 4. Press OK to select the displayed speed dial entry. You can also press to highlight a different unassigned entry, and then press OK. 5. Enter the fax number for the speed dial entry by using the numeric keypad, and then press OK. TIP: To add a pause in the fax number you are entering, press the Symbols (*) button repeatedly until a dash (-) appears on the display. The visual keyboard appears on the display. 6. Use the visual keyboard to enter the name. When you are finished, highlight Done on the visual keyboard, and then press OK. 7. Press OK if you want to set up another number. Related topics "Enter text using the visual keyboard" on page 19 Fax setup 65
-
 1
1 -
2
-
3
-
4
-
5
-
6
-
7
-
8
-
9
-
10
-
11
-
12
-
13
-
14
-
15
-
16
-
17
-
18
-
19
-
20
-
21
-
22
-
23
-
24
-
25
-
26
-
27
-
28
-
29
-
30
-
31
-
32
-
33
-
34
-
35
-
36
-
37
-
38
-
39
-
40
-
41
-
42
-
43
-
44
-
45
-
46
-
47
-
48
-
49
-
50
-
51
-
52
-
53
-
54
-
55
-
56
-
57
-
58
-
59
-
60
-
 61
61 -
 62
62 -
 63
63 -
 64
64 -
 65
65 -
 66
66 -
 67
67 -
 68
68 -
 69
69 -
 70
70 -
 71
71 -
72
-
73
-
74
-
75
-
76
-
77
-
78
-
79
-
80
-
81
-
82
-
83
-
84
-
85
-
86
-
87
-
88
-
89
-
90
-
91
-
92
-
93
-
94
-
95
-
96
-
97
-
98
-
99
-
100
-
101
-
102
-
103
-
104
-
105
-
106
-
107
-
108
-
109
-
110
-
111
-
112
-
113
-
114
-
115
-
116
-
117
-
118
-
119
-
120
-
121
-
122
-
123
-
124
-
125
-
126
-
127
-
128
-
129
-
130
-
131
-
132
-
133
-
134
-
135
-
136
-
137
-
138
-
139
-
140
-
141
-
142
-
143
-
144
-
145
-
146
-
147
-
148
-
149
-
150
-
151
-
152
-
153
-
154
-
155
-
156
-
157
-
158
-
159
-
160
-
161
-
162
-
163
-
164
-
165
-
166
-
167
-
168
-
169
-
170
-
171
-
172
-
173
-
174
-
175
-
176
-
177
-
178
-
179
-
180
-
181
-
182
-
183
-
184
-
185
-
186
-
187
-
188
-
189
-
190
-
191
-
192
-
193
-
194
-
195
-
196
-
197
-
198
-
199
-
200
-
201
-
202
-
203
-
204
-
205
-
206
-
207
-
208
-
209
-
210
-
211
-
212
-
213
-
214
-
215
-
216
-
217
-
218
-
219
-
220
-
221
-
222
-
223
-
224
-
225
-
226
-
227
-
228
-
229
-
230
-
231
-
232
-
233
-
234
-
235
-
236
-
237
-
238
-
239
-
240
-
241
-
242
-
243
-
244
-
245
-
246
-
247
-
248
-
249
-
250
-
251
-
252
-
253
-
254
-
255
-
256
-
257
-
258
-
259
-
260
-
261
-
262
-
263
-
264
-
265
-
266
-
267
-
268
-
269
-
270
-
271
-
272
-
273
-
274
-
275
-
276
-
277
-
278
-
279
-
280
-
281
-
282
-
283
-
284
-
285
-
286
-
287
-
288
-
289
-
290
-
291
-
292
-
293
-
294
-
295
-
296
-
297
-
298
-
299
-
300
-
301
-
302
-
303
-
304
-
305
-
306
-
307
-
308
-
309
 |
 |