HP C8416A HP Officejet V Series - (English) Setup Poster
HP C8416A - Officejet V40 Color Inkjet Manual
 |
View all HP C8416A manuals
Add to My Manuals
Save this manual to your list of manuals |
HP C8416A manual content summary:
- HP C8416A | HP Officejet V Series - (English) Setup Poster - Page 1
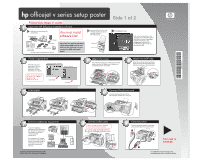
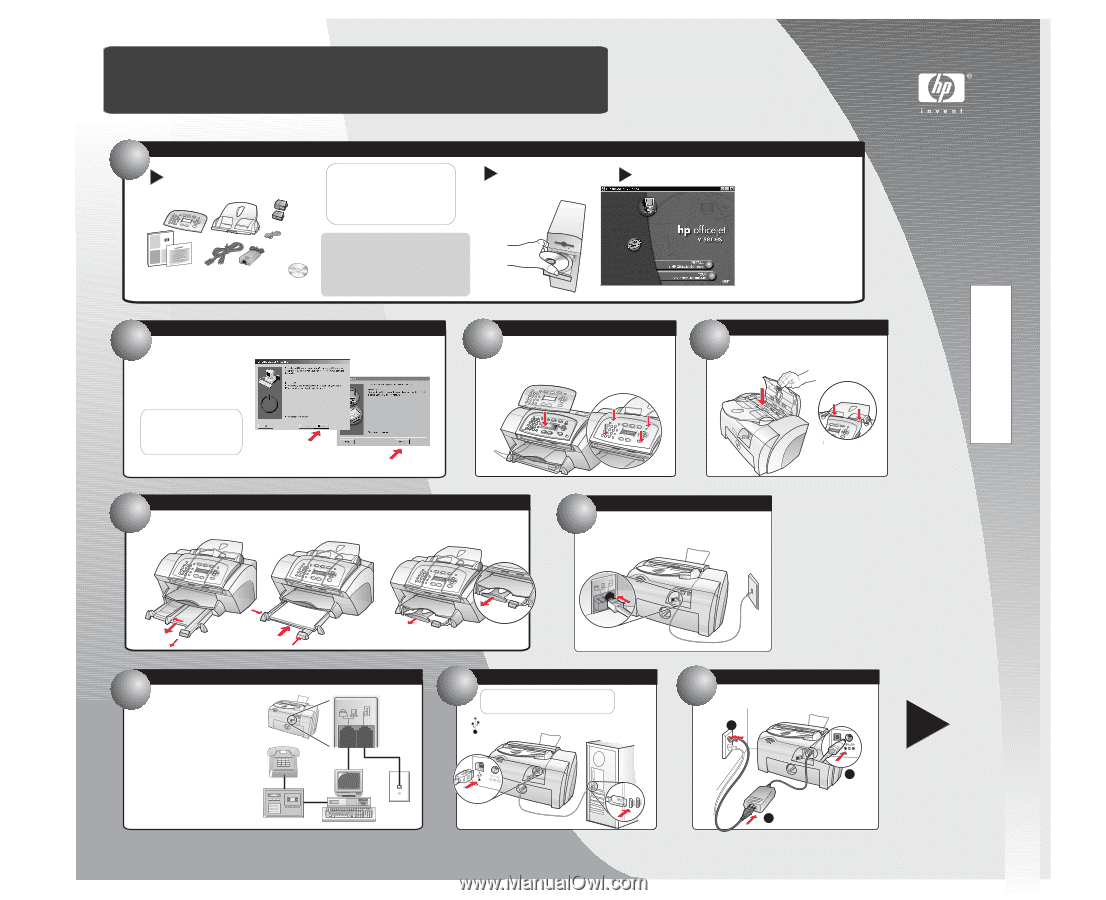
the steps in order. 1 Insert the HP OfficeJet Installation CD first a Verify that you have these key components. You must install tray front-panel cover software first! print cartridges invent phone cord CD Basic Guide power cord and warranty power adapter Remove all tape and packaging - HP C8416A | HP Officejet V Series - (English) Setup Poster - Page 2
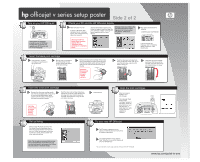
in the Basic Guide. 16 Try your new HP OfficeJet a The Electronic registration screen appears. Follow the onscreen instructions to complete registration. b The Congratulations screen appears. Click "View Tour" to see all the features of your new HP OfficeJet. You can now print, scan, copy, and fax
-
 1
1 -
 2
2
 |
 |
hp
officejet v series setup poster
.
.
.
3
If the screen to the left does not
appear, go to the Windows taskbar,
click
, and then choose
.
In the Run dialog box, type
(substitute your
CD-ROM drive letter for the “d”),
and then click
.
Start
Run
d:\setup.exe
OK
c
a
Follow the onscreen
instructions. For more
information during
installation, click the
Help button, if available.
Connect the power adapter to the power
cord, and then plug into a power outlet.
8
Click
to begin.
Install
.
b
Turn your PC on.Wait for the
Windows desktop to appear,
and then insert the
HP OfficeJet CD.
Verify that you have these key
components.
4
Turn over to
continue.
Attach the front-panel cover. Make sure the cover
is even with the unit. Make sure all buttons are
accessible and can move freely.
9
1
2
3
5
c
1
Attach the automatic document feeder
(ADF) tray. Press the front edge of the
tray down to ensure it clicks into place.
invent
Insert the HP OfficeJet Installation CD first
Attach the cover
Attach the ADF tray
Load paper
Connect USB cable
Connect power
For additional setup information and
troubleshooting, refer to the Basic Guide.
*C8413-90171*
*C8413-90171*
C8413-90171
Copyright Hewlett-Packard Company 2001.
Printed in the USA, Germany, or Singapore.
Connect the phone/fax cord to the
HP OfficeJet, and then to a wall jack.
To connect additional
equipment to the same phone
line, remove the plastic plug.
The diagram on the right
shows a possible
configuration.
If you connect a PC modem,
turn off its fax-receive feature.
See your Onscreen Guide for
information on tone versus
pulse dialing and phone
services.
Connect the phone cord
7
6
Connect additional equipment
power adapter
power cord
tray
phone cord
front-panel cover
Basic Guide
and warranty
print cartridges
CD
Make sure that you have completed
steps 1 and 2 before continuing.
Connect a high-speed USB cable from
your HP OfficeJet to a USB port on your
PC.
2
Finish copying files
When you see one of these
two screens, click
or
before
continuing to step 3.
Next
Restart
Follow the steps in order.
Remove all tape and packaging from the unit.
You must install
software first!
Side 1 of 2
Locked files found, Rebooting
Software Copied
Click Restart
Click Next
Important:You need to purchase
a high-speed USB cable to use
with your HP OfficeJet.
Do not
connect the USB cable until
step 8.