HP C8452A HP Photosmart 315 digital camera - (English) Quick Success Poster
HP C8452A - PhotoSmart 315 Digital Camera Manual
 |
View all HP C8452A manuals
Add to My Manuals
Save this manual to your list of manuals |
HP C8452A manual content summary:
- HP C8452A | HP Photosmart 315 digital camera - (English) Quick Success Poster - Page 1
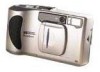
cover open to turn the camera on. camera. C8452-90101 Printed on recycled paper ©2000 Hewlett-Packard Company w w w. h p. c o m / p h o t o s m a r t Viewfinder 19-21 Image LCD on/off button Image LCD 5-way controller For HP Customer Care information, see your HP PhotoSmart 315 User’s Guide - HP C8452A | HP Photosmart 315 digital camera - (English) Quick Success Poster - Page 2
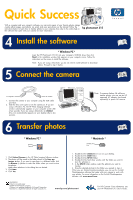
need to install software to download photos. Proceed to step 5 below. 5 Connect the camera 51 52,56 To computer To camera 1. Connect the camera to your computer using the USB cable provided. 2. Slide the lens cover open to turn the camera on. If you are using a Windows PC, the HP Photo Imaging
-
 1
1 -
 2
2
 |
 |

1±
Slide the lens cover open to turn the camera on±
2±
Look through the viewfinder and frame your
subject±
±
5-way
controller
Quick Success
1±
Use the up or down side of the 5-way controller
to select the date and time format you want to
use, then press
OK
±
2±
Use the right or left side of the 5-way controller to
select the day (date) of the month, then press the
down side of the 5-way controller to move to the
next item in the list±
3±
Select the month, year, hour, minutes, and AM or
PM in the same manner, then press
OK
±
4±
To confirm the date and time, press
OK
±
Lens cover
1±
Make sure the lens cover is closed±
2±
Insert the batteries±
1±
Slide the lens cover open to turn the
camera on±
2±
Press the down side of the 5-way
controller until the language you want
to use is highlighted on the image LCD±
3±
Press
OK
(push the center of the 5-way
controller straight in)±
Image LCD
See these pages of the User±s Guide for more information
1
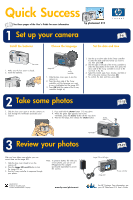
Set up your camera
For HP Customer Care information, see
your HP PhotoSmart 315 User²s Guide±
Install the batteries
Choose the language
Set the date and time
Viewfinder
1±
Slide the lens cover closed to turn the
camera off±
2±
Press the
image LCD on/off
button to turn
the image LCD on±
3±
Use the 5-way controller to sequence through
your photos±
After you have taken some photos, you can
review them on the image LCD±
C8452-90101
Printed on recycled paper
©2000 Hewlett-Packard Company
hp photosmart 315
Shutter
button
3±
Press and hold the
shutter
button 1/2 way down±
4±
When the green light appears next to the
viewfinder, press the
shutter
button all the way down±
5±
Wait for the beeps, then release the
shutter
button±
www±hp±com/photosmart
5-way controller
Image LCD on/off button
Image LCD
Note:
To preserve battery life while you
review photos, you can use an
HP-approved AC adapter
(purchased separately) to power
the camera±
Take some photos
2
Review your photos
3
19-21
11-12
3-6