HP CB015A User Manual
HP CB015A Manual
 |
View all HP CB015A manuals
Add to My Manuals
Save this manual to your list of manuals |
HP CB015A manual content summary:
- HP CB015A | User Manual - Page 1
HP Officejet Pro K8600 Printer series User Guide Podręcznik użytkownika - HP CB015A | User Manual - Page 2
HP Officejet Pro K8600 Printer series User Guide - HP CB015A | User Manual - Page 3
instructions in the documentation that comes with the HP Printer. 2. Use only a grounded electrical outlet when connecting this product to a power , see Maintain and troubleshoot. 9. There are no user-serviceable parts inside. Refer servicing to qualified service personnel. Always follow basic - HP CB015A | User Manual - Page 4
- HP CB015A | User Manual - Page 5
the device parts ...7 Front view ...7 Control panel ...8 Back view ...8 2 Install the accessories Install the duplexer ...10 3 Use the device Select print media ...11 Tips for selecting and using print media 11 Understand specifications for supported media 12 Understand supported sizes 12 - HP CB015A | User Manual - Page 6
page 47 To calibrate the linefeed 48 To clean the printheads ...49 To align the printheads ...49 To clean the printhead contacts manually 49 To replace the printheads 52 Store printing supplies ...54 Store ink cartridges ...54 Store printheads ...54 Troubleshooting tips and resources 54 2 - HP CB015A | User Manual - Page 7
control-panel lights 71 Interpreting network connector lights 76 A HP supplies and accessories Order printing supplies online 77 Accessories ...77 Supplies ...77 Ink cartridges ...77 Printheads ...78 HP media ...78 B Support and warranty Hewlett-Packard limited warranty statement 80 Obtain - HP CB015A | User Manual - Page 8
support period 84 Additional warranty options 84 HP Quick Exchange Service (Japan 85 Prepare the device for shipment 85 Remove the ink cartridges and printheads before shipment 85 Pack the device ...87 C Device specifications Physical specifications ...98 HP inkjet supplies recycling program - HP CB015A | User Manual - Page 9
services. For more information, see Toolbox (Windows). Typically installed with the device software. HP Printer Utility (Mac OS) Contains tools to configure print settings, calibrate the device, clean the printheads, print the self-test diagnostic page, order supplies online, and find support - HP CB015A | User Manual - Page 10
maintenance services to improve the print quality of your printouts. For more information, see To print the print quality diagnostic page. HP Web sites Provide the latest printer software, and product and support information. www.hp.com/support www.hp.com HP telephone support Lists information - HP CB015A | User Manual - Page 11
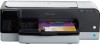
www.hp.com/accessibility. For accessibility information for the Mac OS, visit the Apple Web site at www.apple.com/accessibility. Understand the device parts • Front view • Control panel • Back view Front view 1 Control panel 2 Power button and light 3 Output tray 4 Tray 1 5 Small media length guide - HP CB015A | User Manual - Page 12
Chapter 1 (continued) 7 Ink cartridge door 8 Ink cartridges 9 Ink cartridge lights 10 Printhead lights 11 Printheads 12 Printhead latch Control panel For more information about interpreting control-panel lights, see Control-panel lights reference. 1 Out - HP CB015A | User Manual - Page 13
(continued) 3 Rear universal serial bus (USB) port 4 Rear access panel (for models with no duplexer) 5 Automatic two-sided printing accessory (duplexer) (available on some models) Understand the device parts 9 - HP CB015A | User Manual - Page 14
2 Install the accessories This section contains the following topics: • Install the duplexer Install the duplexer NOTE: This feature is available with some models of the device. For ordering information, see Accessories. You can print on both sides of a sheet of paper automatically when the optional - HP CB015A | User Manual - Page 15
Load media • Change print settings • Use the HP Solution Center (Windows) • Print with the rear manual feed slot • Print on both sides (duplexing) information, see Understand specifications for supported media. • To prevent jams, poor print quality, and other printing problems, avoid the following - HP CB015A | User Manual - Page 16
provides longer drying time and ensures that the ink dries completely before the next page is driver. You might need to reformat existing documents to print them correctly on custom-sized media. Understand specifications for supported media Use the Understand supported sizes and Understand supported - HP CB015A | User Manual - Page 17
(279 x 432 mm; 11 x 17 inches) Ofuku Hagaki (148 x 200 mm; 5.8 x 7.9 inches) Panorama (101.6 x 254 mm; 4 x 10 inches) Panorama (101.6 x 279.4 mm; 4 x 11 inches) Rear manual feed tray Automatic duplexer Select print media 13 - HP CB015A | User Manual - Page 18
x 241 mm; 4.13 x 9.5 inches) Monarch Envelope (98 x 191 mm; 3.88 x 7.5 inches) HP Greeting Card Envelope (111 x 152 mm; 4.38 x 6 inches) A2 Envelope (111 x 146 mm; inches) Borderless Hagaki* (100 x 148 mm; 3.9 x 5.8 inches) Photo media Rear manual feed tray Automatic duplexer 14 Use the device - HP CB015A | User Manual - Page 19
Custom-sized media between 76.2 to 330 mm wide and 127 to 483 mm long (3 to 13 inches wide and 5 to 19 inches long) Rear manual feed tray Automatic duplexer * The device is compatible with plain and inkjet hagaki from Japan Post only. It is not compatible with photo hagaki from - HP CB015A | User Manual - Page 20
to 36 lb bond) Transparencies Photo media Labels Up to 280 g/m2 (75 lb bond) Envelopes Cards Rear manual feed tray Paper Transparencies Photo media Labels Envelopes Cards Duplexer Paper Output-bin All supported media 75 to 90 g/m2 (20 to 24 lb bond envelope) Up to 200 g/m2 (110 lb index - HP CB015A | User Manual - Page 21
Set minimum margins The document margins must match (or exceed) these margin settings in portrait orientation. Media U.S. Letter U.S. Legal A4 U.S. Executive U.S. Statement 8.5 x 13 inch B5 A5 Cards Custom-sized media Photo media A6 Banner media Ofuku Hagaki Hagaki Card A3 A3+ B4 Super B Tabloid - HP CB015A | User Manual - Page 22
inch) inch) * To achieve this margin setting on a computer running Windows, click the Advanced tab in the print driver, and select Minimize Margins. Load media This section provides instructions for loading media into the device. To load Tray 1 (main tray) 1. Lift the output tray. 2. Insert the - HP CB015A | User Manual - Page 23
slot. For more information, see Print with the rear manual feed slot. 1. Raise the output tray and remove any media from the input tray. 2. Insert a stack of media that does not exceed the height of the paper guide, print- side down along the right side of the input tray until it stops - HP CB015A | User Manual - Page 24
, the small media guide extends until it touches the edge of the media. 6. Lower the output tray. 7. When printing, select the appropriate media type and size from the printer driver. For more information, see Understand specifications for supported media. To load the rear manual feed slot 1. If - HP CB015A | User Manual - Page 25
settings for all print jobs, make the changes in the printer driver. For more information about the features of the Windows printer driver, see the online help for the driver. For more information about printing from a specific application, see the documentation that came with the application. • To - HP CB015A | User Manual - Page 26
on media types supported by the manual feed slots, see Understand specifications for supported media. Printing from the rear manual feed slot is the software settings (Windows) 1. Open the printer driver. 2. Click the Paper/Quality tab. 3. Select the manual feed option from the Source is drop-down - HP CB015A | User Manual - Page 27
printing accessory (duplexer), or manually by turning the media over specifications. For more information, see Understand specifications for supported media. • Specify duplex options in your application or in the printer driver media and pauses while the ink dries. Once the ink dries, the media is - HP CB015A | User Manual - Page 28
Chapter 3 7. Select or clear the Flip Pages Up check box depending on which way you want the binding. See the graphics in the print driver for examples. 8. Choose a booklet layout from the Booklet Layout drop-down list, if you want. 9. Change any other settings, and then click OK. 10. Print - HP CB015A | User Manual - Page 29
media size on which you are printing the image. You can also gain access to this feature from the Printing Shortcuts tab. Open the printer driver, select the Printing Shortcuts tab, and select the printing shortcut for this print job drop-down list. • To print a borderless document (Windows) • To - HP CB015A | User Manual - Page 30
*Up to 4800 x 1200 optimized dpi for color printing and 1200 input dpi. This setting might are printing on thick or photo media, select the manual feed option. 10. Change any other print settings, to be processed. Windows: Double-click the printer icon that appears in the lower-right corner - HP CB015A | User Manual - Page 31
, see Use device management tools. NOTE: Specific procedures might include other methods. Windows • Device control panel • Embedded Web server • Printer driver • HP Web Jetadmin NOTE: For more information about the HP Web Jetadmin software, open the HP Web Jetadmin software and see its documentation - HP CB015A | User Manual - Page 32
then scroll to display the Cartridge Details button. Click the Cartridge Details button to view information about replacement ink cartridges and expirations dates. * Ink cartridge information: Open the Information and Support panel and click Supplies Status. * * The ink levels shown are an estimate - HP CB015A | User Manual - Page 33
) HP Printer Utility (Mac OS) to do the following... • Order supplies: On any tab, click the Order Supplies button, and then follow the onscreen instructions. • Support: On any tab, click the Support button, and then select a support option. Perform device maintenance tasks: Click the Services tab - HP CB015A | User Manual - Page 34
). • HP Printer Utility (Mac OS): On the Printer Settings panel Support provides a number of support services, including e-services such as HP Instant Support, myPrintMileage. For more information, see HP Instant Support and myPrintMileage. Order Supplies connects you to online ordering of supplies - HP CB015A | User Manual - Page 35
Printing Preferences, Features or Color Tabs, and then select Printer Services. Toolbox tabs The Toolbox contains the following tabs. Tabs Estimated Ink Level Information Services Contents • Ink Level Information: Shows estimated ink level for each cartridge. NOTE: The ink levels shown are an - HP CB015A | User Manual - Page 36
Utility. HP Printer Utility panels This section covers the following topics: • Information and Support panel • Printer Settings panel Information and Support panel • Supplies Status: Shows the information about currently installed printheads and ink cartridges. • Supply Info: Shows the ink cartridge - HP CB015A | User Manual - Page 37
get more information or to download the software, go to www.hp.com/go/webjetadmin. HP Instant Support HP Instant Support is a suite of Web-based troubleshooting tools. It helps you quickly identify, diagnose, and resolve printing problems. HP Instant Support provides the following information about - HP CB015A | User Manual - Page 38
is an update for the printer driver. A message appears on the HP Instant Support homepage; click the link within the message to go directly to the download section of the HP Web site. • Managing ink and media usage (myPrintMileage): Helps you manage and forecast device supplies usage. • Security and - HP CB015A | User Manual - Page 39
the self-test diagnostic page to view current device information, ink cartridge status, and printhead health status; to help troubleshoot problems; and to verify installation of optional accessories, such as the duplexer. If you need to call HP, it is often useful to print the self-test diagnostic - HP CB015A | User Manual - Page 40
. To print the self-test diagnostic page • Toolbox (Windows): Click the Services tab, and then click Print Self-Test Diagnostic Page. • HP Printer Utility (Mac OS): Click Device Information from the Information and Support panel, and then click Print Configuration Page. • Embedded Web server: Click - HP CB015A | User Manual - Page 41
supports SNMPv1 protocol on IP networks. • The Windows Internet Naming Service (WINS) server provides Internet Protocol (IP) address and name resolution services install a printer driver on Windows 2000, Windows XP, Windows Vista, or Windows Server 2003. When setting up the device, HP recommends that - HP CB015A | User Manual - Page 42
up the device, HP recommends that you menu, click Install and follow the onscreen instructions. 4. When prompted, turn on the printer driver. 2. Select the check box for specifying the driver location, and ensure that the other check boxes are clear. 3. Insert the Starter CD into the CD drive - HP CB015A | User Manual - Page 43
follow the onscreen instructions. 6. Click and then click Printers or Printers and Faxes. - Or Click Start, click Control Panel, and then double-click Printers. 2. Right-click Additional Drivers to install those drivers as a convenience to the users. You must have the Starter CD in your CD drive. - HP CB015A | User Manual - Page 44
can connect to the device in the following ways: • In the Printers folder, double-click the Add Printer icon and follow the instructions for a network installation. For more information, see To install the printer driver using Add Printer. • On the network, browse to the device and drag it to - HP CB015A | User Manual - Page 45
network, follow these instructions to install the printer driver. NOTE: If you printer driver is available. Other device software features such as Toolbox and Solution Center will not be available. To install the device drive on Windows XP 1. Connect the HP device to your network. 2. Install the HP - HP CB015A | User Manual - Page 46
Insert the Starter CD into the CD drive. Double-click the CD icon on the and follow the onscreen instructions. 4. If necessary, installed, and the driver or PPD for the sharing, see the support information on the Apple the box next to Share my printers with other computers. • Mac OS 10.4: - HP CB015A | User Manual - Page 47
to Printer, select Shared Printers, Power button to turn off the device. 3. On the Windows taskbar, click Start, select Programs or All Programs, select HP, select the device you want to uninstall, and then click Uninstall. 4. Follow the onscreen instructions drive, follow the onscreen instructions - HP CB015A | User Manual - Page 48
5. To reinstall the software, insert the device Starter CD into your computer's CD- ROM drive. 6. On the desktop, open the CD-ROM, and then double-click HP Installer. 7. Follow the onscreen instructions and also see To install the software for network or direct connection. 44 Configure and manage - HP CB015A | User Manual - Page 49
printing supplies • Troubleshooting tips and resources • Solve printing problems • Poor print quality and unexpected printouts • Solve paper-feed problems • Solve device management problems • Troubleshoot installation issues • Clear jams Supported ink cartridges The availability of ink cartridges - HP CB015A | User Manual - Page 50
from the device for long periods of time. To find out which ink cartridges work with your device, see Supplies. To replace the ink cartridges 1. Gently pull open the ink cartridge cover. 2. Remove the ink cartridge that requires replacement by grasping it between your thumb and forefinger and - HP CB015A | User Manual - Page 51
problems persist after cleaning. For more information, see To replace the printheads. CAUTION: HP Ink Supplies services to improve the print quality of your printouts. You can also view the ink level information, and the printhead health status on the page. • Control panel: Press and hold (Power - HP CB015A | User Manual - Page 52
5 • Toolbox (Windows): Click the Services tab, and then click Print PQ (print quality) diagnostic page and follow the onscreen instructions. • HP Printer Utility (Mac OS): Click Print Quality Diagnostics from the Information and Support panel. 1 Printer Information: Shows device information (such - HP CB015A | User Manual - Page 53
Run Diagnostic. • Toolbox (Windows): Click the Services tab, and then click Align Printheads and follow the onscreen instructions. • HP Printer Utility (Mac OS): Click Align from the Information and Support panel. To clean the printhead contacts manually After the printheads are installed, one or - HP CB015A | User Manual - Page 54
until the carriage moves to the left. Wait for the carriage to stop moving, and then unplug the power cord from the printer. 3. Lift the printhead latch. 4. Lift the handle of the printhead you want to replace and and lens cleaning paper. CAUTION: Do not use water. 50 Maintain and troubleshoot - HP CB015A | User Manual - Page 55
are small copper-color squares, grouped on one face of the printhead. The nozzles are on a different face of the printhead. Ink will be visible on clean, dry, soft and lint-free cloth. 9. Plug in the power cord and turn on the device. The control panel should indicate that the printhead is - HP CB015A | User Manual - Page 56
pages. If the device does not print the pages, start the alignment process manually. For more information, see To align the printheads. To replace the printheads NOTE: To find out which printheads work with your printer, see Supplies. 1. Open the cover. 2. If the carriage does not move to the left - HP CB015A | User Manual - Page 57
Do not shake printheads after the caps are removed. 7. Insert the printhead into its color-coded slot (the label on the printhead must match the label on the printhead latch). pages, start the alignment process manually. For more information, see To align the printheads. Maintain the printheads 53 - HP CB015A | User Manual - Page 58
functioning alternating current (AC) power outlet, and is turned on. For voltage requirements, see Electrical specifications. ◦ Media is loaded correctly in the tray and is not jammed in the device. ◦ Printheads and ink cartridges are properly installed in their correct color-coded slots. Press down - HP CB015A | User Manual - Page 59
error has occurred Disconnect all cables (such as power cord, network cable, and USB cable), wait about 20 seconds, and reconnect the cables. If the problem persists, visit the HP Web site (www.hp.com/support) for the latest troubleshooting information, or product fixes and updates. The device - HP CB015A | User Manual - Page 60
environment Ensure the correct device driver and printer driver port are being used. problem communicating with the device, try temporarily disabling the firewall. If the problem persists, the firewall is not the source of the communication problem inserted into its correct color-coded slot. For more - HP CB015A | User Manual - Page 61
in the device driver. For more information, see Change print settings. Blank or partial page printed Check for empty ink cartridges Check the control panel or the embedded Web server (see Embedded Web server) to see which cartridge is low or empty. The Toolbox (Windows), HP Printer Utility (Mac OS - HP CB015A | User Manual - Page 62
Check the color print settings Make sure Print in Grayscale is not selected in the printer driver. For is loaded Make sure the media width and length guides fit snugly against the edges of the stack of media printer driver match the size of media loaded in the tray. 58 Maintain and troubleshoot - HP CB015A | User Manual - Page 63
settings in the printer driver. For more solutions do not work, the problem may be caused by the inability specific help. Device prints half a page, then ejects the paper Check the ink cartridges The ink cartridges may be low on ink, and the print job was cancelled. Replace the ink cartridges - HP CB015A | User Manual - Page 64
and ink cartridges Print the print quality diagnostic page on a clean sheet of white paper. Evaluate any problem areas, supports the type of media you have loaded. For more information, see Understand specifications for supported media. • Make sure you have selected the tray in the print driver - HP CB015A | User Manual - Page 65
printer driver, select the Best print quality, and also increase the ink drying time and reduce the ink saturation using the ink volume under the advanced features (Windows) or ink features (Mac OS). However, note that decreasing ink saturation might give printouts a "washed-out" quality. • Color - HP CB015A | User Manual - Page 66
the intricate printing system and result in reduced print quality and damage to the device or printhead. HP does not guarantee or support refilled ink cartridges. For ordering information, see HP supplies and accessories. Check the media type Some media types are not suitable for use with the device - HP CB015A | User Manual - Page 67
mode in the printer driver. For more information problem is occurring A paper-feed problem is occurring Media is not supported for the printer or tray Use only media that is supported for the device and the tray being used. For more information, see Understand specifications for supported the guides - HP CB015A | User Manual - Page 68
tray is full.) • If you are using thick special media (such as brochure paper), load media so that the tray is between 1/4 and 3/4 full. If the device and reload the media properly, making sure that the paper guides are properly aligned. • Make sure the rear access panel or duplexer is troubleshoot - HP CB015A | User Manual - Page 69
• If you are using thick special media (such as brochure paper), load media so that the tray is between Use HP media for optimum performance and efficiency. • Do not load the paper when the carriage is moving. Solve device management problems This section provide solutions to common problems that - HP CB015A | User Manual - Page 70
Chapter 5 Troubleshoot installation issues If the following topics do not help, see Support and warranty for information about HP support. • Hardware installation suggestions • Software installation suggestions • Solve network problems Hardware installation suggestions Check the device • Make sure - HP CB015A | User Manual - Page 71
drive, inspect the Starter CD for damage. You can download the device driver from the HP Web site (www.hp.com/support). NOTE: After correcting any problems, run the installation program again. Solve network problems General network troubleshooting enter the IP address manually in the installation - HP CB015A | User Manual - Page 72
turn off the device before you remove any jam. • Make sure that you are printing with media that meets specifications. For more information, see Select print media. • Make sure that you are printing with media that is not with both hands and then pull it towards you. 68 Maintain and troubleshoot - HP CB015A | User Manual - Page 73
. Tips for avoiding jams • Make sure that nothing is blocking the paper path. • Do not overload the trays. For more information, see Understand specifications for supported media. • Load paper properly and when the device is not printing. For more information, see Load media. • Do not use media that - HP CB015A | User Manual - Page 74
• Always use media that conforms with specifications. For more information, see Select print media. • Make sure the output tray is not overly full. • Make sure media is aligned against the right side of a tray. • Make sure the media length and width guides are adjusted snugly against the media, but - HP CB015A | User Manual - Page 75
-panel lights indicate status and are useful for diagnosing printing problems. This section contains information about the lights, what they 4 Cancel button 5 Resume button and light 6 Power button and light 7 Ink cartridge lights 8 Printhead lights Control-panel lights reference 71 - HP CB015A | User Manual - Page 76
6 Visit the HP Web site (www.hp.com/support) for the latest troubleshooting information, or product fixes and updates. Light description/Light pattern All lights are off. Explanation and recommended action The device is off. • Connect the power cable. • Press (Power button). The Power light is - HP CB015A | User Manual - Page 77
or more of the ink cartridges have expired. CAUTION: Device services or repairs required as a result of using expired ink cartridges will not be covered under warranty. • Replace the indicated ink cartridge. • If you choose to use the expired ink cartridge, press and hold (Power button), and press - HP CB015A | User Manual - Page 78
. • If the error persists, replace the indicated ink cartridge. One or more of the ink cartridges are low on ink and must be replaced before you can continue printing. Replace the indicated ink cartridge. For ordering information, see HP supplies and accessories. 74 Control-panel lights reference - HP CB015A | User Manual - Page 79
light and one or more of the ink cartridge lights blink. The Power light is on, and one or more of the ink cartridge lights are on. The Power light is on, and the Resume and Out of paper lights blink. Explanation and recommended action One or more of the ink cartridges are faulty or need attention - HP CB015A | User Manual - Page 80
to the network. If the device is turned off, turn on the device. If the device is turned on and a network cable is connected, see Troubleshoot installation issues. 76 Control-panel lights reference - HP CB015A | User Manual - Page 81
following topics: • Ink cartridges • Printheads • HP media Ink cartridges The availability of ink cartridges varies by country/region. The ink cartridges might come in different sizes. To obtain a list of supported ink cartridges for your device, print the self-test HP supplies and accessories 77 - HP CB015A | User Manual - Page 82
, click the Estimated Ink Levels tab, scroll to display the Cartridge Details button, and then click Cartridge Details. • Mac OS: From the HP Printer Utility, click Supply Info from the Information and Support panel, and then click Retail Supplies Information. Printheads HP 88 Black and Yellow - HP CB015A | User Manual - Page 83
and warranty The information in Maintain and troubleshoot suggests solutions to common problems. If your device is not operating correctly and those suggestions did not solve your problem, try using one of the following support services to obtain assistance. This section contains the following - HP CB015A | User Manual - Page 84
Appendix B Hewlett-Packard limited warranty statement 80 Support and warranty - HP CB015A | User Manual - Page 85
number of the printer software. (To find the version number of the printer driver, open the printer settings or properties dialog box, and click the About tab.) 6. If you have a problem printing from a particular application, note the application and version number. Obtain HP telephone support 81 - HP CB015A | User Manual - Page 86
online support specialists • Software and driver updates for the HP Printer • Valuable HP Printer and troubleshooting information for common problems • Proactive device updates, support alerts, and HP newsgrams that are available when you register the HP Printer 3. Call HP support. Support options - HP CB015A | User Manual - Page 87
Obtain HP telephone support 83 - HP CB015A | User Manual - Page 88
also be available at the HP online support Web site: www.hp.com/support. Contact your HP dealer or call the support phone number for your country/region to learn more about support options. Additional warranty options Extended service plans are available for the HP Printer at additional costs. Go to - HP CB015A | User Manual - Page 89
for shipment If after contacting HP Customer Support or returning to the point of purchase, you are requested to send the device in for service, make sure you remove and keep the following items before returning your device: • The ink cartridges and printheads • The power cord, USB cable, and any - HP CB015A | User Manual - Page 90
power cord and then manually slide the print carriage to the far right side to remove the ink cartridges. 2. Gently pull open the ink cartridge cover. 3. Remove the ink cartridges with the device unless the HP customer support call agent instructs you to. 5. Close the ink cartridge door and wait a - HP CB015A | User Manual - Page 91
so they will not dry out, and put them aside. Do not send them with the device unless the HP customer support call agent instructs you to. 6. Close the cover. 7. Press the Power button to turn off the device. Pack the device Complete the following steps after you have prepared the device for - HP CB015A | User Manual - Page 92
shipping label on the outside of the box. 3. Include the following items in the box: • A complete description of symptoms for service personnel (samples of print quality problems are helpful). • A copy of the sales slip or other proof of purchase to establish the warranty coverage period. • Your - HP CB015A | User Manual - Page 93
: Adds 2.5 kg (5.6 lb) Product features and capacities Feature Connectivity Print method Ink cartridges Printheads Supply yields Device languages Font support Duty cycle Control panel language support Capacity • USB 2.0-compliant high speed • Embedded network connection Drop-on-demand thermal - HP CB015A | User Manual - Page 94
specifications printer driver for Windows Server 2003 (both 32-bit and 64-bit versions) requires a minimum of an Intel® Pentium® II or Intel Celeron® processor, 128 MB RAM, 200 MB free hard disk space. The driver is available at http://www.hp.com/support/. Minimum requirements • Windows 2000 Service - HP CB015A | User Manual - Page 95
X (v10.3.9 and higher, v10.4.6 and higher): 400 MHz Power PC G4 (v10.3.9 and higher, v10.4.6 and higher) or 1.83 GHz Intel Core Duo (v10.4.6 and higher), 256 MB memory, 500 MB free hard disk space Network protocol specifications Network operating system compatibility • Windows 2000, Windows XP (32 - HP CB015A | User Manual - Page 96
ink Color HP enhanced photo quality (up to 4800 x 1200 dpi optimized on HP Premium Plus photo papers with 1200 x 1200 input dpi) Environmental specifications of 65° C (150° F) Electrical specifications Power supply Universal power adapter (external) Power requirements Input voltage: 100 to 240 VAC - HP CB015A | User Manual - Page 97
Acoustic emission specifications (print in Draft mode, noise levels per ISO 7779) Sound pressure (bystander position) LpAd 55 (dBA) Sound power LwAd 6.7 (BA) Acoustic emission specifications (print in Draft mode, noise levels per ISO 7779) 93 - HP CB015A | User Manual - Page 98
• Notice to users in Korea • VCCI (Class B) compliance statement for users in Japan • Notice to users in Japan about the power cord • RoHS notices (China only) • LED indicator statement • Regulatory model number • Declaration of conformity • Environmental product stewardship program FCC statement - HP CB015A | User Manual - Page 99
Notice to users in Korea VCCI (Class B) compliance statement for users in Japan Notice to users in Japan about the power cord RoHS notices (China only) The device meets product requirements from regulatory agencies in your country/region. RoHS notices (China only) 95 - HP CB015A | User Manual - Page 100
assigned a Regulatory Model Number. The Regulatory Model Number for your product is SNPRC-0704. This regulatory number should not be confused with the marketing name (HP Officejet Pro K8600 Printer series) or product number (CB015A, CB016A). 96 Regulatory information - HP CB015A | User Manual - Page 101
Declaration of conformity Declaration of conformity 97 - HP CB015A | User Manual - Page 102
visit: www.hp.com/hpinfo/globalcitizenship/environment/recycle/ HP inkjet supplies recycling program HP is committed to protecting the environment. The HP Inkjet Supplies Recycling Program is available in many countries/regions, and lets you recycle used print cartridges and ink cartridges free of - HP CB015A | User Manual - Page 103
Disposal of waste equipment by users in private households in the European Union Environmental product stewardship program 99 - HP CB015A | User Manual - Page 104
without compromising product performance. It has been designed to reduce total energy consumption both during operation and when the device is not active. Specific information on power consumption may be found in the printed documentation that came with the device. 100 Regulatory information - HP CB015A | User Manual - Page 105
26 capacity trays 16 cards guidelines 12 sizes supported 14 tray supporting 16 cartridges. See ink cartridges clean printheads 49 colors bleeding 62 faded or dull 61 print black and white, troubleshoot 62 specifications 92 troubleshoot 63 wrong 62 connectors, locating 8 control panel illustration - HP CB015A | User Manual - Page 106
-feed problems, troubleshoot 63 part numbers, supplies and accessories 77 PCL 3 support 89 phone customer support 81 phone support 82 phone support period period for support 82 photo media guidelines 12 sizes supported 14 photos borderless printing 25 ports, specifications 89 power specifications 92 - HP CB015A | User Manual - Page 107
, 47 supported 89 troubleshoot 56 warranty 80 privacy, HP Instant Support 34 processor specifications 90 Q quality, troubleshoot diagnostic page 47 print 59 R readme 5 rear access panel clear jams 68 illustration 8 rear tray capacity 16 media types and weights supported 16 recycle ink cartridges 98 - HP CB015A | User Manual - Page 108
port, locating 7, 8 setup Mac OS 41 setup Windows 38 specifications 89 V voltage specifications 92 W warranty 80, 84 Web sites accessibilty information 7 Apple 42 customer support 81 environmental programs 98 HP Web Jetadmin 33 order supplies and accessories 77 supply yield data sheet 89 104 - HP CB015A | User Manual - Page 109
- HP CB015A | User Manual - Page 110
© 2007 Hewlett-Packard Development Company, L.P. www.hp.com/support Podręcznik użytkownika
-
 1
1 -
 2
2 -
 3
3 -
 4
4 -
 5
5 -
 6
6 -
 7
7 -
8
-
9
-
10
-
11
-
12
-
13
-
14
-
15
-
16
-
17
-
18
-
19
-
20
-
21
-
22
-
23
-
24
-
25
-
26
-
27
-
28
-
29
-
30
-
31
-
32
-
33
-
34
-
35
-
36
-
37
-
38
-
39
-
40
-
41
-
42
-
43
-
44
-
45
-
46
-
47
-
48
-
49
-
50
-
51
-
52
-
53
-
54
-
55
-
56
-
57
-
58
-
59
-
60
-
61
-
62
-
63
-
64
-
65
-
66
-
67
-
68
-
69
-
70
-
71
-
72
-
73
-
74
-
75
-
76
-
77
-
78
-
79
-
80
-
81
-
82
-
83
-
84
-
85
-
86
-
87
-
88
-
89
-
90
-
91
-
92
-
93
-
94
-
95
-
96
-
97
-
98
-
99
-
100
-
101
-
102
-
103
-
104
-
105
-
106
-
107
-
108
-
109
-
110
 |
 |

HP Officejet Pro K8600 Printer series
User Guide