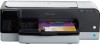
HP CB015A User Manual - Page 58
Store printing supplies, Store ink cartridges, Store printheads, Troubleshooting tips and resources
 |
View all HP CB015A manuals
Add to My Manuals
Save this manual to your list of manuals |
Page 58 highlights
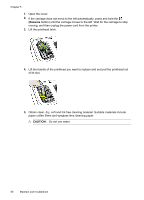
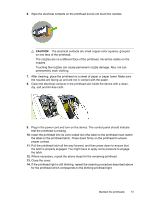
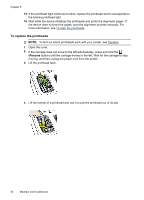
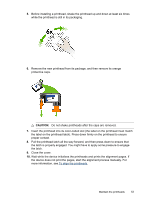
Chapter 5 Store printing supplies This section covers the following topics: • Store ink cartridges • Store printheads Store ink cartridges Ink cartridges can be left in the device for extended periods of time. If you remove the ink cartridges, place them in an airtight container, such as a resealable plastic bag. Store printheads Printheads can be left in the device for extended periods of time. If you remove the printheads, place them in an airtight container, such as a resealable plastic bag. Troubleshooting tips and resources Use the following tips and resources to resolve printing problems. • For a paper jam, see Clear jams. • For paper-feed problems, such as the paper skew and paper pick, see Solve paper-feed problems. • Verify that: ◦ Power light is on and not blinking. When the device is turned on for the first time, it takes approximately 10 minutes to initialize it after the printheads are installed. ◦ The device is in the ready state. If lights are on or blinking, see Control-panel lights reference. ◦ No error messages appear on the computer screen. ◦ Power cord and other cables are working, and are firmly connected to the device. Make sure the device is connected firmly to a functioning alternating current (AC) power outlet, and is turned on. For voltage requirements, see Electrical specifications. ◦ Media is loaded correctly in the tray and is not jammed in the device. ◦ Printheads and ink cartridges are properly installed in their correct color-coded slots. Press down firmly on each one to ensure proper contact. Ensure you have removed the orange protective caps from each printhead. ◦ Printhead latch and all covers are closed. ◦ The rear access panel or optional duplexer is locked into place. ◦ All packing tapes and materials are removed. ◦ The device can print a self-test diagnostic page. For more information, see Understand the self-test diagnostic page. ◦ The device is set as the current or default printer. For Windows, set it as the default in the Printers folder. For the Mac OS, set it as the default in the Printer Setup Utility. See your computer's documentation for more information. 54 Maintain and troubleshoot
-
 1
1 -
2
-
3
-
4
-
5
-
6
-
7
-
8
-
9
-
10
-
11
-
12
-
13
-
14
-
15
-
16
-
17
-
18
-
19
-
20
-
21
-
22
-
23
-
24
-
25
-
26
-
27
-
28
-
29
-
30
-
31
-
32
-
33
-
34
-
35
-
36
-
37
-
38
-
39
-
40
-
41
-
42
-
43
-
44
-
45
-
46
-
47
-
48
-
49
-
50
-
51
-
52
-
 53
53 -
 54
54 -
 55
55 -
 56
56 -
 57
57 -
 58
58 -
 59
59 -
 60
60 -
 61
61 -
 62
62 -
 63
63 -
64
-
65
-
66
-
67
-
68
-
69
-
70
-
71
-
72
-
73
-
74
-
75
-
76
-
77
-
78
-
79
-
80
-
81
-
82
-
83
-
84
-
85
-
86
-
87
-
88
-
89
-
90
-
91
-
92
-
93
-
94
-
95
-
96
-
97
-
98
-
99
-
100
-
101
-
102
-
103
-
104
-
105
-
106
-
107
-
108
-
109
-
110
 |
 |
